
Noise reduction can be an important part of a photographer’s workflow. In this guide, I’m going to compare some of the most popular noise reduction software applications on the market, to give you an idea of which might be best for you.
Specifically, I’ll be comparing Topaz Photo 4 against On1 NoNoise AI 2024, DxO PureRAW 5, and Adobe Lightroom Classic 14.4.
As a professional photographer who also teaches photography online, I’m always striving to get the best out of my images. Whilst it’s nice to get everything right in camera, that isn’t always possible, and noise is often an unavoidable side effect of photography.
I’ve spent a lot of time editing photos and trying out a range of noise reduction tools, which I use in my photography workflow on a regular basis.
My degree in computer science means I actually enjoy testing software, and I always relish the opportunity to combine two of my pleasures (computers and photography) in a review like this.
I’m going to cover a few things in this post. Naturally I’ll be comparing the features and actual noise reduction performance of the software which I’ll do using my own images.
I’ll also compare how each tool fits into your photography workflow, look at how easy they are to use, and look at how quickly they process images. I’ll also look at any extra features that the software might have.
As well as the performance and features comparison, I’m also going to go through what you should be thinking about when choosing a noise reduction application.
First though, let’s take a look at what noise and noise reduction is in photography, and why you might want to invest in a noise reduction tool like those I’m reviewing today.
Table of Contents:
What is “Noise” in Photography?
Noise appears as random color or brightness variations across an image, which can give it a grainy or splotched appearance on close inspection.
There are two types of noise in digital photography, color noise and luminance noise. The former appears as colored speckles and the latter appears as a grainy effect. You can see both types of noise in the below image.
Both types of noise appear in some form in all digital images, however there are a number of factors which can cause increased noise.
The first of these is the ISO setting of your camera. As a general rule and all else being equal, the higher the ISO, the noisier the image will be.
This is because the ISO setting works a bit like the gain on an amplifier. As you increase the gain on an amplifier, the sound gets louder, but any errors or unwanted sounds also get amplified.
As you increase the ISO on a camera sensor, the chance of random errors being recorded also increases. Images shot in lower light tend to be noisier due to the high ISOs used in these scenes.
The size of the sensor and the physical size of the pixels recording the light on the sensor also contribute to image noise. Smaller sensors with higher megapixel counts tend to create noisier images. Larger sensors with smaller megapixel counts tend to create less noisy images.
Whilst noise is normally undesirable in photography, there may be times where a photographer doesn’t mind noise in a photo or even wants it. For example, if trying to achieve a certain effect for a vintage or grungy style of photo, noise might be of value.
However, noise is generally something most photographers want to avoid. When it can’t be avoided in camera by using low ISOs, then you will want to use noise reduction software to remove it from your processed image files.
What is Noise Reduction in Photography?
Noise reduction is basically the removal of digital noise which can appear in an image.
Because noise is random, it normally appears all across an image in an arbitrary manner. This makes removing noise a bit of a challenge, as the noise reduction tool needs to be able to correctly identify which pixels are unwanted noise, and which are actually part of the image. The unwanted noise pixels should be replaced with pixels that seamlessly blend into the existing image.
Too much noise reduction can result in lost image detail, giving an image a soft, almost plastic look. Too little noise reduction means your images can look like a grainy speckled mess.
Good noise reduction should result in a clean noise-free image that looks natural.
Do You Need Noise Reduction?
Whilst noise reduction is important to ensure your images look their best, running dedicated noise reduction software is not necessary for every photographer. It depends a lot on what you will be using your photos for.
This is because when you resize an image to a smaller size, it becomes a lot harder to see the noise. If you primarily share your images on the web and on social media sites where they are normally viewed at a fraction of their original size, then the benefits of dedicated noise reduction tools will be far less obvious. Your photo editing software’s built-in noise reduction will generally do a good enough job.
However, if you plan to enlarge your images, print them out, or are regularly tightly cropping your images (such as with wildlife photography), then noise reduction can become very useful.
What to Look for in Noise Reduction Software
Before evaluating each piece of noise reduction software and comparing them, I want to go through the various features that noise reduction software offers so you know what to consider when comparing the available options.
Noise Reduction Performance
Of course, the first thing to look for in noise reduction software is how well it actually performs. I’ll be testing each piece of noise reduction software on my images and sharing my thoughts in this post to give you some pointers. However, I strongly urge you to do some testing of your own with your own image files from your own camera.
This is because every camera and lens combination will output slightly different results, and you will definitely want to test how your setup works with your noise reduction software. The software also performs differently depending on your hardware setup, so it’s important to check that for your computer system as well.
Finally, what counts as “good” noise reduction is quite subjective, like many things in photography. What looks great to me might look too soft or artificial to you, and vice versa. Testing the software against your images and adjusting the settings to see what results look like on your images is the only way to truly be sure. You can download trial versions of each version of the software, and many of them also come with a money back guarantee.
Here are links to each noise reduction application on test so you can download them and test them out yourself.
Note that Lightroom is not a dedicated noise reduction tool. I’m using it in this post primarily as a comparison as it’s the photo editing application of choice for many photographers and it has built-in noise reduction tools.
RAW / JPG Support
You would normally look to reduce the noise in your images as early in your photo editing workflow as possible. Assuming you are shooting in RAW, this means that the noise reduction tool you are using will need to support the RAW format that your camera produces.
Every camera manufacturer has their own RAW file format, and these can differ between camera models from the same manufacturer. For example, Canon have CR2 and CR3 files, Nikon have NEF files and Sony has ARW files.
Any photo editing application, including noise reduction software, needs to be able to read the RAW file in order to make any changes to it. So, when you are evaluating noise reduction software, you will want to check that it supports your camera model.
If it doesn’t, there is the option to convert the RAW file into a more universal RAW format like Adobe’s DNG format. Alternatively, you can use an edited format like TIFF, and apply noise reduction a little later on in your editing workflow. More on when to apply noise reduction in another part of this guide.
Note that noise reduction tools can also sometimes work with photos not shot in RAW, such as JPG files from smartphones. The results are likely to be less impressive as these files will already have been processed, and some form of noise reduction will likely already have been applied.
However, as many folks do have images in compressed formats, if this is important to you then make sure you choose a program which also supports editing JPG files as well as RAW files.
Price
Whilst the noise reduction performance of the software is obviously important, price is also going to be a consideration when it comes to choose the right software for you.
Noise reduction software is available at a range of prices, starting from around $70 USD up to around $200.
Buying a piece of software that focuses on one function might seem like an extravagance, or you might feel it’s an essential purchase. When comparing prices, definitely compare the performance of the product as well as additional features to see if it’s the right option for you.
In some cases, the noise reduction software might also be sold as part of a more full-featured photo editing application which is available for a little bit more. This will normally have a full range of photo editing tools, as well as the noise reduction capabilities of the standalone software.
For example, On1 sells their NoNoise AI tool as a standalone product, but it’s also part of the On1 PhotoRAW product. This latter is one of our favourite Lightroom alternatives for photo editing and photo management, and it’s only around $30 more for the full suite.
Instead of spending $69 for a product that does one thing, you could spend $99 on a product which does many things including noise reduction. If you are already in the market for a photo editor, this can be an excellent option.
GPU / AI Acceleration
Noise reduction, as I’ve already alluded to, is a complicated process. The noise reduction tool needs to correctly identify the two types of noise (color noise and luminance noise), and then remove them from the image.
However, obviously it can’t just delete the pixels – they need to be replaced with something else. A digital image isn’t made up of layers, so where you delete a pixel there isn’t anything behind it.
Most noise reduction software works by analyzing the area around noisy pixels and using that analysis to decide what to replace the noisy pixels with.
This analysis is key to getting good results and is why some noise reduction software can result in a plastic and overly smoothed look. If you are working with details of skin or feathers, it’s vital that the replaced noise pixels fit the existing texture, so the result looks natural.
This pixel level image analysis takes a huge amount of processing power, and the higher your camera’s megapixel count, the longer it will take as the tool has to analyze more pixels.
To improve the speed at which they work, many noise reduction tools leverage the power of a specialized bit of hardware inside your computer.
There are two main types of hardware that can be used to improve the speed at which a noise reduction tool works, a GPU or an AI processor.
GPU Accelerated Noise Reduction
The most common hardware for noise reduction tools to utilize is a Graphics Processing Unit, or GPU. These are also commonly called graphics cards.
Graphics cards are a specially designed piece of hardware inside a computer which are commonly used for graphically intensive workloads such as computer games. However, they can also be utilized for other specific tasks, such as image manipulation.
Whilst a computer’s central processing unit, or CPU, can also handle these tasks, their general-purpose nature means they aren’t usually as fast at it as a dedicated graphics processor. A high-end graphics card will often be orders of magnitude faster at these specific tasks than a fast CPU.
AI Accelerated Noise Reduction
More recent developments (2023 onwards) have seen dedicated AI processing chips added to computers. These are generally found as part of more recent processors from Intel and AMD.
These chips are designed to accelerate AI tasks, and as you will have noticed, most noise reduction software includes the word “AI” in the title.
So it stands to reason that a computer with a dedicated AI processor would be able to handle these tasks faster.
Performance Improvement with AI / GPU Processing in Noise Reduction
In my testing with both a GPU and an AMD AI enabled CPU, the performance improvement with either AI or GPU acceleration is significant compared to just using a CPU. Performance gains are anywhere from four to fourteen times quicker!
That makes a big difference, as you are talking about image processing taking 7 – 10 seconds rather than a minute (or longer!). If you are processing a lot of files, this makes a huge difference to your workflow.
However, the noise reduction software does need to be specially coded in order to support offloading tasks to the AI processor or GPU instead of the CPU.
If you have an AI processor or graphics card in your desktop or laptop computer that you want to utilize for noise reduction tasks, you’ll want to be sure to purchase noise reduction software which supports this type of acceleration.
This is normally made clear in the promotional material, and there will also usually be options within the software to enable or disable the feature.
AI processors are very new and as of the time of writing only Topaz Photo appears to support AI processing, which it appears to use for the analysis phase of the noise reduction process.
GPU processors are a much more established technology and the majority of noise reduction tools on the market support these processors. In my testing, a recent GPU performs much better for the actual image processing than either a CPU with an AI processor or a regular CPU.
With this in mind, I’d normally advise buying noise reduction software which does include GPU acceleration, even if you don’t have a graphics card currently, as it future proofs you should you upgrade to a GPU at a later date.
If you have an existing graphics card, do compare performance between using the GPU and just using the CPU. In some cases, especially if you have a newer CPU and an older GPU, the CPU might actually be faster.
If you are in the market for a new computer, check out my guide to the best laptops for photo editing. Many of these have built-in GPUs to help you get the most out of your photo editing applications.
Batch Editing
If you often work with a large number of similar images, then you will want to think about the batch editing options that the noise reduction software offers.
For example, you might be a wedding photographer who has taken lots of shots of an event or a wildlife photographer with multiple shots of animals.
Whilst you might be happy to sit down and tweak the noise in every image individually, the chances are that many of your images will be similar enough that you’ll be applying similar settings to all of them. Tools like Lightroom allow you to apply the same edits to multiple images at once, so this sort of feature is handy to look for in noise reduction software too.
Noise reduction software can also take time to run, so the option to load up multiple images as a batch and have them process whilst you do something else can also be a real benefit.
Automation and Control
Another feature to look at is what level of automation the tool offers. This will vary depending on the software. It might be a one-click solution, where you simply load the image and noise reduction is applied entirely automatically with minimal user input. Alternatively, it might require fully manual editing of various sliders.
Ideally, the software will come with a best of both worlds approach. There should be a fully automatic mode, where the software performs an analysis of the image and suggests the correct settings. Then you should have the option to adjust and tweak to suit your needs.
Of course, you might prefer a more manual or more automated approach. It’s up to you. The main thing is to pick the software that fits into your workflow.
AI Features
You will have noticed that the word “AI” is tacked on to the end of some of the products in our round-up today. This stands for “Artificial Intelligence”, and suggests that these specific tools are capable of something a bit special.
Let me explain what’s actually happening. When these manufacturers refer to AI, what they mean is that their software has been trained using something called machine deep learning. Basically, the software has been presented with millions of images, to get an idea of what a good noise-free image looks like and what a bad noisy image looks like.
When you load up your noisy image, this machine learning helps the tool figure out, based on its extensive training on the millions of images in its dataset, which areas of your image are noisy and what to replace them with.
This can result in far more natural and impressive results than the more traditional pixel level analysis, where nearby pixels are used to blend in to existing pixels. However, it can also sometimes get it wrong, leading to less than impressive results.
Overall, my testing leads me to recommend a noise reduction tool with AI capabilities, as the results on the whole tend to be more impressive. However, I do recommend you test any tool out before making a final decision.
Masking
In photography, masking essentially refers to an area of the photo that you have selected in an editing application. Once you have selected, or “masked” an area, you can choose to only apply edits to that area. You can also invert the mask, and apply edits everywhere else.
Most photo editing tools come with range of masking options, and it’s something I cover in detail in the editing section of my online photography course.
Some noise reduction software also offers masking controls. These allow you to more carefully define which areas of the image you want to apply noise reduction to. This is helpful especially with some of the AI powered tools which don’t always get it perfect, meaning you can tweak the results.
Plugins for other Photo Apps
Many photographers looking for noise reduction software already have an existing photography workflow in place. That means you probably already use a photo editing application like Adobe Lightroom to edit and manage your photos.
If so, finding a noise reduction tool that seamlessly integrates into your existing setup will make your photo editing workflow a little bit easier. Many noise reduction tools ship with plugins for Adobe Lightroom and Photoshop, which is arguably the most common photo management and editing product on the market.
A plugin makes it easier to send an image from Lightroom to the noise reduction tool, apply the noise reduction, and then have the adjusted image come back to Lightroom where you can continue to work on it.
Some software also ships with plugins for other software, like Capture One or On1 Photo RAW, but as these are less commonly used, this isn’t as standard.
Of course, a plugin isn’t totally necessary, and you can still use noise reduction tools entirely standalone without a plugin. But it is a nice to have feature.
Additional Features
When evaluating noise reduction tools and their price, it’s good to compare any additional features they might offer on top of noise reduction.
For example, some tools include built-in lens profile correction and image sharpening tools. As these are common tasks to perform on most images, having these built-in to the noise reduction tool can further enhance your workflow.
These aren’t generally deal breakers, but if you are struggling to decide between two similar products, features like this might be where your decision is made.
Where in Your Workflow to Use Noise Reduction Software
You might be wondering which point in your photography workflow is best to apply noise reduction.
In my opinion, you want to apply noise reduction as early as possible.
This is because as you start to edit the photo, you apply changes to the image which are also applied to the noise. For the noise reduction software to be most effective, running it on an unedited RAW photo means it can get to work on the unadulterated version of the image.
As previously mentioned, you can also sometimes run noise reduction tools on JPG files, however this will not yield the best results compared to using them on RAW files as JPG files are already processed.
Each noise reduction tool will normally have a recommendation as to the best point in your workflow to run it for the best results. However, you might have a specific workflow that you prefer. For example, if you are planning to crop your images, you might prefer to crop first and then just apply noise reduction to the cropped area of the image.
Noise reduction can be a time intensive process, so you can save time by only reducing noise on the area of the image you intend to use. You might also prefer to make some basic tonal edits in your photo editing application before removing noise.
In my testing, there is not a huge difference between using noise reduction before doing any editing, versus applying noise reduction after doing some basic edits. However, you should be careful of any default settings applied.
For example, Lightroom applies both color noise reduction and sharpening to images automatically when you load them. In my experience, you need to turn these adjustments off before sending the image to the noise reduction tool to do its best work.
Depending on the noise reduction tool you choose, you might not have a choice, as some will only work on RAW files prior to editing them.
Noise Reduction Software
There are a number of noise reduction products on the market today. I’ve picked four of my favorites to review in this guide. In each case I’ve used the most recent available version of the software.
If these products update in any way that meaningfully changes how they perform, I’ll update this guide accordingly.
I have primarily focused on standalone noise reduction tools in this round-up, on the assumption that you already have an image editor you use. However, some of these tools are also available as part of a photo editing application, so if you are also looking for a photo editor then one of these options might make more sense.
I’d also recommend reading my guide to the best photo editing applications on the market for more suggestions. I’ve also included Lightroom as it’s a popular tool with many photographers, and it has noise reduction tools built-in.
It’s also worth noting that in some cases, you get more control over the noise reduction process with the full photo editor compared to the standalone noise reduction tool. This is because the standalone tools are designed to slot into an existing workflow and just get the job done with minimal user intervention.
However, if you prefer to have more control over your editing process from end to end, this is something to keep in mind when evaluating.
First, I’m going to go over all four options and outline their features and pros and cons. Then, I’ll look at how each software actually performs, both in terms of the images produced, and also in terms of processing speed and file size output.
Topaz Photo
Topaz Labs have been making image improvement tools for a long time. Up until 2023, these tools were separate products which fulfilled different functions, namely Topaz DeNoise AI for noise reduction, Topaz Sharpen AI for sharpening, and so on.
In 2024, these products were retired, and a single app was created, known as Topaz Photo. In 2025, this was rebranded to Topaz Photo.
This is an all-in-one product which can handle noise reduction, image sharpening, image upscaling and more.
As Topaz DeNoise is no longer available for purchase, this review will be focusing on Topaz Photo. I will primarily be focusing on the denoise feature, but when comparing this tool to other tools be aware that it also has significant other capabilities, including image upscaling, the ability to recover blurry images and more.
The tool heavily leverages machine learning to analyze and suggest improvements for your image. Topaz Labs train their AI engine using millions of images. It compares your image against this dataset in order to get the best results for your image.
In terms of where it fits in your workflow, Topaz usually recommends running Topaz Photo before you make any other changes to your image. However, they do also say that you can run Tioaz Photo wherever you want in your workflow and it should work ok.
Topaz Labs provides a plugin for Lightroom. It also offers two options for sending images from Lightroom, you can either send the unedited RAW file, or you can send the image over to Topaz for denoising at any point in your editing workflow. If you choose to do the latter, I suggest turning off the default sharpening and noise reduction in Lightroom before you send the image to Topaz Photo.
You can also load RAW or JPG files (as well as various other compressed file formats) directly into Topaz Photo if you prefer.
Topaz Photo is a very smart tool with a number of features. When you first open an image, it runs an Autopilot tool. This analyses your image and attempts to figure out exactly what improvements are required. It also analyses and detects subjects, faces and text in the image.
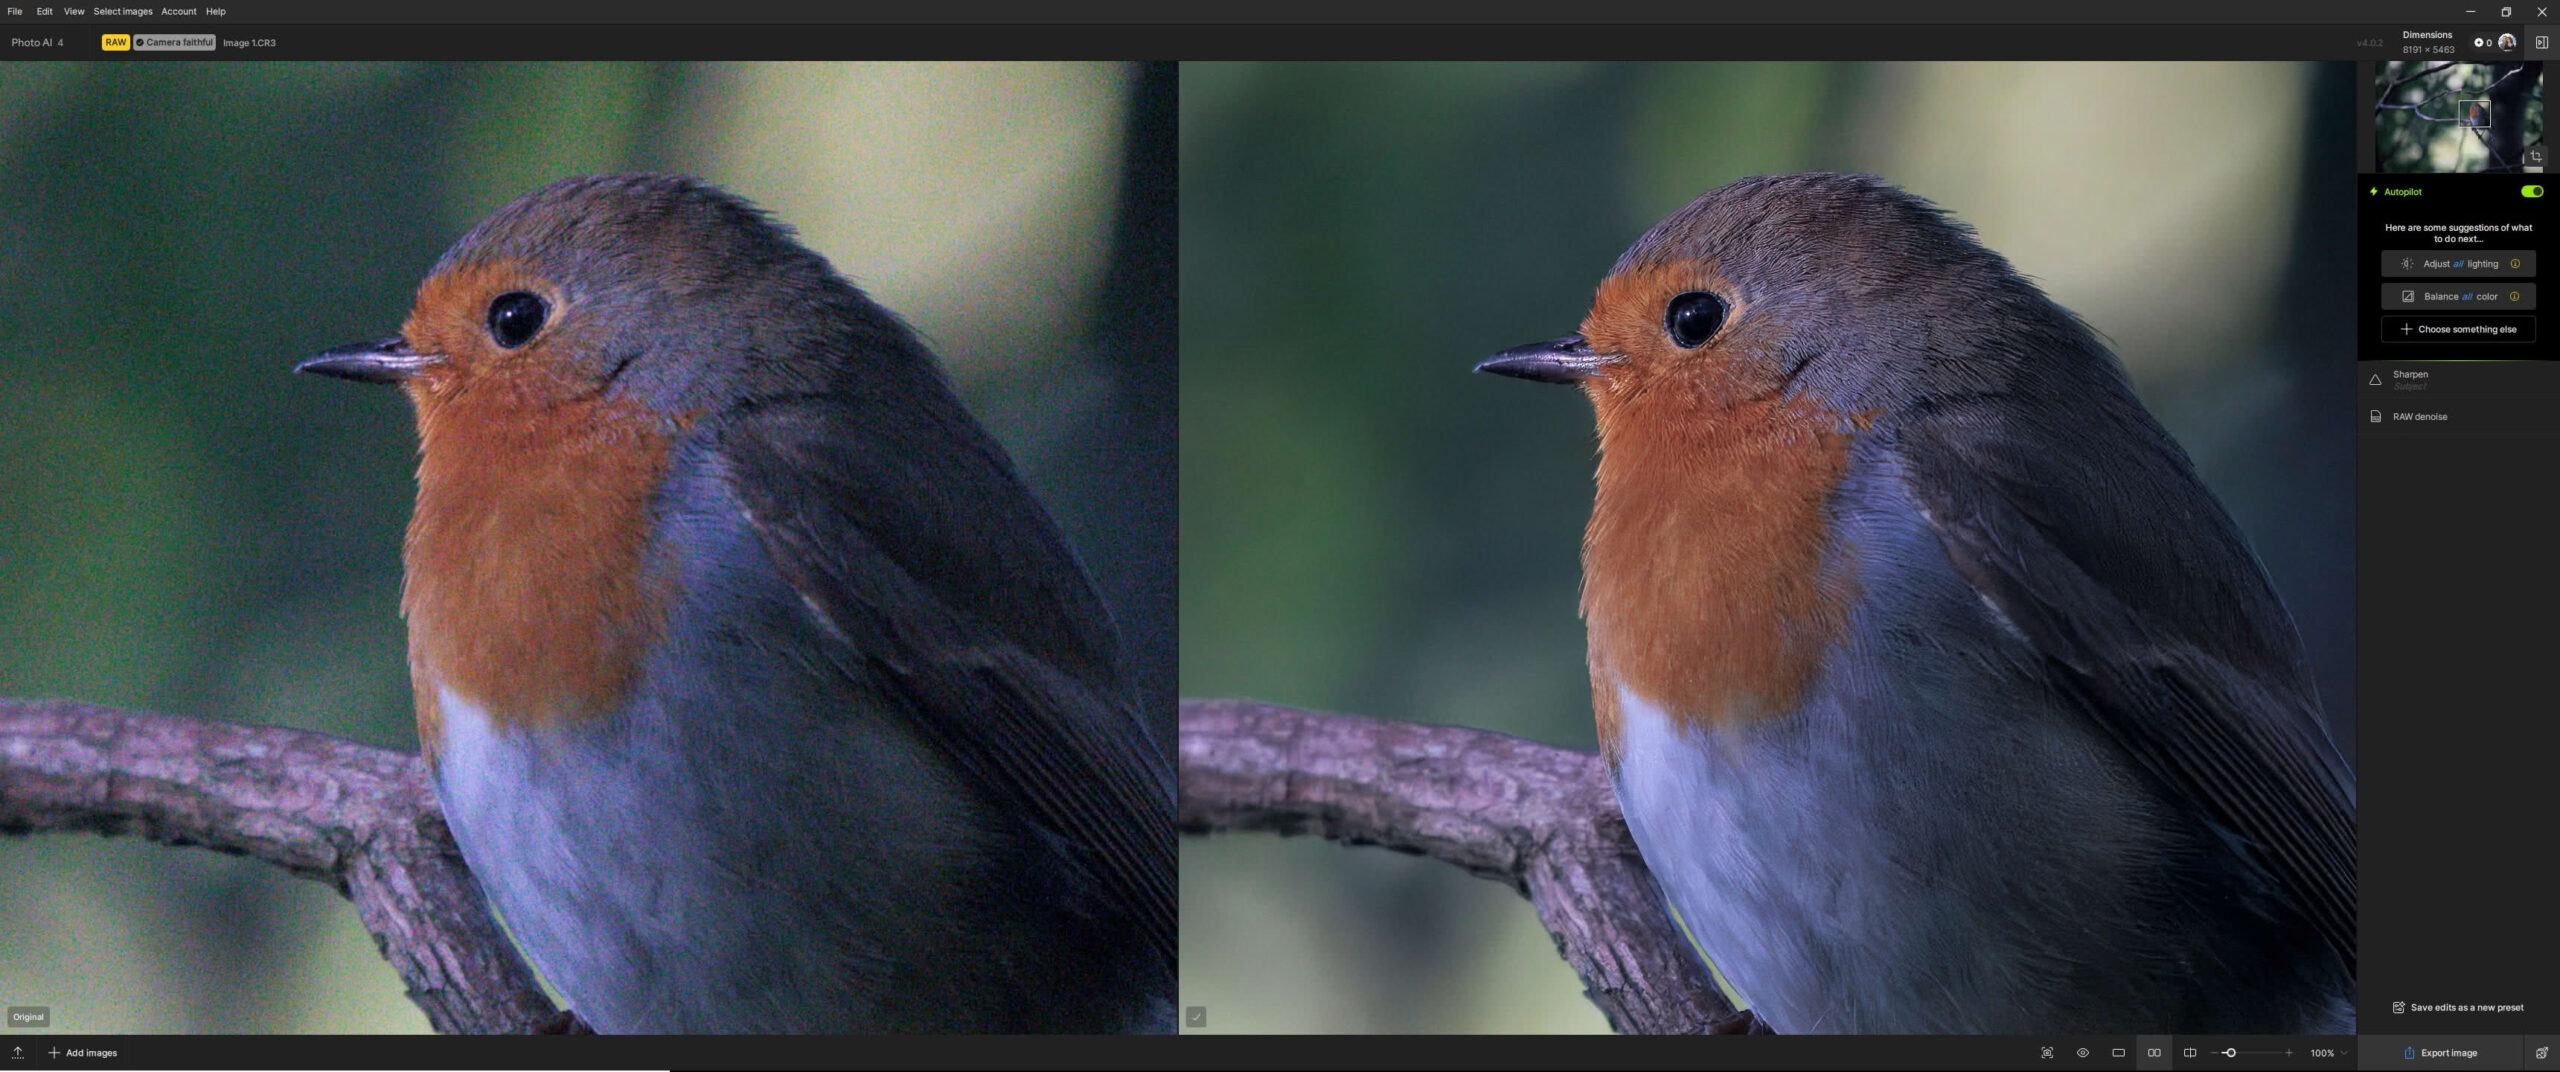
Once it has analyzed the image, it will select improvements which include upscaling, noise reduction, face recovery, and sharpening.
Note you can disable the Autopilot tool entirely and do your own edits, but in my testing it does a pretty good job so can be left on. You can also always adjust the filters it recommends.
When it comes to options, Topaz Photo has a lot of controls to offer. Of course, you can just choose to use the preselected choices for each improvement that the Autopilot tools loads. However, you can also turn each of these options on or off and adjust the strength manually. Over time, the software will keep track of the style you prefer and adjust its recommendations accordingly.
As well as the global adjustments, Topaz Photo comes with a masking tool. However, this only applies to the sharpening feature rather than the noise reduction.
This actually makes sense, as normally you want to remove noise across the whole image and then selectively sharpen the subject. By default, Topaz Photo selects the subject for you, but you can adjust this to sharpen areas of interest or the whole image.
Topaz Photo also has batch editing, so you can load a number of images into the software, adjust the settings, and then batch process them. The only downside of this is that you do need to load up and preview each image to trigger the AI analysis prior to running the noise reduction.
You can’t just load up a bunch of images and hit a button – there is still some work to be done before you can process all the images. If you want batch processing with minimal input, I’d suggest checking out DxO PureRAW.
The good news is that Topaz Photo is designed to be performant. By default, it only loads a part of the image you are working on, and it displays the noise reduction of that area rather than applying noise reduction to the whole image. It’s also GPU and AI accelerated, meaning it takes advantage of either your AI processor or your graphics card (or both) to improve performance.
The downside is that if you pan around the image or change the output settings, the image preview has to be regenerated which takes a bit of time.
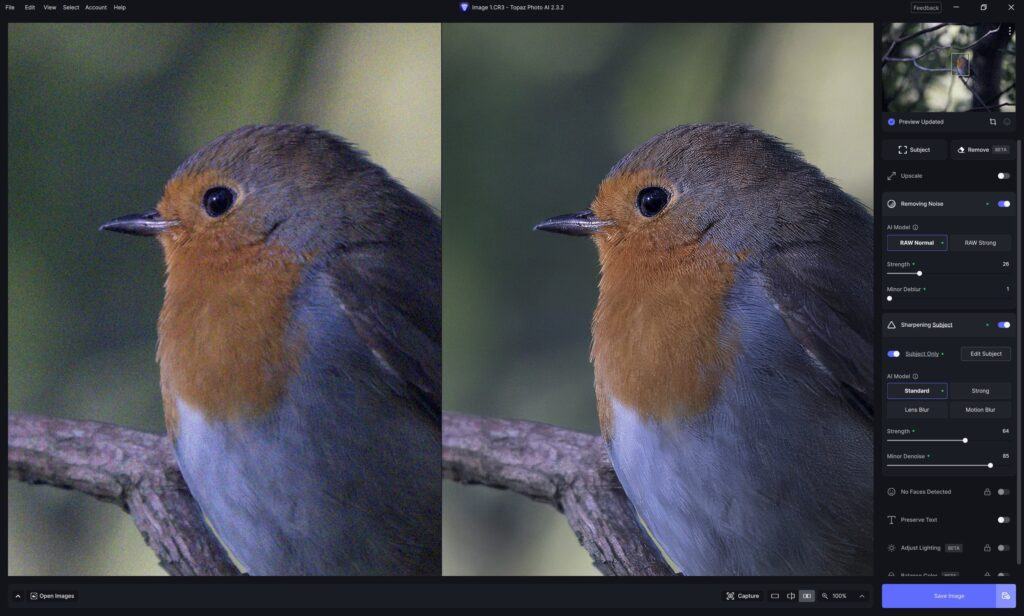
I do like the interface and the various options Topaz Photo has for displaying the preview. You can choose a split screen view, where you move a slider to quickly switch between the original and the edited version. You can also choose a side-by-side view, with the original file on one side and the edited version on the other.
Once you have your image settings dialed in, either manually or you are happy with the automatic settings chosen by the AI, you can process the image.
Time wise, this will vary depending on the size of the image and the amount of noise. The power of your computer and any GPU or AI processor you have installed will also make a massive difference.
At the time of writing in 2024, Topaz Photo is the only noise reduction tool on the market which utilizes an AI processor if available on your system.
In my testing, an AI processor definitely improves the speed of the initial load and analysis of the image. However, the noise reduction export is still significantly faster with a dedicated GPU.
You can choose which to use, and it’s definitely worth testing your own system with the different options. Generally, the Auto option (which decides for you) will give you the best results, leveraging the capabilities of your system as required.
Supporting both options is definitely a nice future proof feature, but in my testing a dedicated GPU is going to be the fastest option for noise reduction in Topaz Photo.
With a dedicated GPU, expect the actual noise reduction process to take in the region of 10- 20 seconds (time will vary depending on your exact configuration and file size). With a regular CPU, expect processing to take around a minute or more.
In terms of results, Topaz Photo was consistently near or at the top in terms of the image quality in my tests, which you can see further on in this post.
Overall, I really like Topaz Photo for noise reduction and general image improvements. The interface is very clean, it works well, and the results are great. I like that it integrates with Lightroom or can be used on its own. It also has plenty of control options, even though the automatic settings work well the majority of the time.
The Topaz team are also spending a lot of time and effort improving the software, with releases almost every week with new features and capabilities.
The downside however is that you are paying for more than just noise reduction.
In previous years, you could choose to purchase a standalone noise reduction tool from Topaz which was priced at around $79 USD. Then, Photo came out with a price of $199.
Unfortunately, as of 2025, Topaz Photo is now only available as a subscription, which makes it a bit less of an obvious recommendation as you have to keep paying if you want it to keep working.
Topaz Photo is certainly a powerful and well-rounded tool, however you have to pay significantly more for all the extra features it offers.
If you want a tool that does everything it offers and embraces the latest technologies, this is a great option.
Price: $199 / year (subscription)
Lightroom Plugin Available: Yes
GPU / AI Accelerated: Yes, both GPU and AI acceleration
Consider If: You’re looking for a powerful yet easy to use noise reduction tool that delivers great results
Don’t Consider If: You don’t need the extra features it offers or feel the price is too high
Trial Available: Yes, download here
On1 NoNoise AI 2024
On1 NoNoise AI is a standalone noise reduction tool from On1, who make a range of photo editing software including On1 Photo RAW.
On1 designed NoNoise AI from the ground up to be one of the fastest noise reduction tools on the market, a goal they appear to have achieved as you’ll see in the tests a little further on in the post.
Like Topaz Photo with Autopilot, when you first load NoNoise AI it applies the noise reduction to the whole image when you load it. As you pan around the image and adjust the sliders it updates the preview, which happens very quickly. In fact, in my testing, On1 NoNoise has one of the snappiest feeling interfaces when it comes to noise reduction.
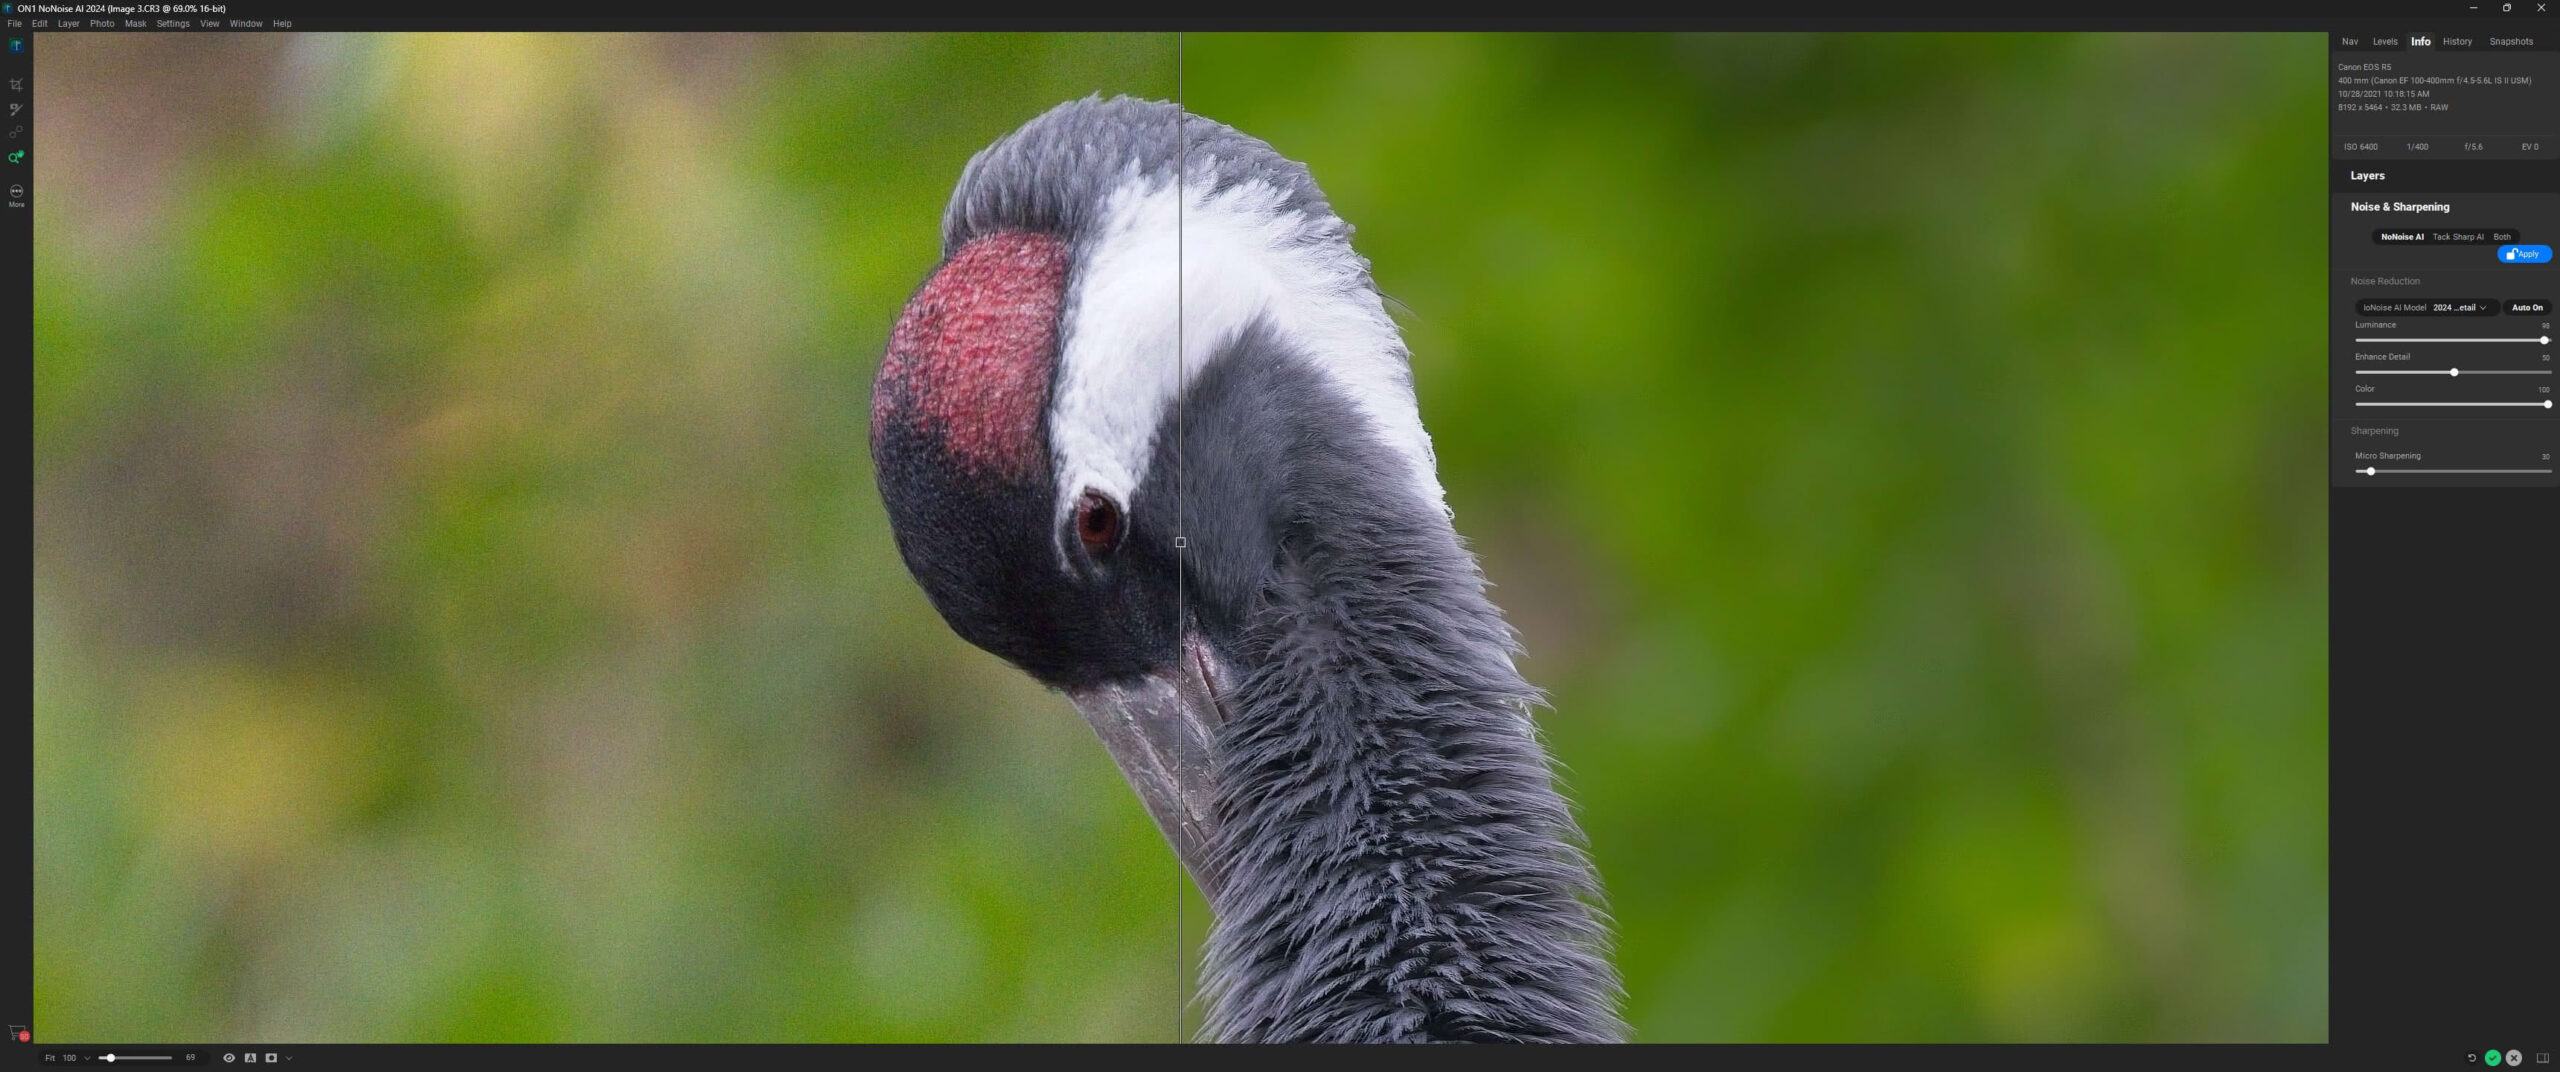
Once the image is loaded, you can adjust the noise reduction settings and sharpening or leave them on the automatically adjusted settings. You can preview your changes in real time, and use a split screen view to compare the original and your edit. Once you’ve got the noise reduction and sharpening dialled in, you then have the option to further refine the noise reduction using the masking tools, and you can also crop your image.
On1’s masking tools are by far the most powerful of all the dedicated noise reduction tools in this round up. As well as manually masking using a brush, there’s an AI powered subject selection mask, radial masks and graduated masks. There’s even luminosity masking.
That’s not all though. The tool also comes with On1’s subject removal and heal tools, so you can remove unwanted objects as well. There’s also layer support, giving you even more flexibility over your editing.
I’ll be honest, whilst these features are nice to have, most people are going to be buying this tool for noise reduction. Having extra features is nice, but most users will likely find them in their main photo editing application.
Since the noise reduction engine used by On1 NoNoise is the same as the one which is used by On1 Photo RAW, if you want those kinds of tools, you would be better off opting for the full product. It’s only a little bit more expensive, and you get all the editing controls as well as image management tools.
One thing I did notice with the DNG files output by On1 NoNoise AI is that they lost my lens and camera profile, so Lightroom couldn’t apply any auto corrections. This is slightly vexing, but hopefully something a future update will resolve.
Note that I originally tested the 2022 version of On1 NoNoise AI. Newer versions which I have since updated this post to include, offer even faster performance, being up to twice as fast on the same image files in my testing. The 2024 version significantly improved the sharpening feature, with a new dedicated tack sharp AI system which can help fix blurry photos. I’d say if you are on version 2022, then upgrading to 2024 would make sense. However the jump from 2023 to 2024 is not that great.
In my testing the actual noise reduction is fairly similar between versions, but the improved speed and additional features make it a worthwhile upgrade in my opinion. Of all the software I tested, this has the best price for all the features, but the noise reduction is not class leading.
Price: $69
Lightroom Plugin Available: Yes, also allows export of unedited DNG files as well as TIFF files
GPU Accelerated: Yes
RAW Support: Yes
Consider If: You are looking for the fastest noise reduction tool on a budget which also has some extra features and powerful masking
Don’t Consider If: You want the best-in-class noise reduction
Trial Available: Yes, download here
DxO PureRAW 5
I have used DxO software for a number of years, primarily for the PRIME noise reduction feature which has always done a great job of noise reduction especially on skin tones.
So, I am definitely interested to see how DxO PureRAW stacks up against the competition.
Like On1, DxO has two versions of its noise reduction software. It has a standalone product known as DxO PureRAW, and a full featured photo editor called DxO PhotoLab Elite.
The noise reduction system is similar, the difference is that PureRAW focuses purely on noise reduction, whilst PhotoLab is a full featured photo editor.
PureRAW is designed to fit into your workflow before you do any other editing. It takes in completely unedited RAW files and applies DxO’s noise reduction.
By default these are output as DNG files which you can then load into your normal photo management and editing app. TIFF and JPG output is also supported.
When PureRAW was first released, it was a fairly simple tool with minimal controls. You sent it an image, it denoised it. It was very much set and forget.
However, since that first version, and likely to better compete with the fine-grained controls available in other tools, each iteration of the product has provided additional controls. As of PureRAW v5, released in 2025, you can now preview the results prior to processing and apply simple masks to further tweak select areas of the image.
This marks quite a shift from the original way the program worked up to version 4, where minimal user input was available. Now you can choose between just letting the program do its thing or tweaking the output to your needs.
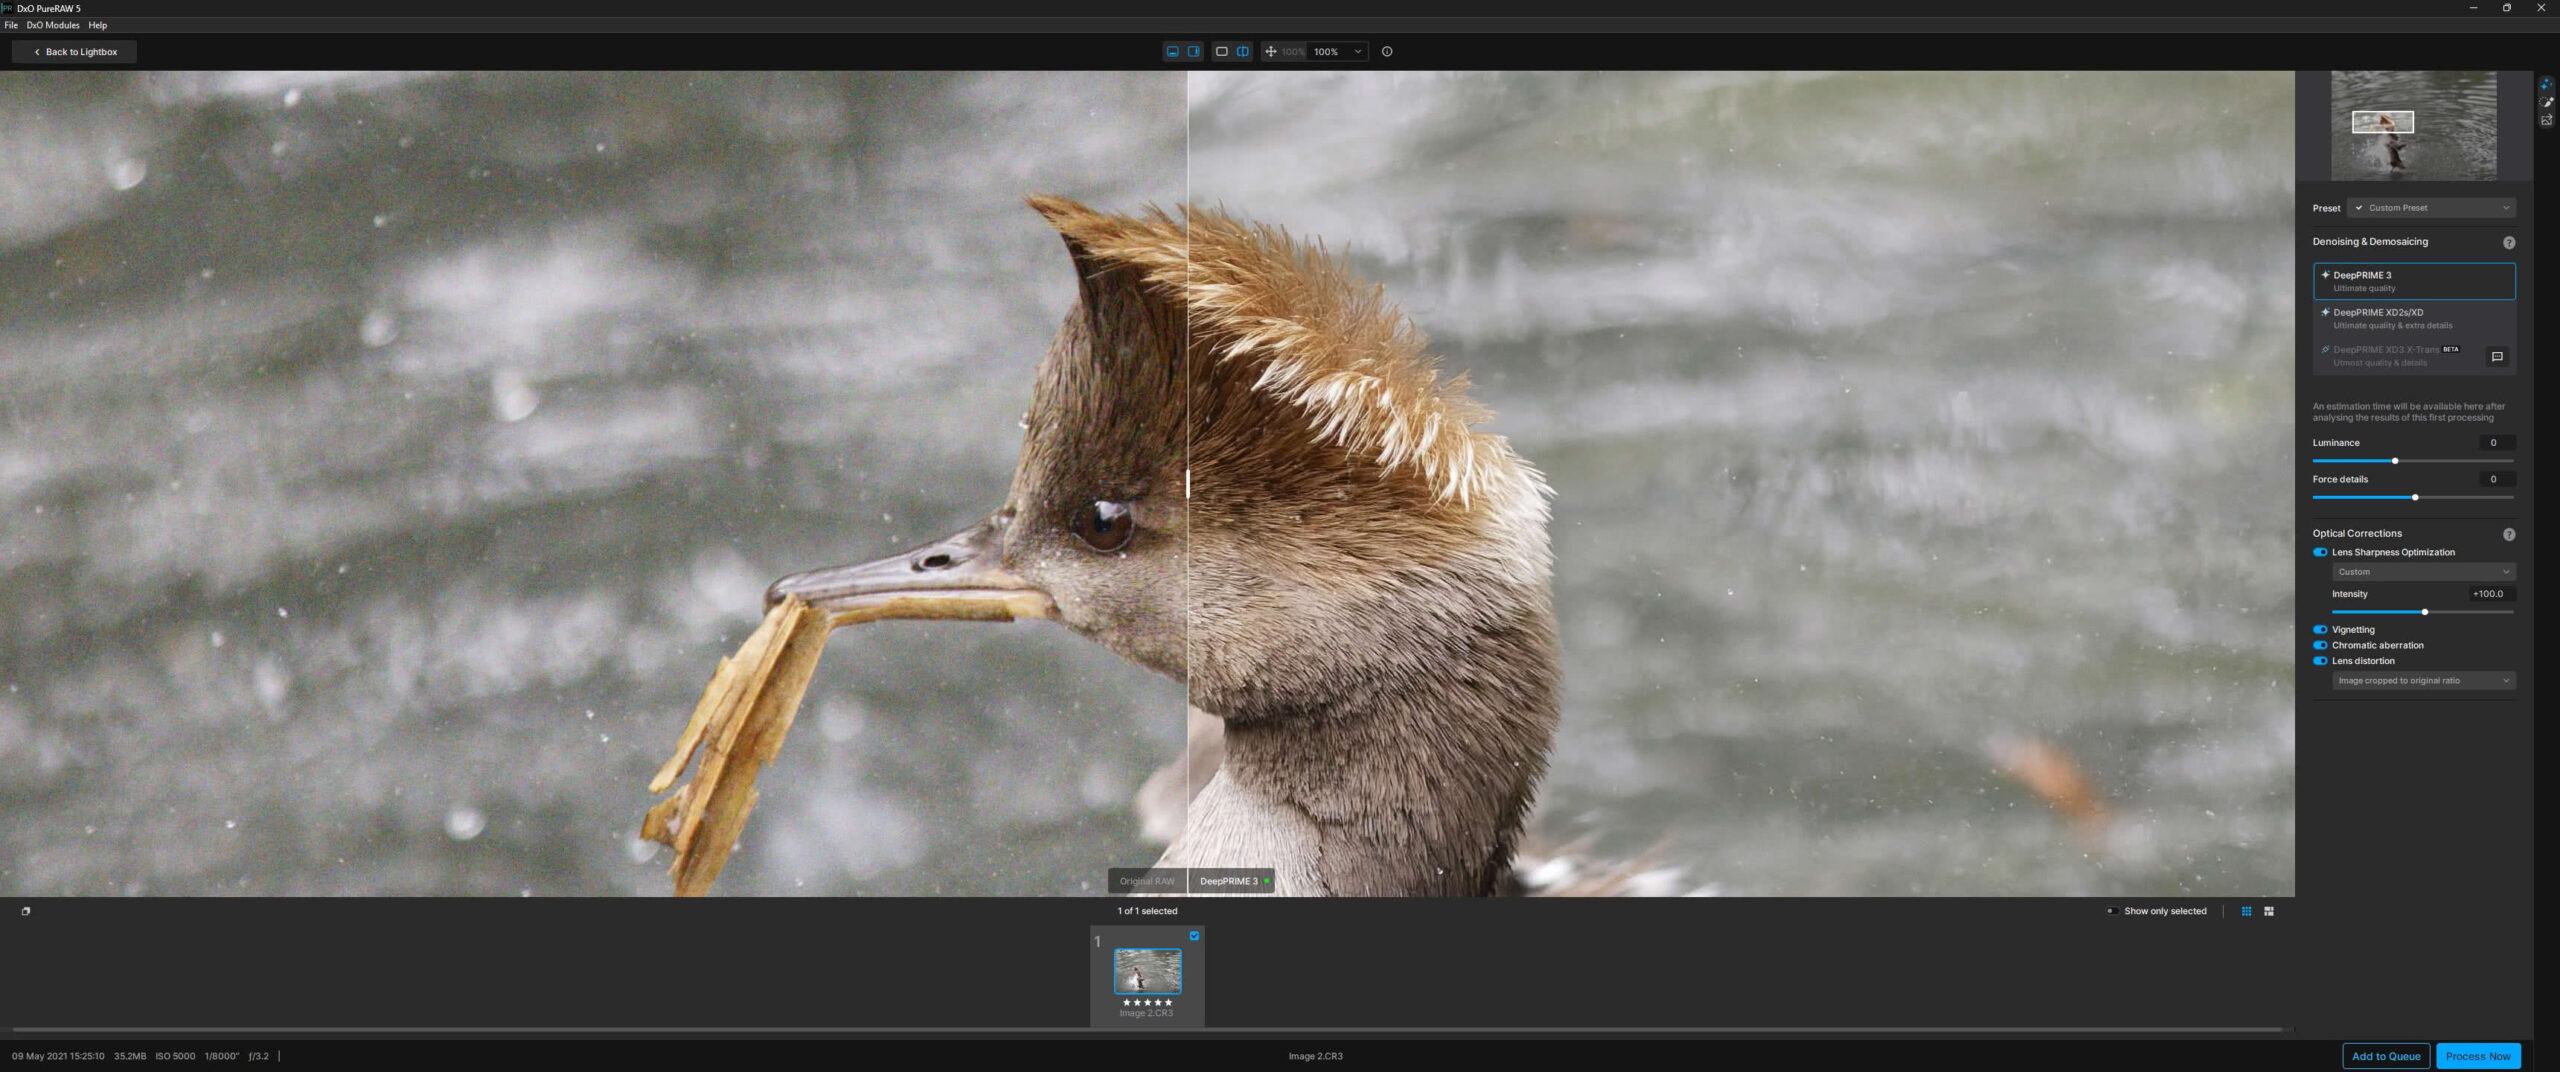
You have a number of options when it comes to RAW processing. First, you can choose between two main types of noise reduction. As of version 5 of the software, these are DeepPRIME 3 and DeepPRIME XD2S. There is also a DeepPRIME XD3 X-Trans filter for users of Fuji cameras. I don’t have a Fuji camera to test this on, but this feature is new for version 5 and good news for Fuji camera owners who are often left out of denoise products.
Previous versions of DxO PureRAW used older denoise algorithms, including DeepPRIME, HQ and PRIME. However, as of version 5 of the software these are not available. In my testing, every new iteration of the algorithm has produced better results, so it makes sense that these older tools are no longer available.
DxO describes DeepPRIME 3 and DeepPRIME XD2s / XD as follows:
DeepPRIME 3 (introduced in PureRAW 5) is the latest cutting-edge deep learning technology which eliminates noise and restores details without compromising image quality. It includes a new enhancement to the RAW conversion process, chromatic aberration correction at the pixel level.
DeepPRIME XD2 was introduced in version 4 of DxO PureRAW. It produces much better results than the original DeepPRIME algorithm, taking advantage of advanced AI and deep learning.
Both the above options require a fast GPU to get good results, otherwise your experience is going to be very slow.
For both options you can adjust the strength of the effect with the “luminance” and “force details” sliders. You can tweak these sliders and preview the results prior to processing the image.
As well as noise reduction, PureRAW also has the option to apply lens corrections and lens sharpening. These correct for common issues like chromatic aberration, lens distortions and vignetting. DxO have a huge database of lens and camera combinations, so the settings are tailored to the setup for each image.
From version 4 of the software onwards, you get some control over these adjustments. There are four options for sharpening to compensate for lens softness, from soft to hard, as well as a fifth custom option where you can adjust the sharpness manually. You can also turn it off completely, and you can also selectively enable or disable chromatic aberration, vignetting and lens distortion correction.
PureRAW is designed as a batch processor, so the idea is that you load all your images into DxO PureRAW, pick which model to apply, and then process the images. Then you load them into your photo editing application.
As of version 3, you can set up different queues for different settings, so depending on the images you are processing you can apply different noise reduction or sharpening options.
The only thing that is missing is an automated analysis of your image to provide recommended settings, like the Autopilot feature in Topaz Photo.
As it is, you have to choose the images you want to process with a specific noise algorithm and batch those together, which makes the workflow a bit less efficient. In my testing, some images definitely benefit from the DeepPRIME 3 technology, whilst others look better with DeepPRIME XD2.
Price wise, DxO PureRAW sits between On1 NoNoise AI and Topaz Photo, although the latter offers more features.
In my testing, which you’ll see further on in this guide, DxO PureRAW consistently produced great results with minimal user interaction required.
The sharpening and lens corrections are also excellent, working particularly well on older images and across a huge range of lens and camera body combinations.
Price: $119
Lightroom Plugin Available: Yes
GPU Accelerated: Yes, but requires a modern GPU
RAW Support: Yes
Consider If: You want a single click option that produces great results prior to your editing, with easy batch processing
Don’t Consider If: You don’t have a good GPU
Trial Available: Yes, download here
Adobe Lightroom
Adobe Photoshop Lightroom barely needs an introduction. It’s one of the world’s most popular photo management and editing tools, and it’s also what I use for the majority of my photo editing.
As you would expect from a photo editor, Adobe Lightroom has noise reduction built in. As of version 12.3, released in April 2023, it also includes AI powered noise reduction, which offers a major leap forward in performance compared to previous versions.
By default, when you load an image into Lightroom’s editor it will remove the majority of color noise. You can then press the Denoise button to use Lightroom’s AI powered noise reduction.
This applies the noise reduction, after which you can use as a slider to adjust the level of noise reduction from 0 (none) to 100 (lots).
As of version 14.4, released in June 2025, this feature is integrated into Lightroom’s non-destructive workflow. Prior to this, like all the other tools, Lightroom created a separate DNG file which it applied the noise reduction to. Now, it all happens as part of the workflow without creating a DNG file, so you don’t need to take up extra hard drive space with additional DNG files, which is definitely a benefit.
The only downside of Adobe’s approach is that there’s no preview. You have to check the denoise box to apply the denoise, which will take some time. Once its applied, you can move the slider to update the amount of reduction from 0 to 100 (this does at least happen very quickly). I’ve also not found a way to batch apply the noise reduction, which is annoying.
If you don’t want to use the AI powered noise reduction, you can use the more basic noise reduction which offers a number of sliders to remove noise.
For low noise images, the basic sharpening and noise reduction in Lightroom is generally good enough. However, for higher noise images, my experience is that you definitely get better results with Lightrooms AI denoise.
One major downside of Lightroom is that it’s only available as a subscription. If you are in the market for a photo editor that doesn’t require a monthly or annual payment and which also has excellent noise reduction built in, you might consider DxO PhotoLab Elite or On1 Photo RAW.
These Lightroom alternatives offer many of the same features at a one-off price, with the advantage of powerful noise reduction tools as well.
That said, Lightroom is still the hub of my photo management and editing workflow as I’ve not yet found an application that does everything it does quite so well. The AI powered noise reduction is also good enough to stand up to most of the alternatives on the market in my testing.
Price: $11.99 a month ($143.88 a year)
Lightroom Plugin Available: N/A
GPU Accelerated: Yes, for various features including AI noise reduction
RAW Support: Yes
Consider If: You are looking for an all-in-one option which includes good noise reduction
Don’t Consider If: You would prefer a one-off payment rather than a subscription, or to have more control over your noise reduction
Trial Available: Yes, download here
Noise Reduction Software Results Comparison
I’ll now compare a number of different images to see how the various software stacks up in the four software programs. I’ll be using unedited RAW files from my Canon EOS R5 and my Canon EOS 6D.
For DxO, I’m going to use the two output options with everything set to default (lens correction, sharpening etc).
For Topaz, I use the RAW AI model and everything else set to Auto. This means some images will have sharpening applied and others won’t, this will depend on what the Autopilot decides.
For On1, it uses the default settings.
For Lightroom, I leave the AI tool and sharpening sliders at their default settings.
It’s worth noting that all the noise reduction software applies some form of sharpening, and this has been left to the default setting. JPG files for use in this post were not sharpened when creating them from the DNG files output from each noise reduction tool.
Finally, it’s important to note that every tool for processing RAW files has its own approach to rendering color, brightness etc. So there will be some variations in image color and brightness across the tools. These can be quickly adjusted when editing, so I would recommend not focusing on that, and looking at the noise and sharpness specifically for each output image.
Noise Reduction Software Versions in Use
It’s important when comparing tools and doing performance benchmarks to know which versions of the software are being used. Software updates can improve performance, both in terms of the quality of the noise reduction, and the speed at which the noise reduction is performed.
I will update these results when there are any updates to the software being used that might affect either the output or speed. The versions used for the tests below are as follows:
- Topaz Photo 4.0.2 (released June 2025)
- DxO PureRAW 5.2 (released June 2025).
- On1 NoNoise AI 2024.5 (released August 2024)
- Lightroom Classic CC 14.4 (released June 2025)
If you are an existing DxO PureRAW user wondering if it is worth upgrading to version 5 from previous versions, I would say that most users will likely see an improvement when using the new DeepPRIME v3, but only if you have a fast graphics card.
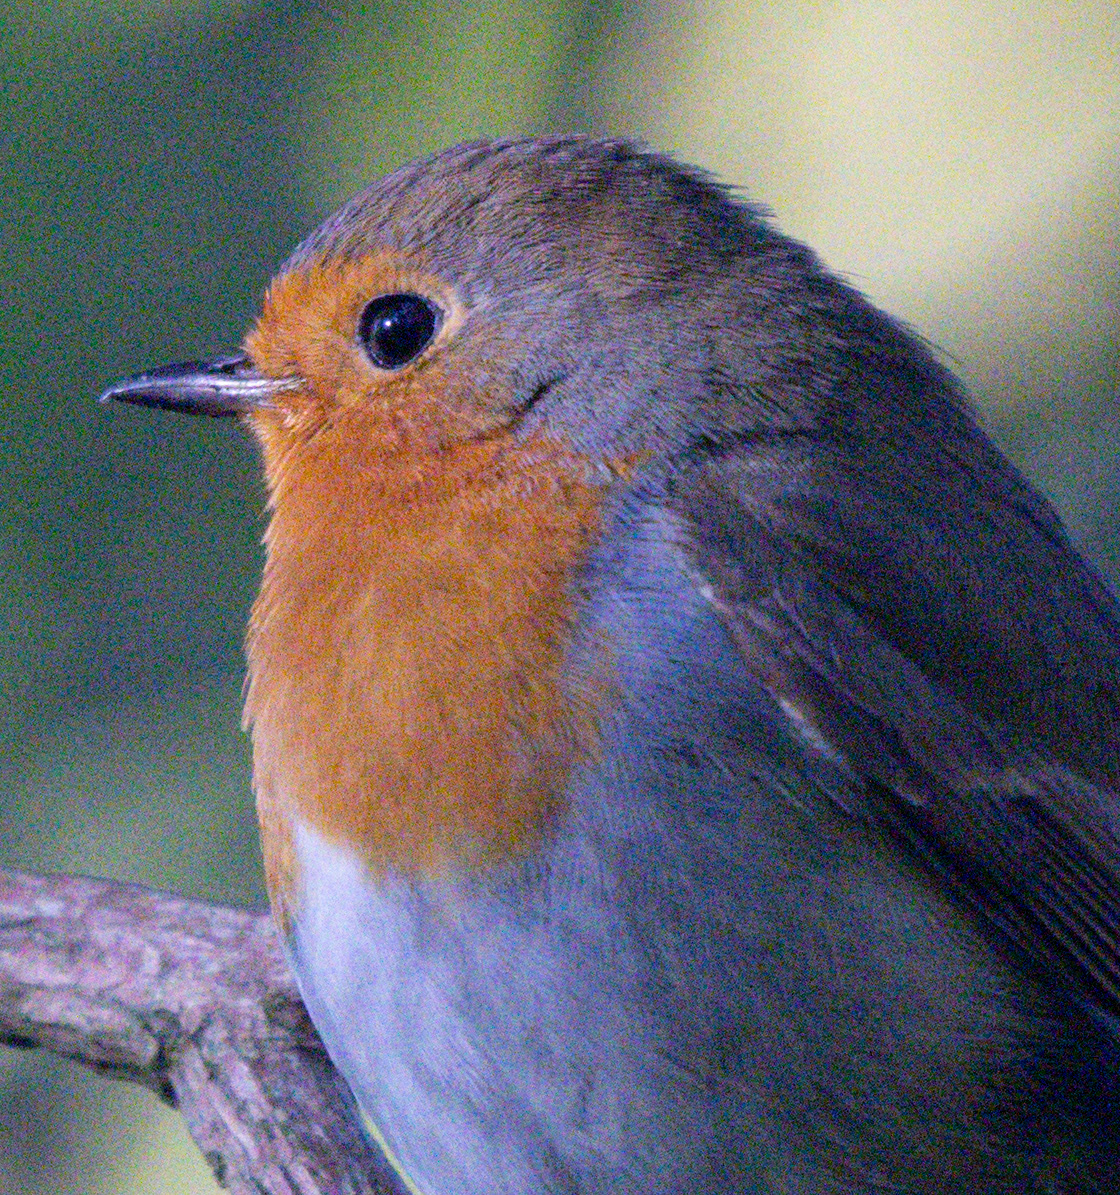
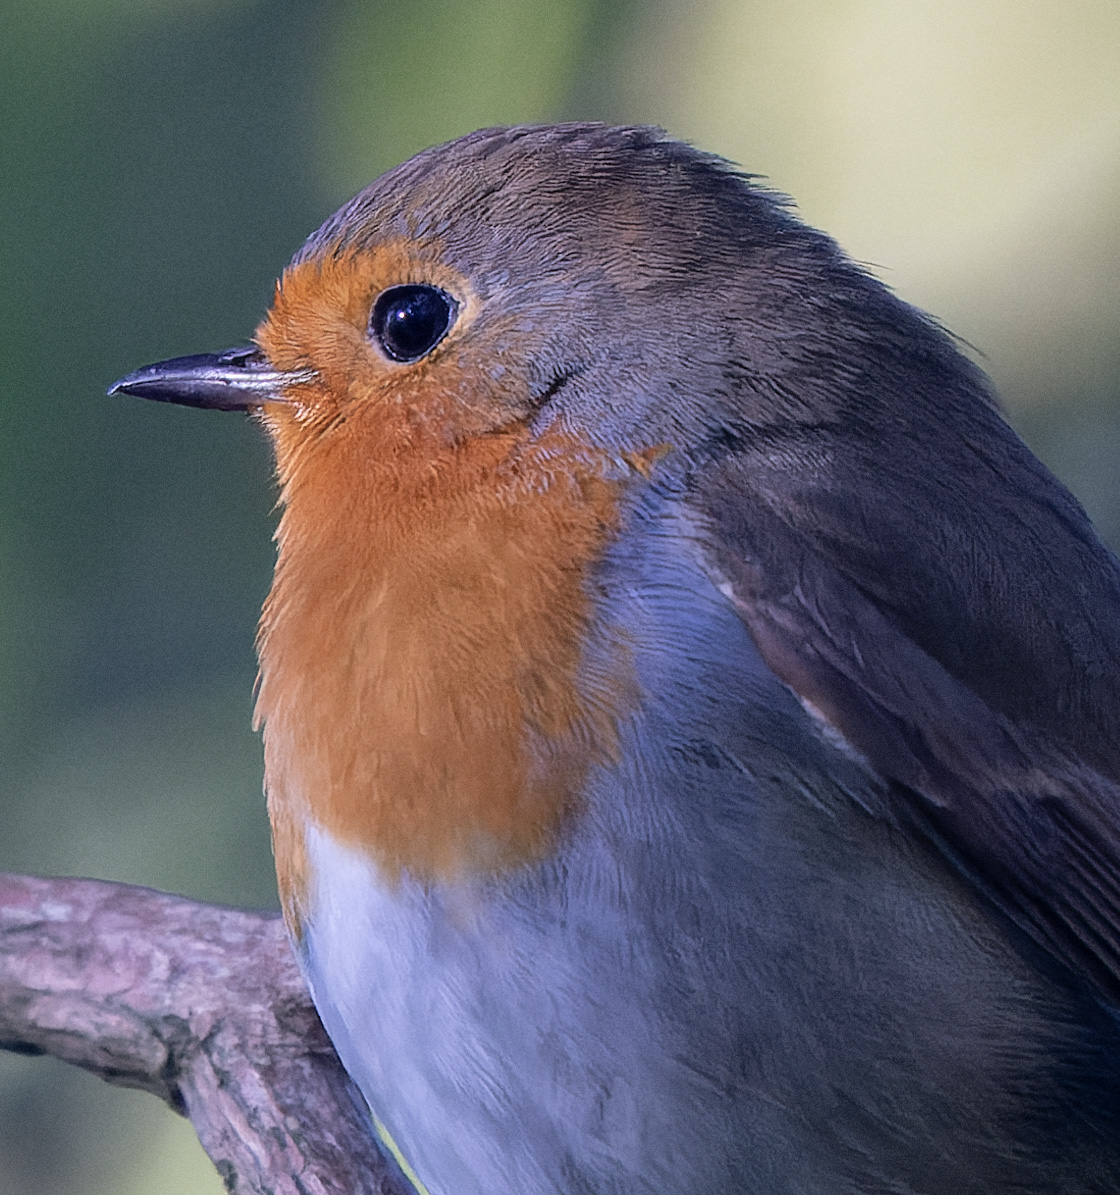
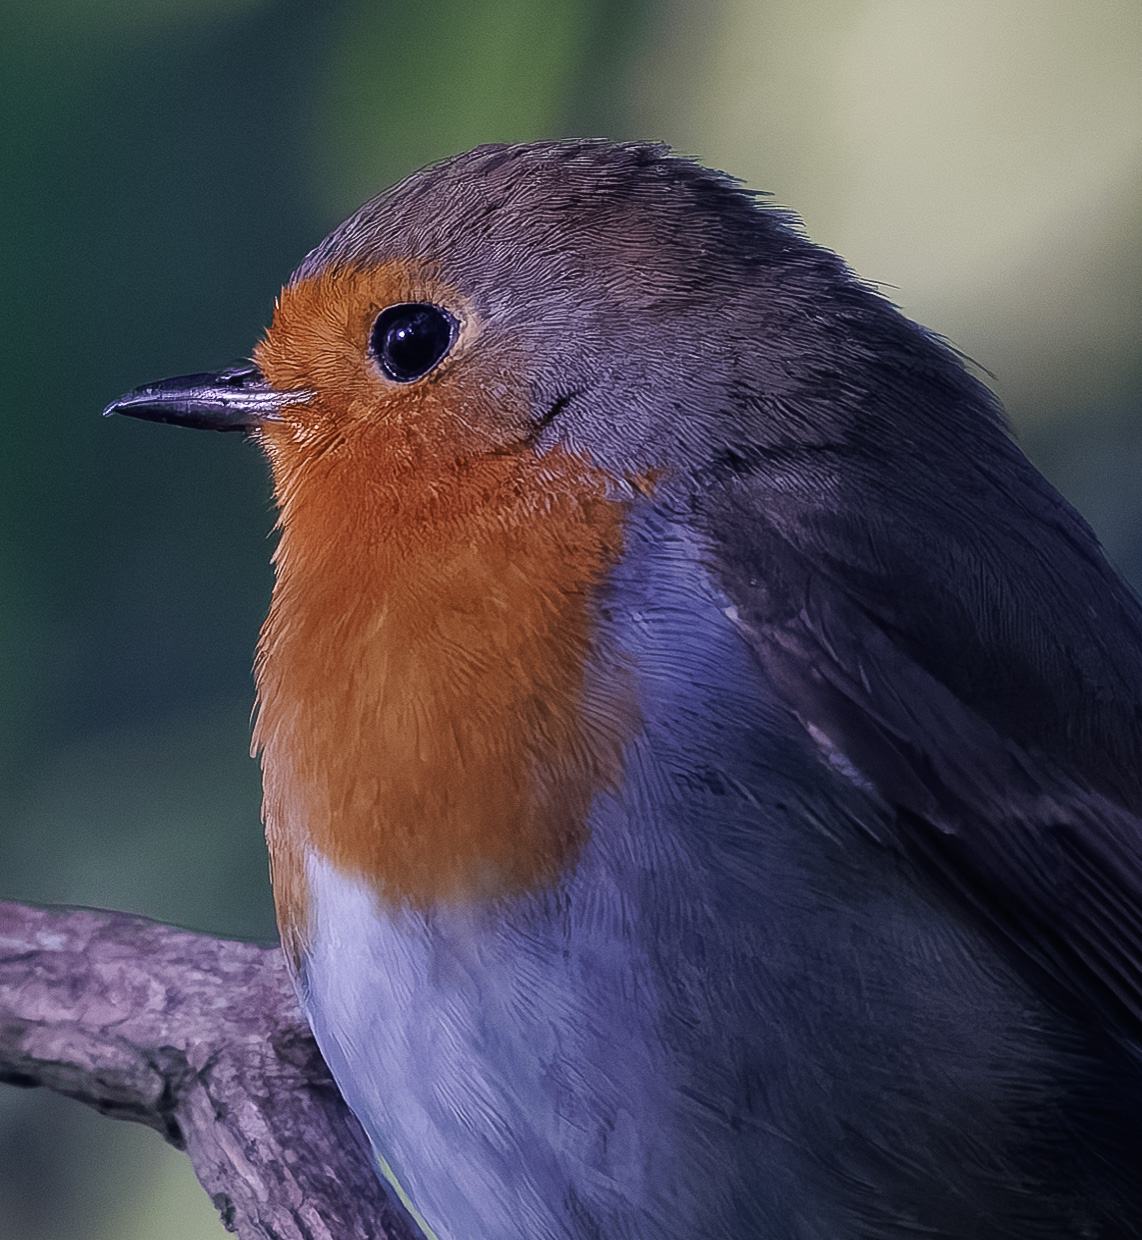
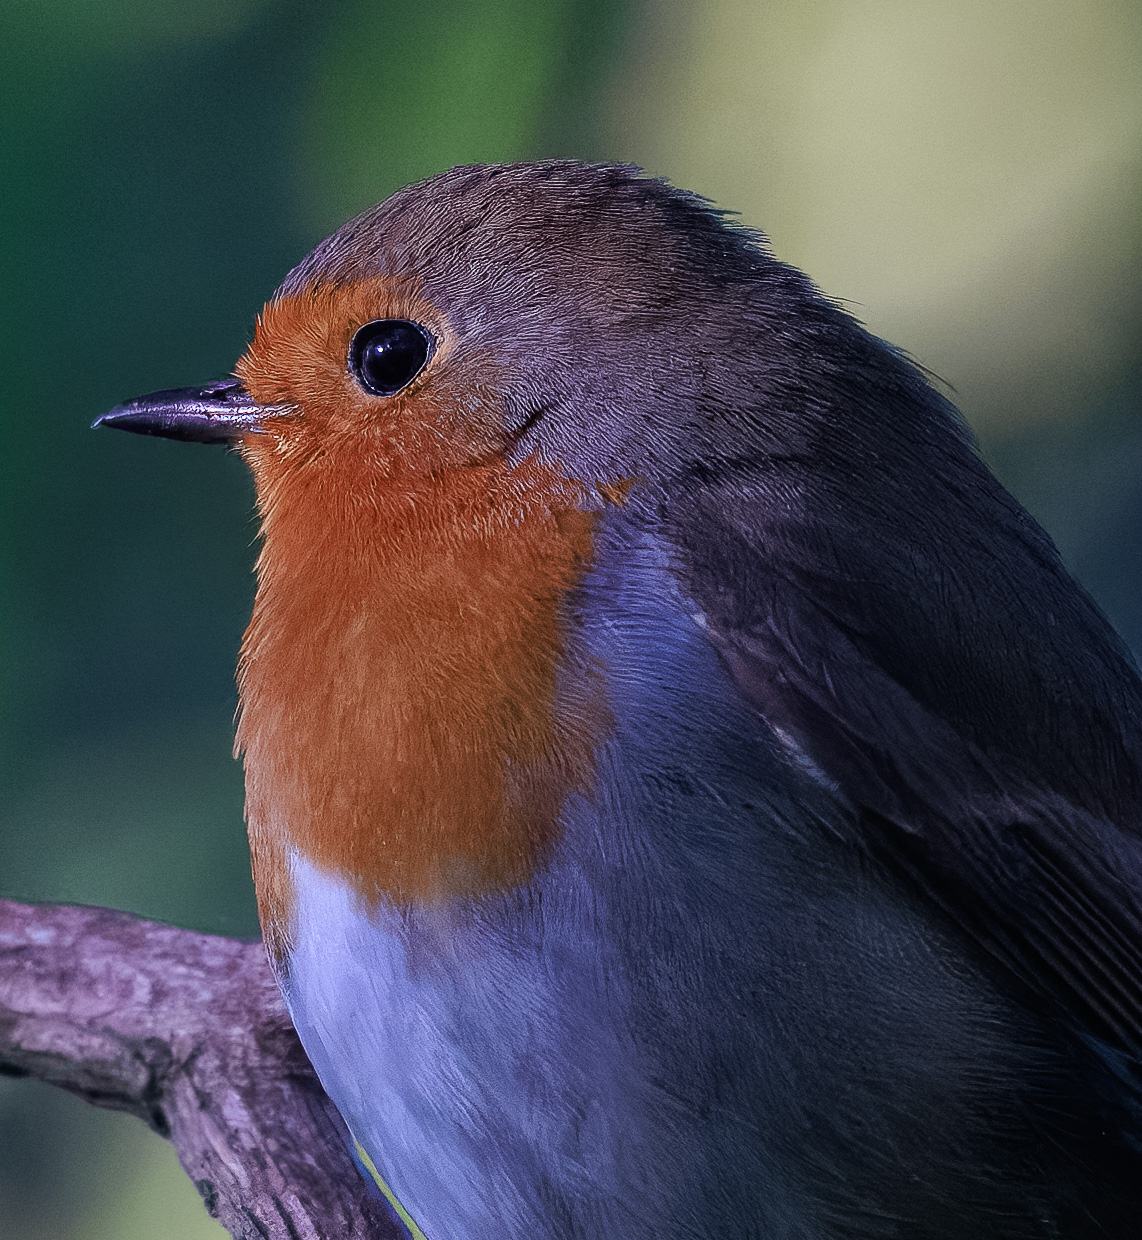
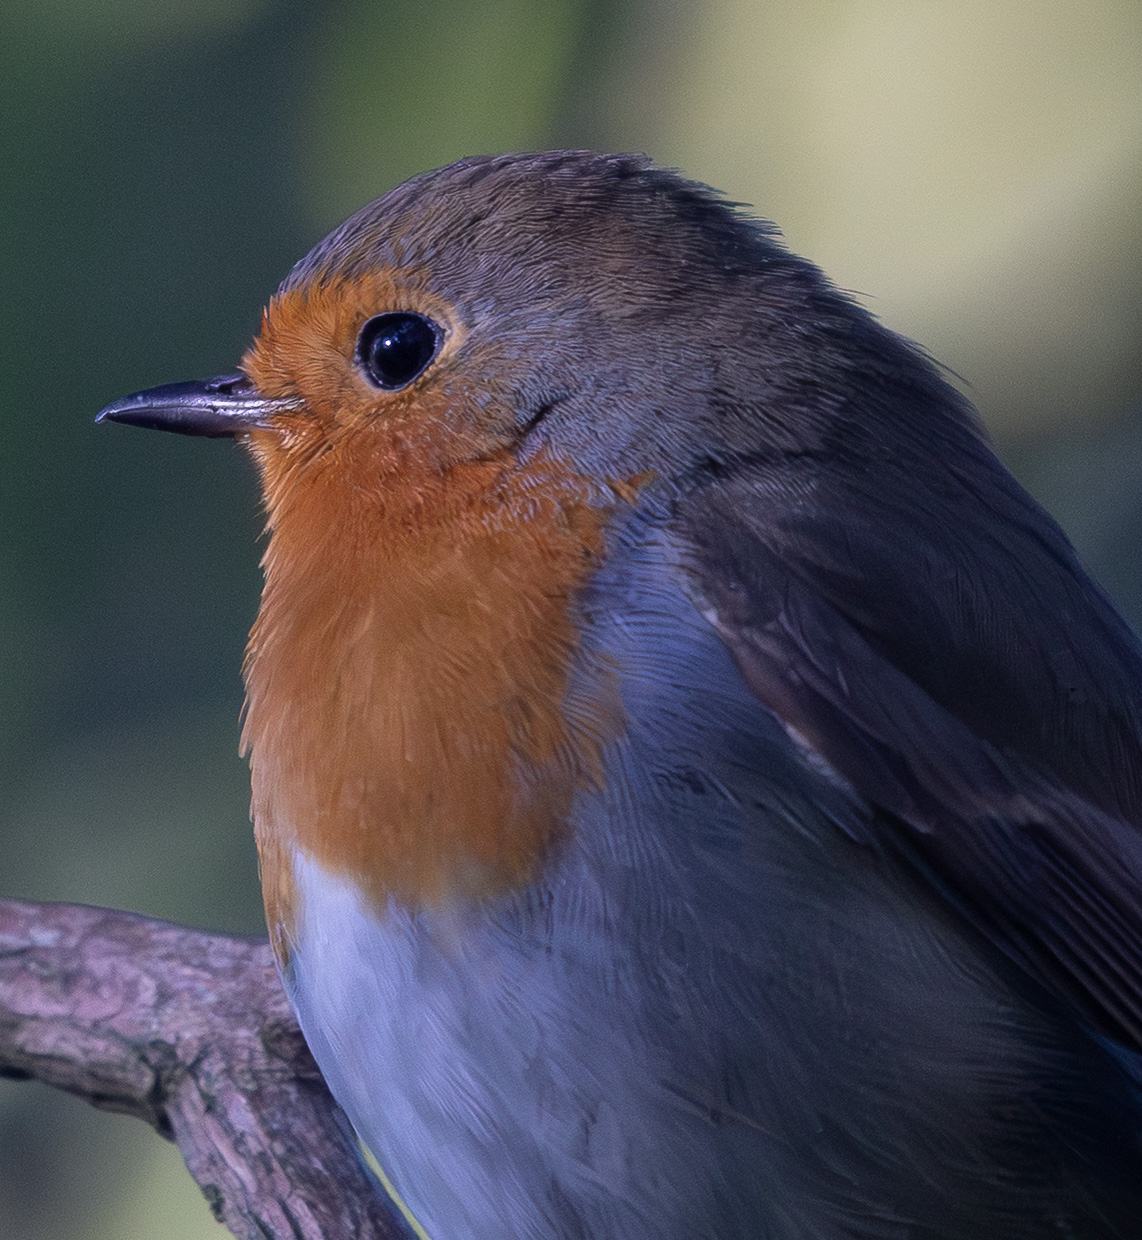
Noise Reduction Test Image 1
The first image is this shot of a UK robin sitting on a branch. It was in a shaded area, and this was shot on a Canon EOS R5 at 6400 ISO. The small version doesn’t show too much noise, but if you click through to the larger version, you’ll see more noise.
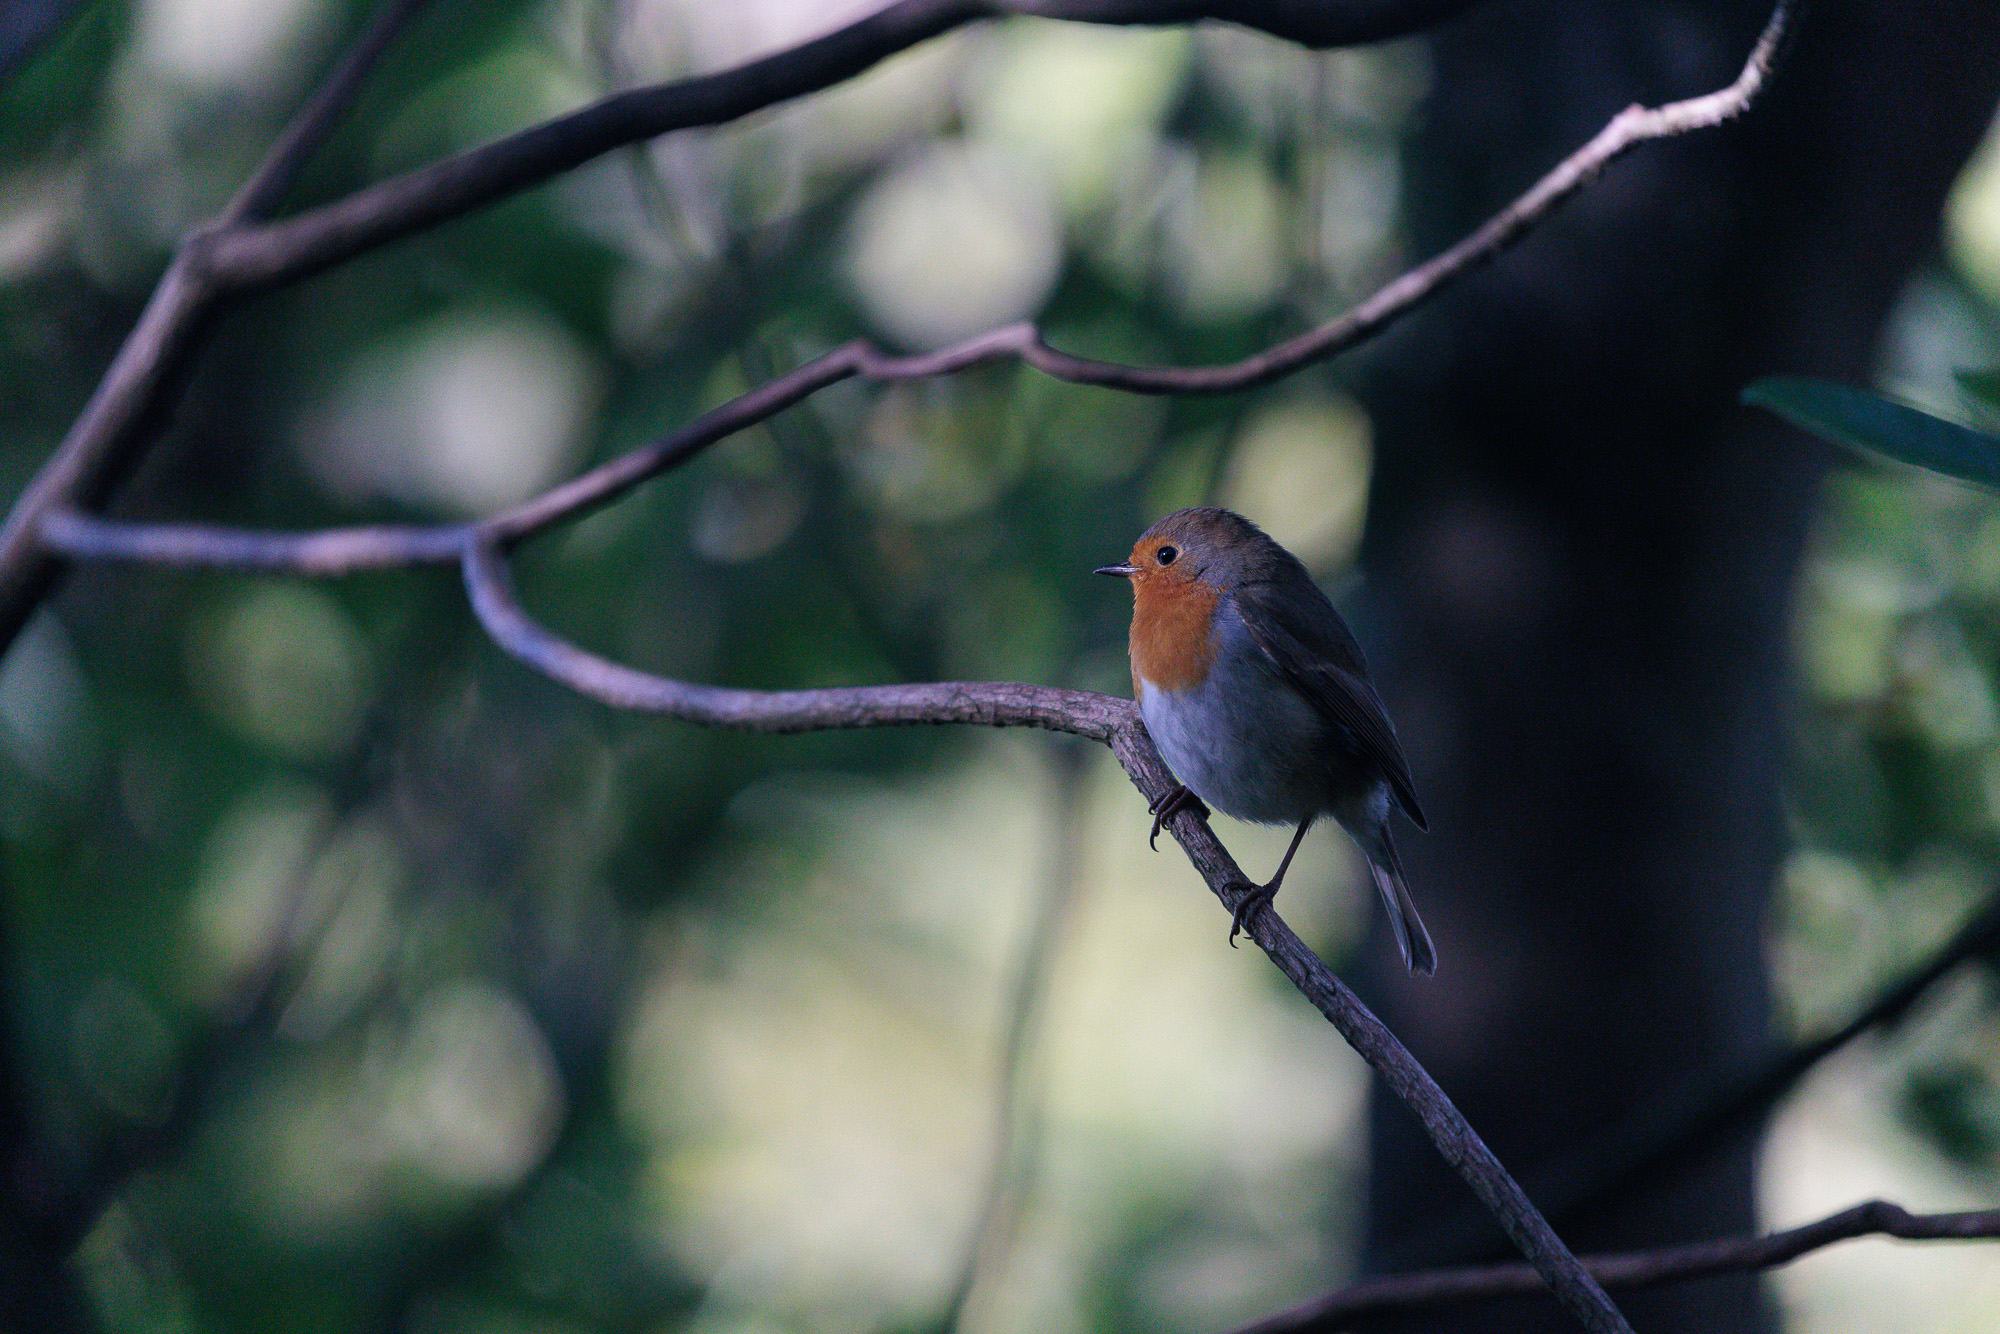
No noise reduction, sharpening or other editing applied, 6400 ISO. Click image for larger version.Now, let’s look at a 100% crop of the subject, which is what we’re interested in. We’ll look first at the unedited version, followed by output from the noise reduction tools we’ve used.
You can click on each image for a large version. For easy comparison, you might want to open the full-size versions in different tabs and flip between them.
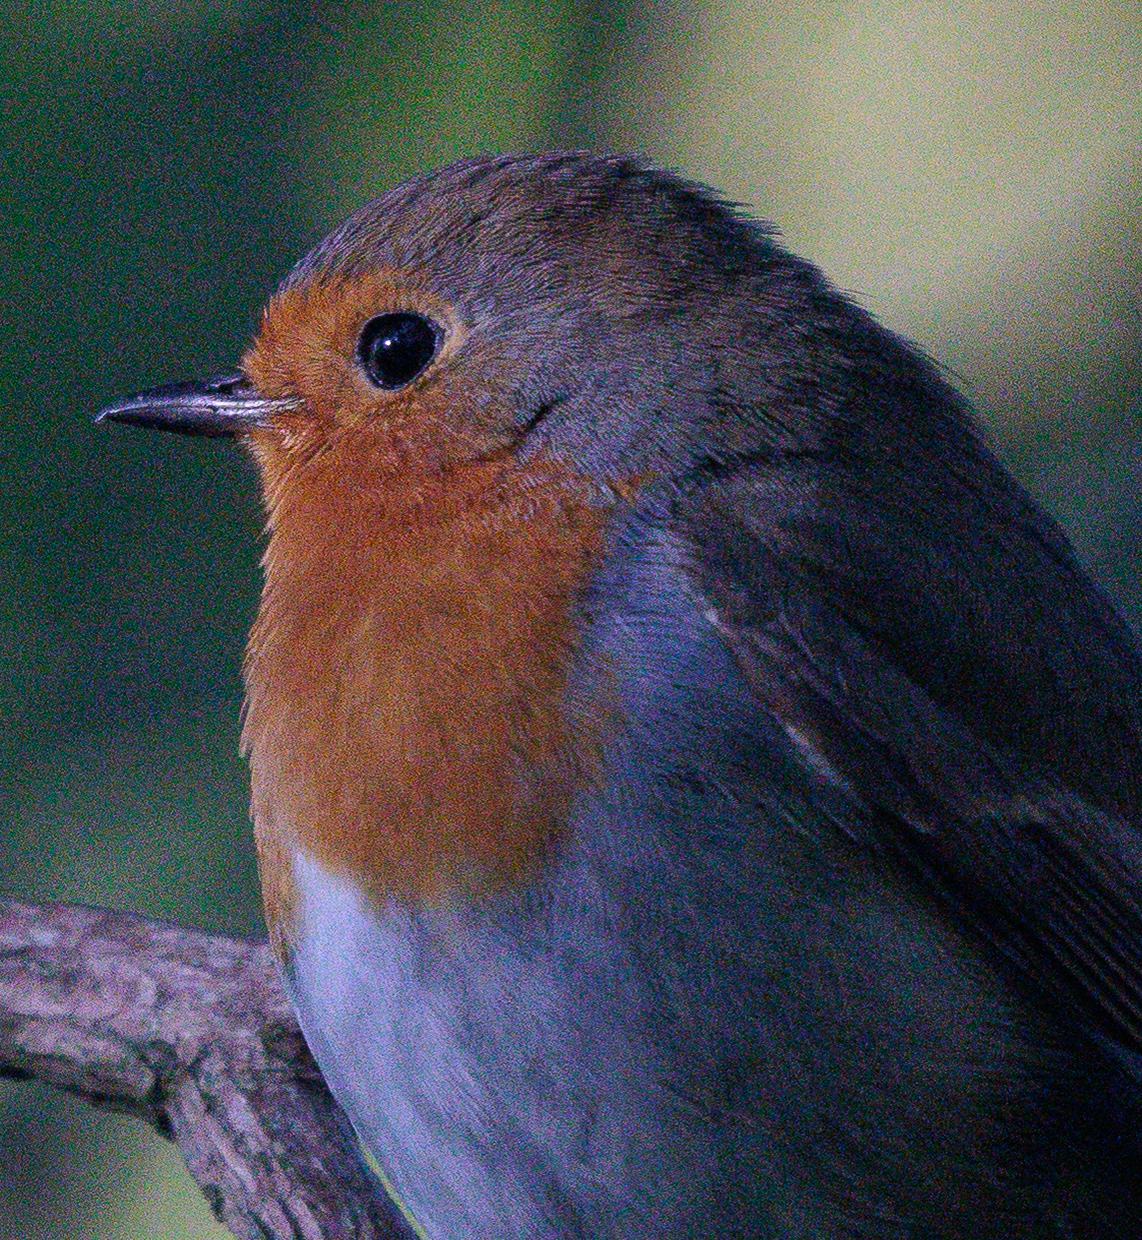


My preference from the above images is in the following order, but you should come to your own conclusion:
- DxO PureRAW DeepPrime XD2
- Adobe Lightroom AI DeNoise
- Topaz Photo
- DxO PureRAW DeepPrime 3
- On1 NoNoise AI
Comparing the images, I prefer the way the subject looks using DxO PureRAW DeepPrime XD2, with slightly more feather detail and improved background noise reduction compared to DeepPRIME 3. However, Lightroom’s AI DeNoise tool puts in a strong performance, being my second favorite result.
Topaz Photo does a good job of noise reduction but the sharpening tool is a little aggressive in my opinion so I would probably dial that down from the suggested setting. On1 NoNoise AI seems to add a number of artefacts in the area around the bird which is not good.
It’s also worth noting that none of these images have any additional sharpening applied beyond the default in each tool. So you can always adjust further in a photo editor like Lightroom if required.
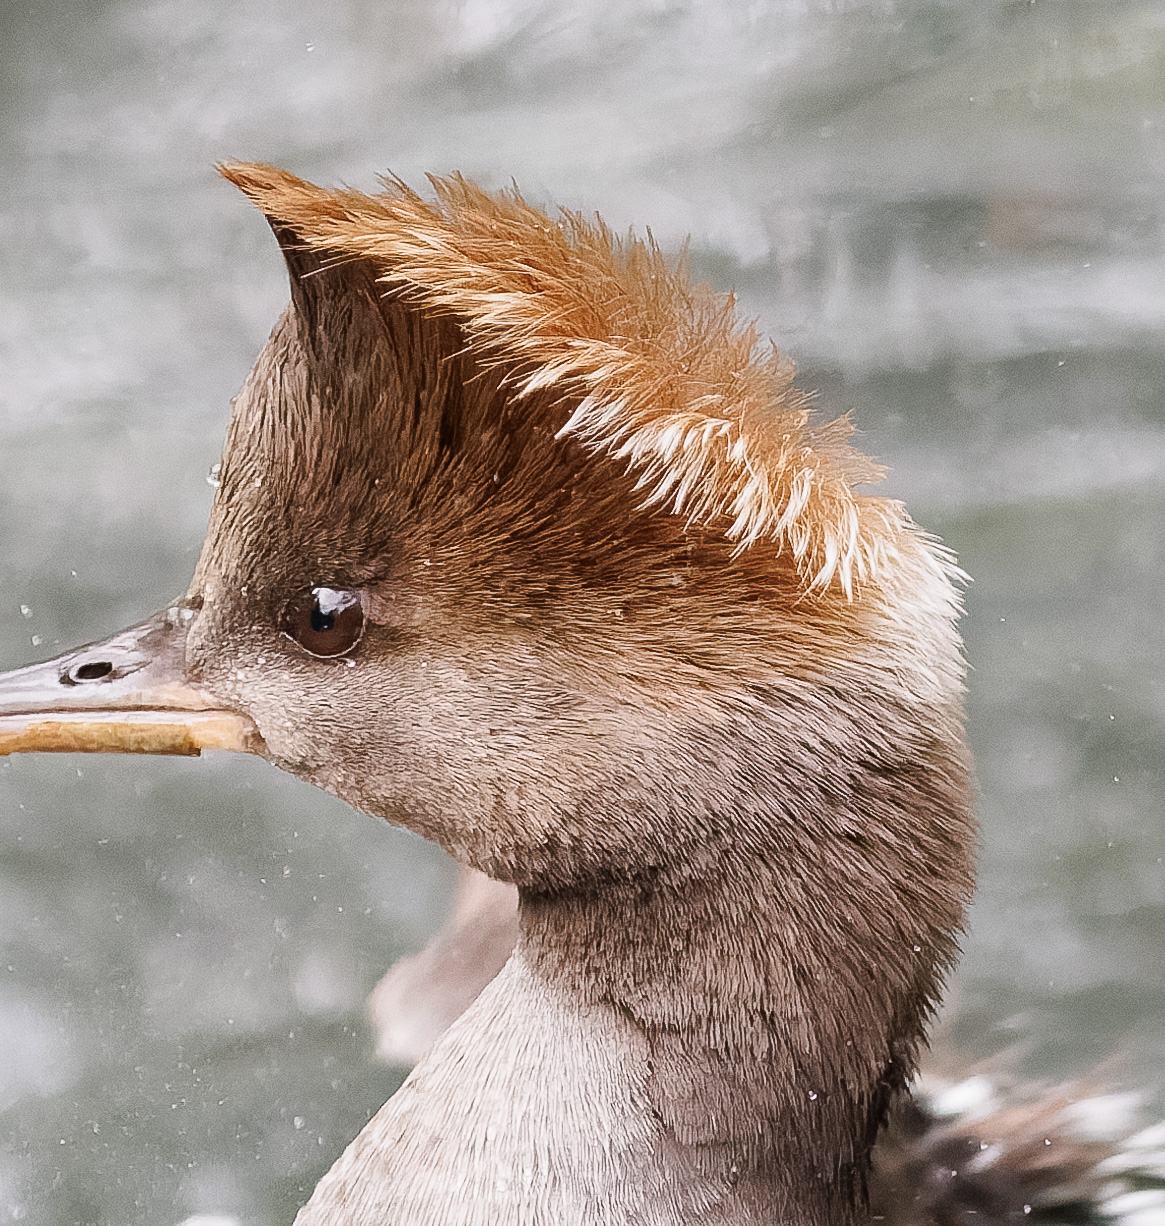
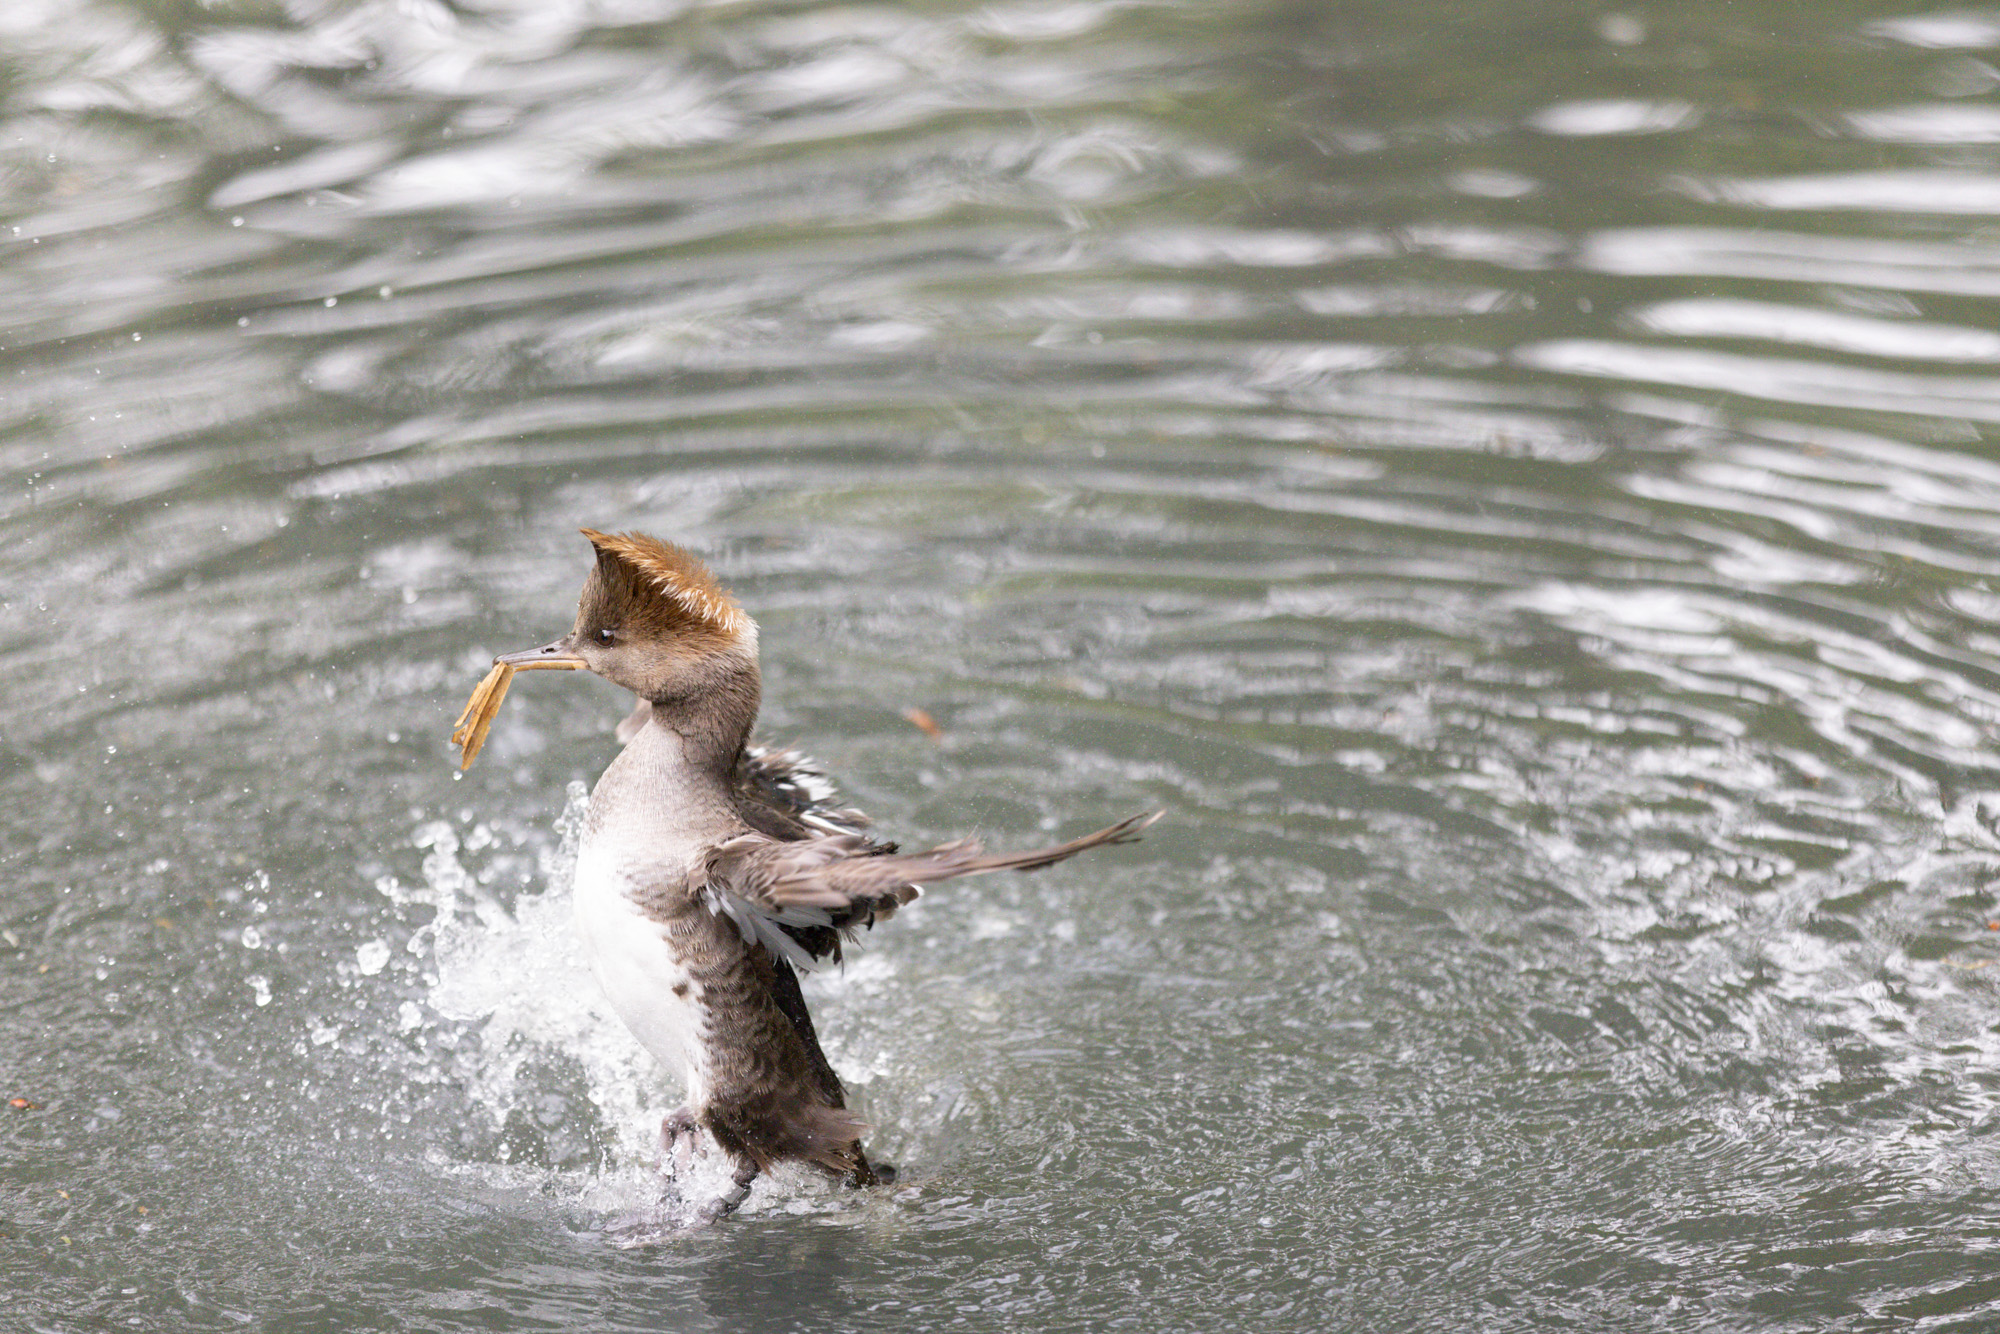
Noise Reduction Test Image 2
The second image is a shot of a Merganser duck having a bath. Due to the fast motion, this was shot at a high shutter speed with a resulting ISO of 5000. This was shot on a Canon EOS R5. Again, the small version doesn’t show too much noise, but if you click through to the larger version you’ll see more noise.


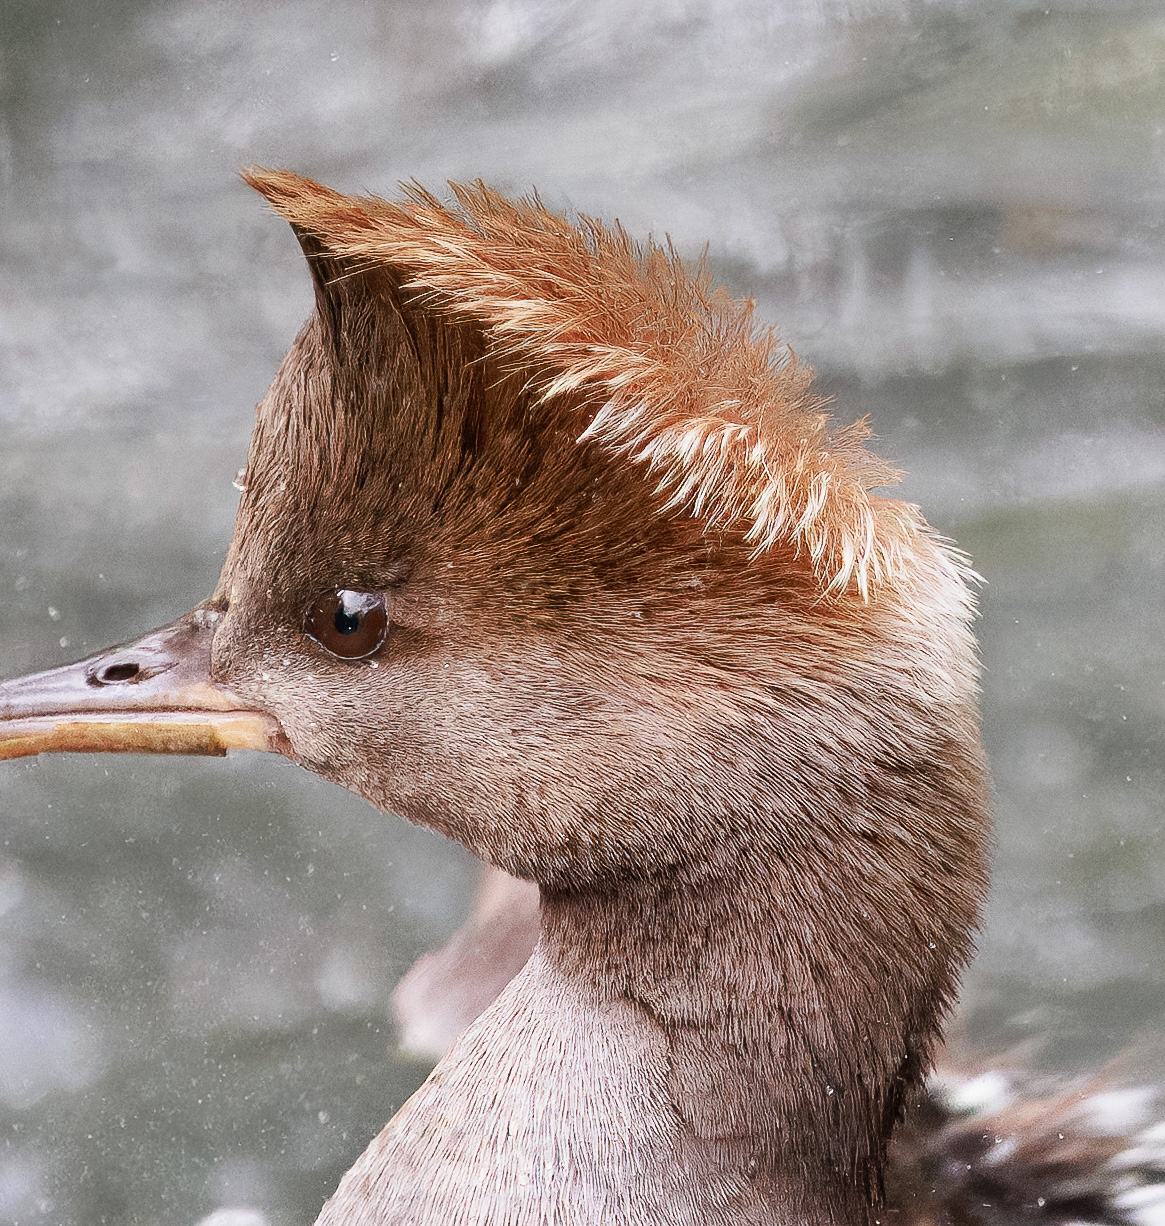
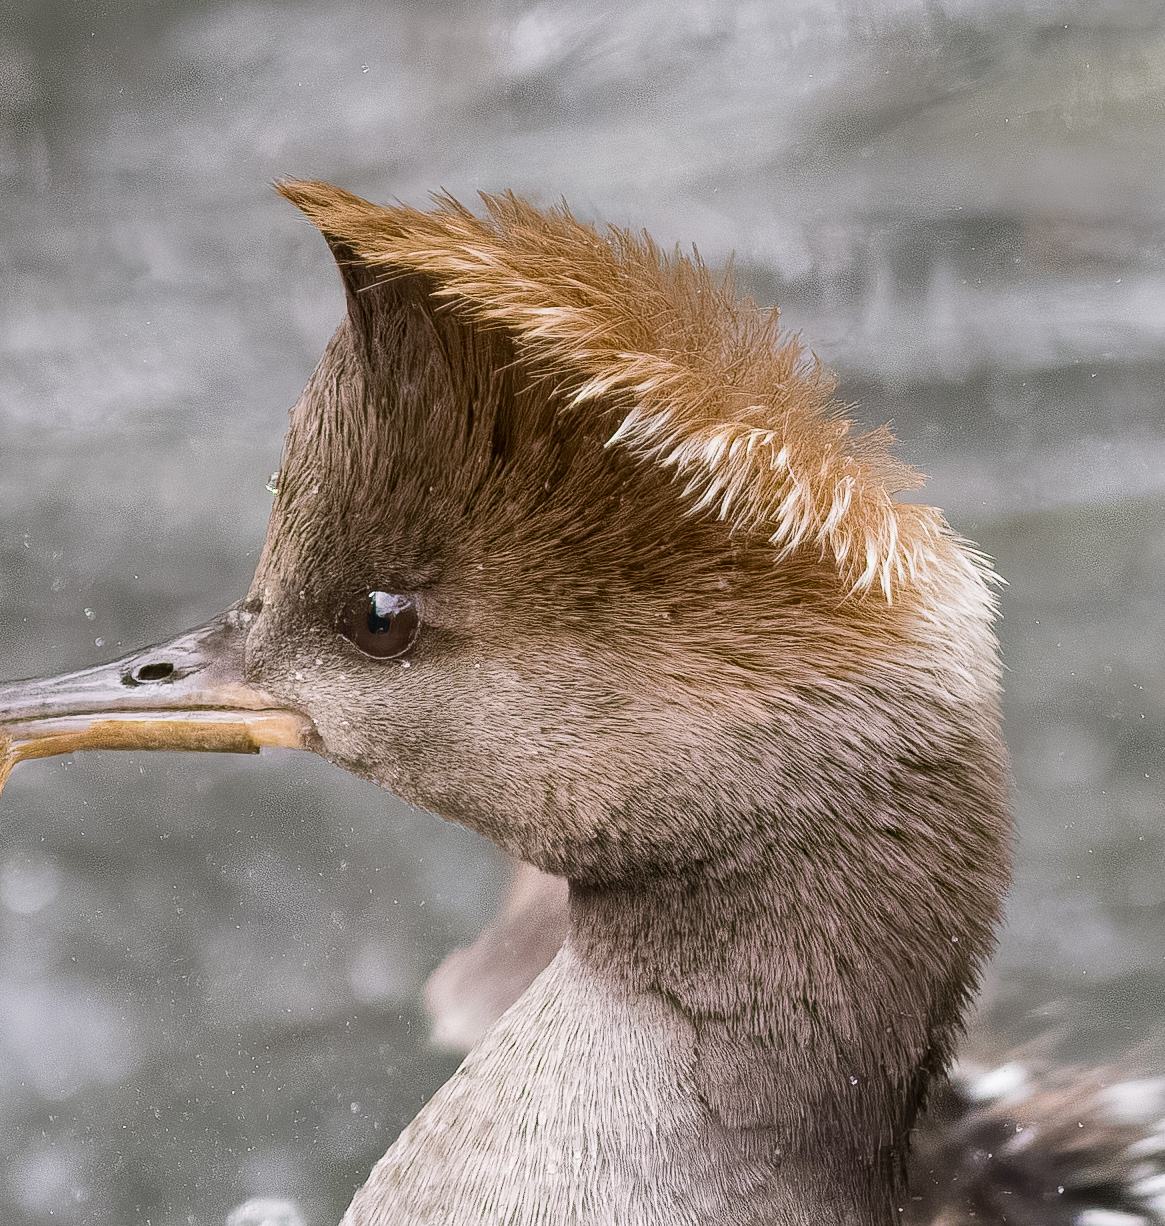
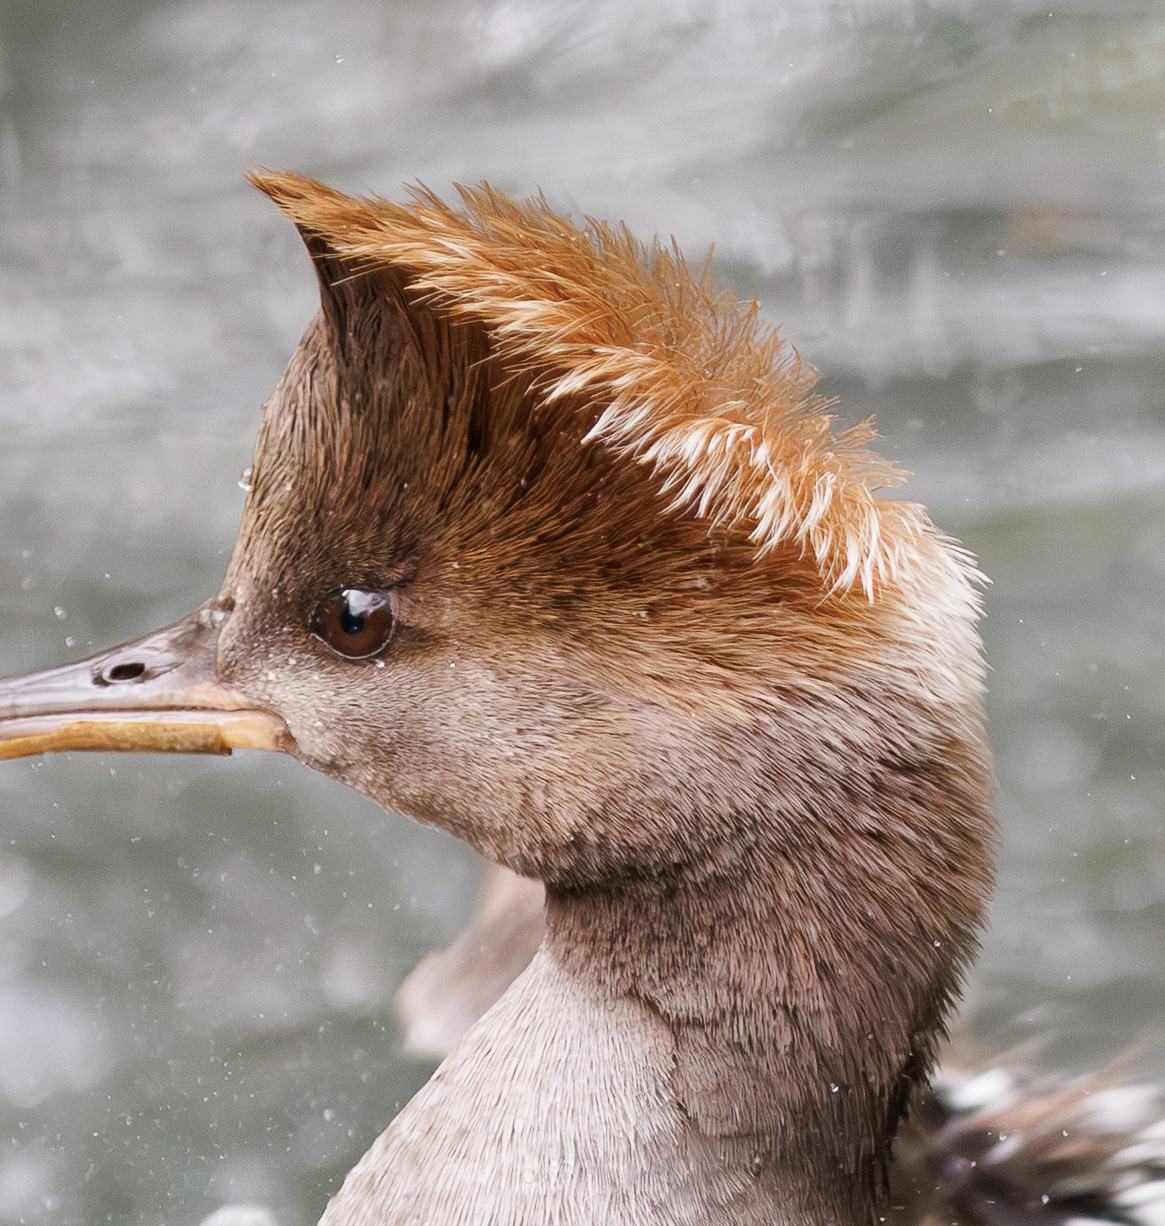
My preference from the above image versions is in the following order, but you should come to your own conclusion:
- Topaz Photo
- DxO PureRAW DeepPrime XD 2
- Adobe Lightroom AI DeNoise
- DxO PureRAW DeepPrime
- On1 NoNoise AI
Overall, I feel that the output from Topaz Photo is the best option, followed by PureRAW DeepPrime XD and Lightroom AI DeNoise. I would however say that the Topaz sharpening is quite a lot, but this can be tweaked.
They are definitely all better than what I can achieve in regular Lightroom without the Lightroom Denoise AI.
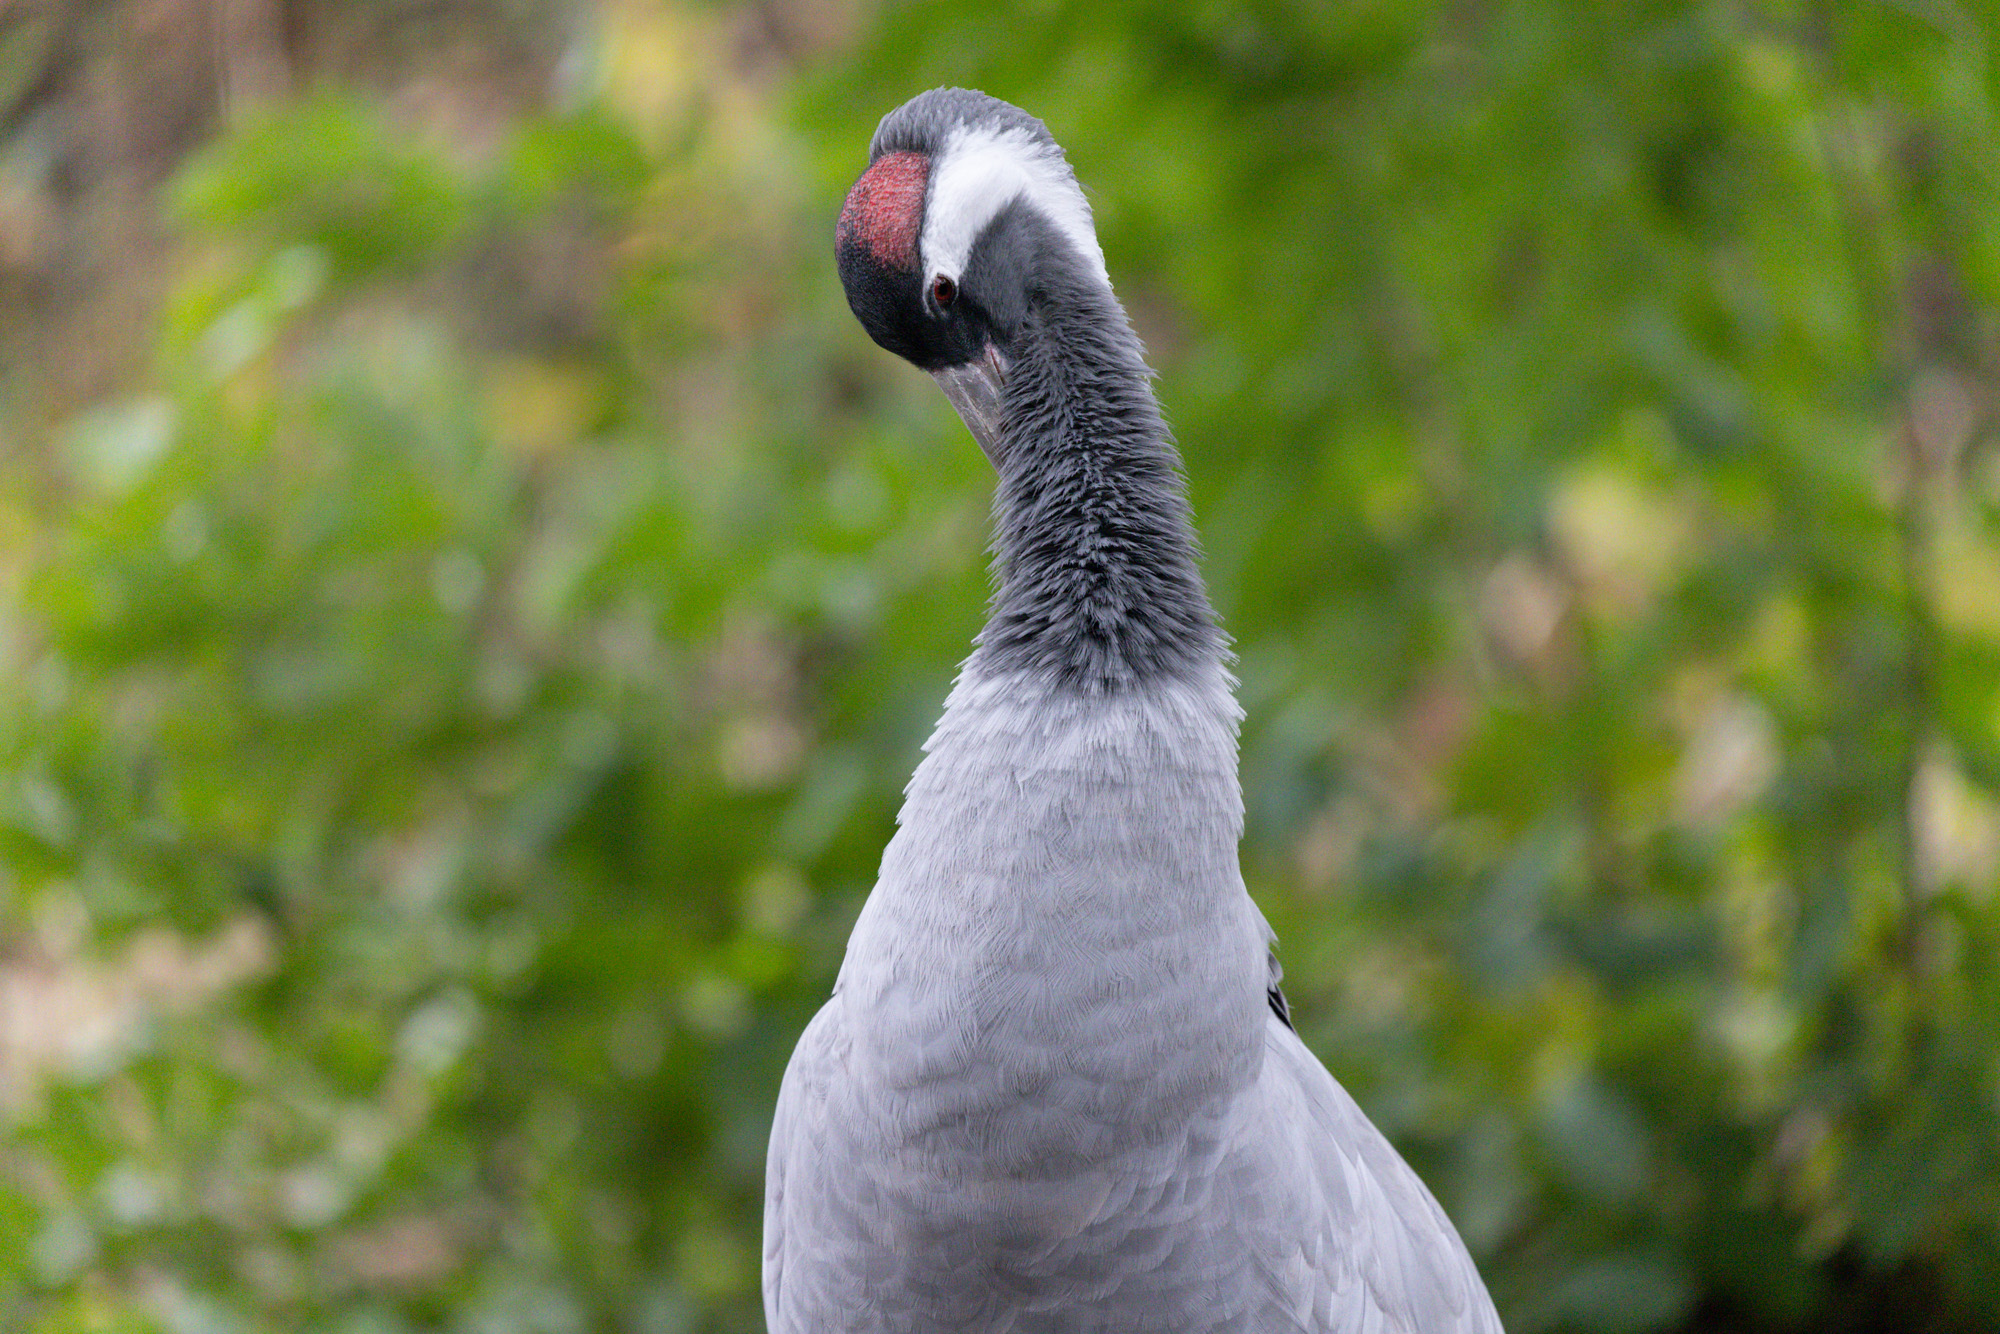
Noise Reduction Test Image 3
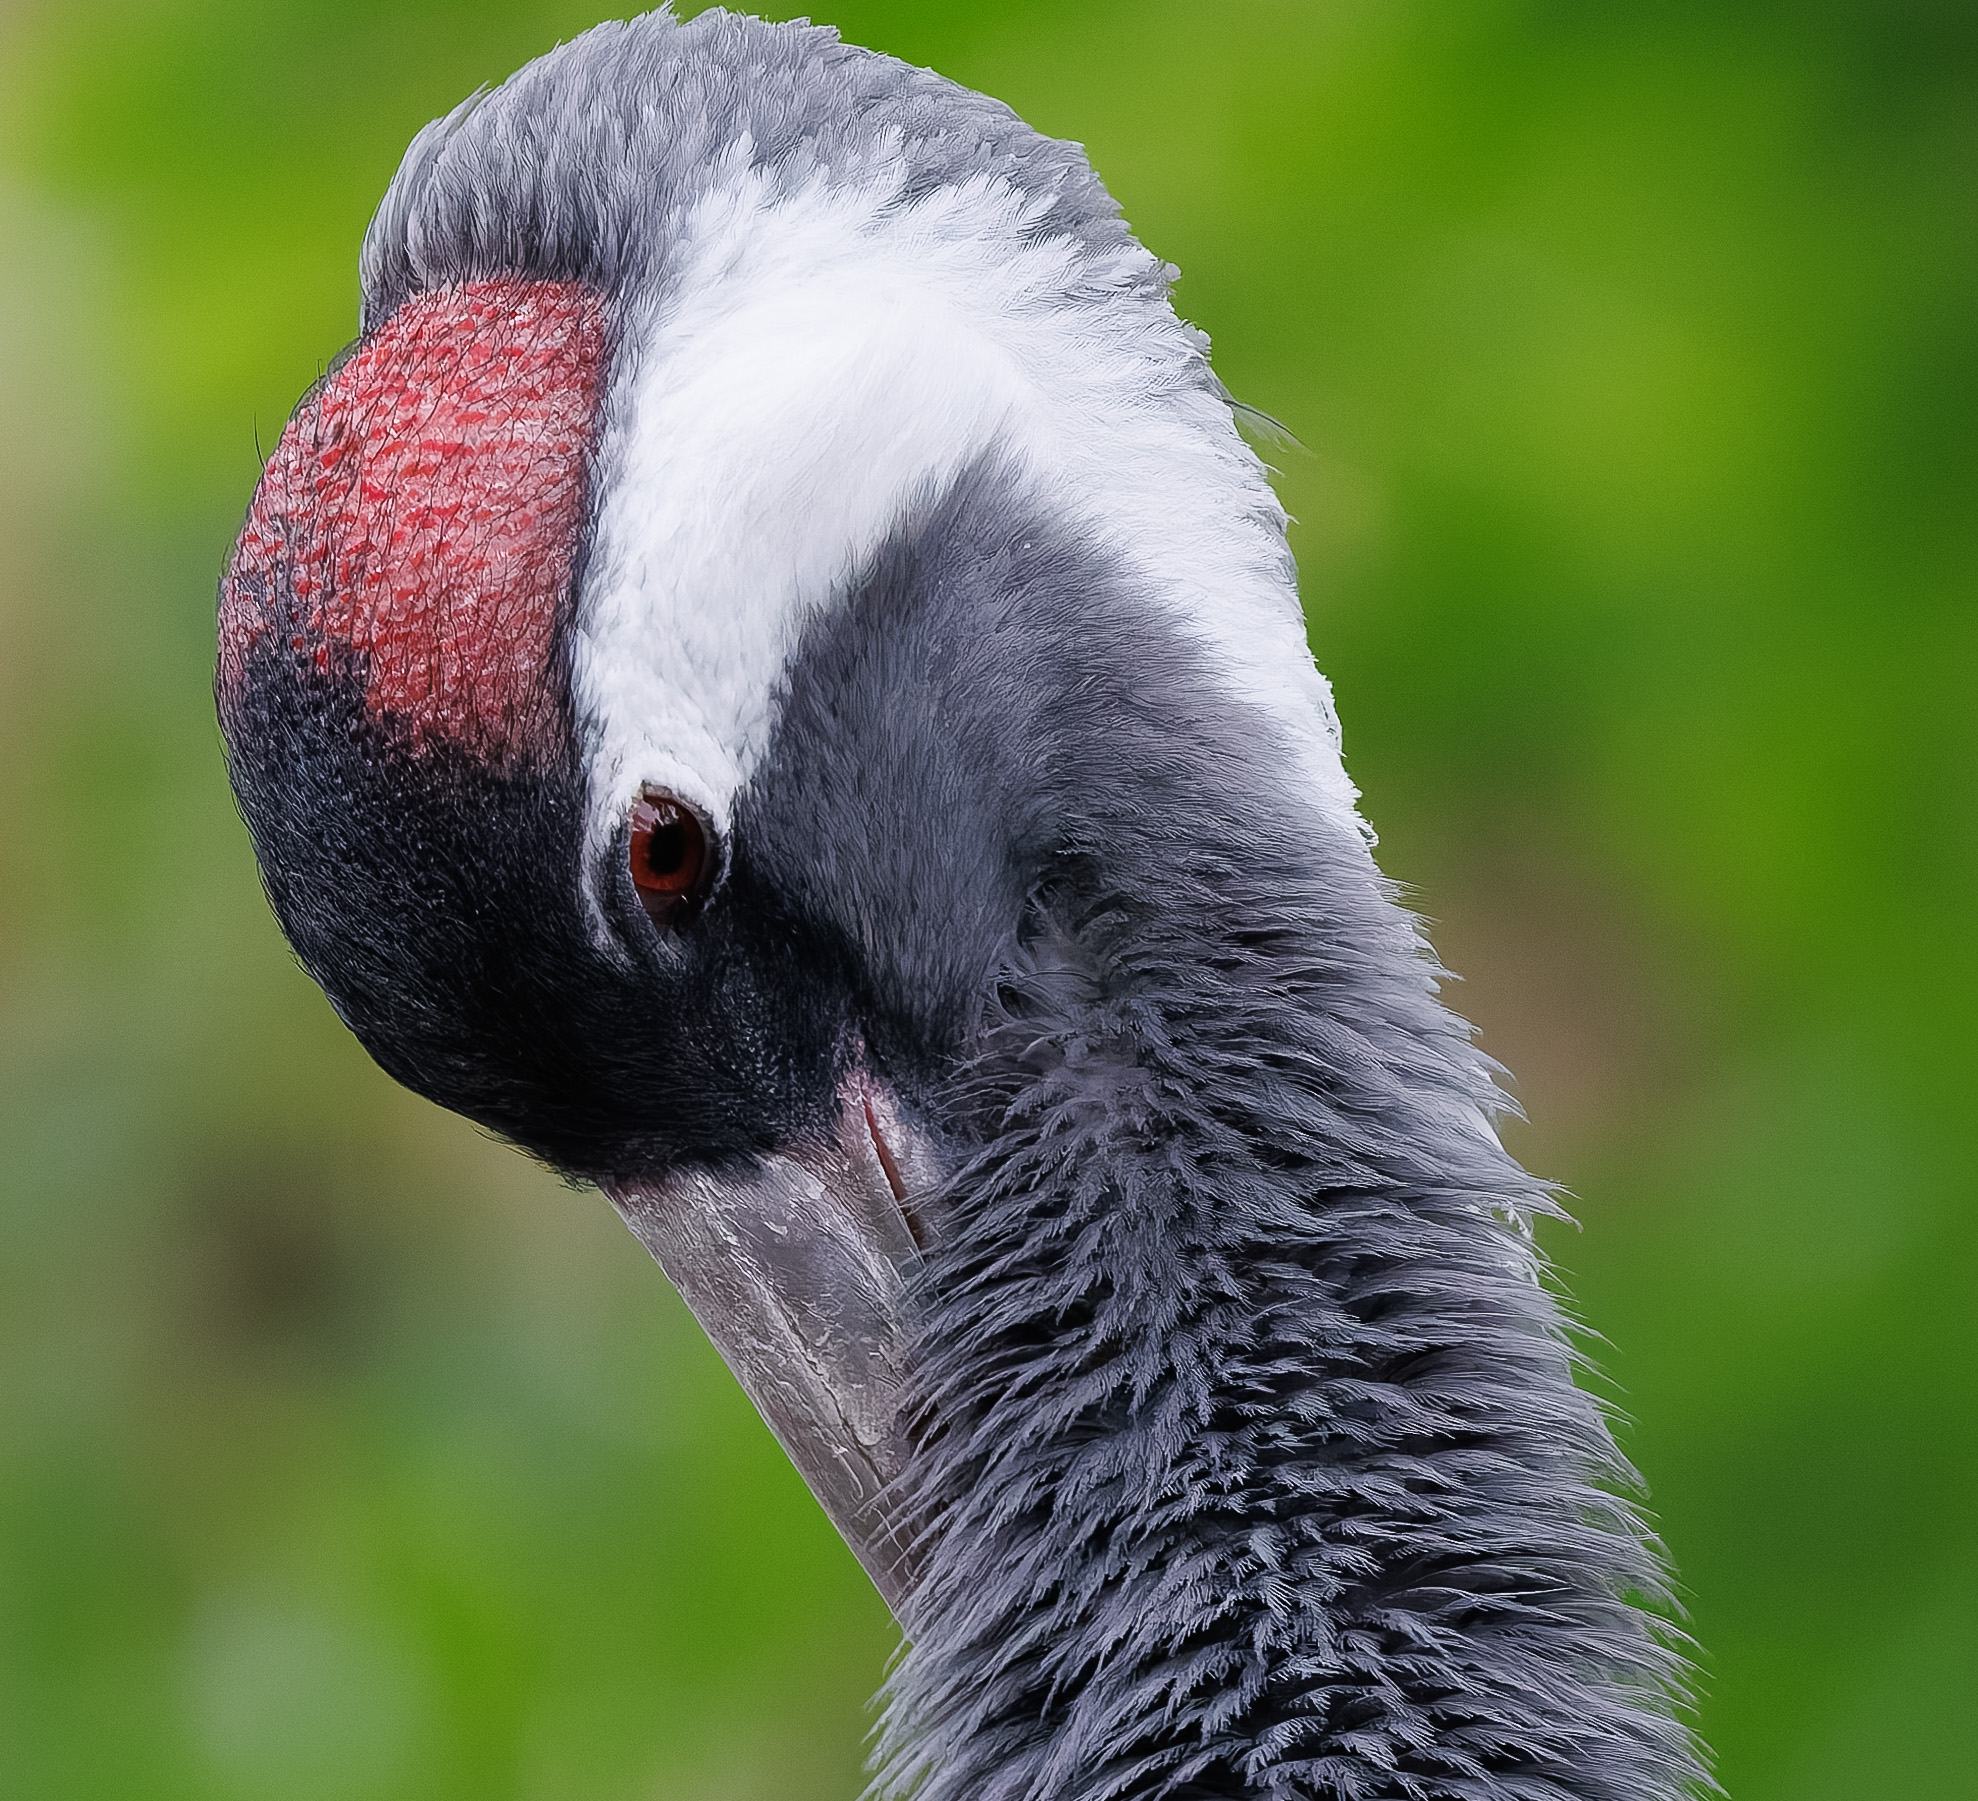
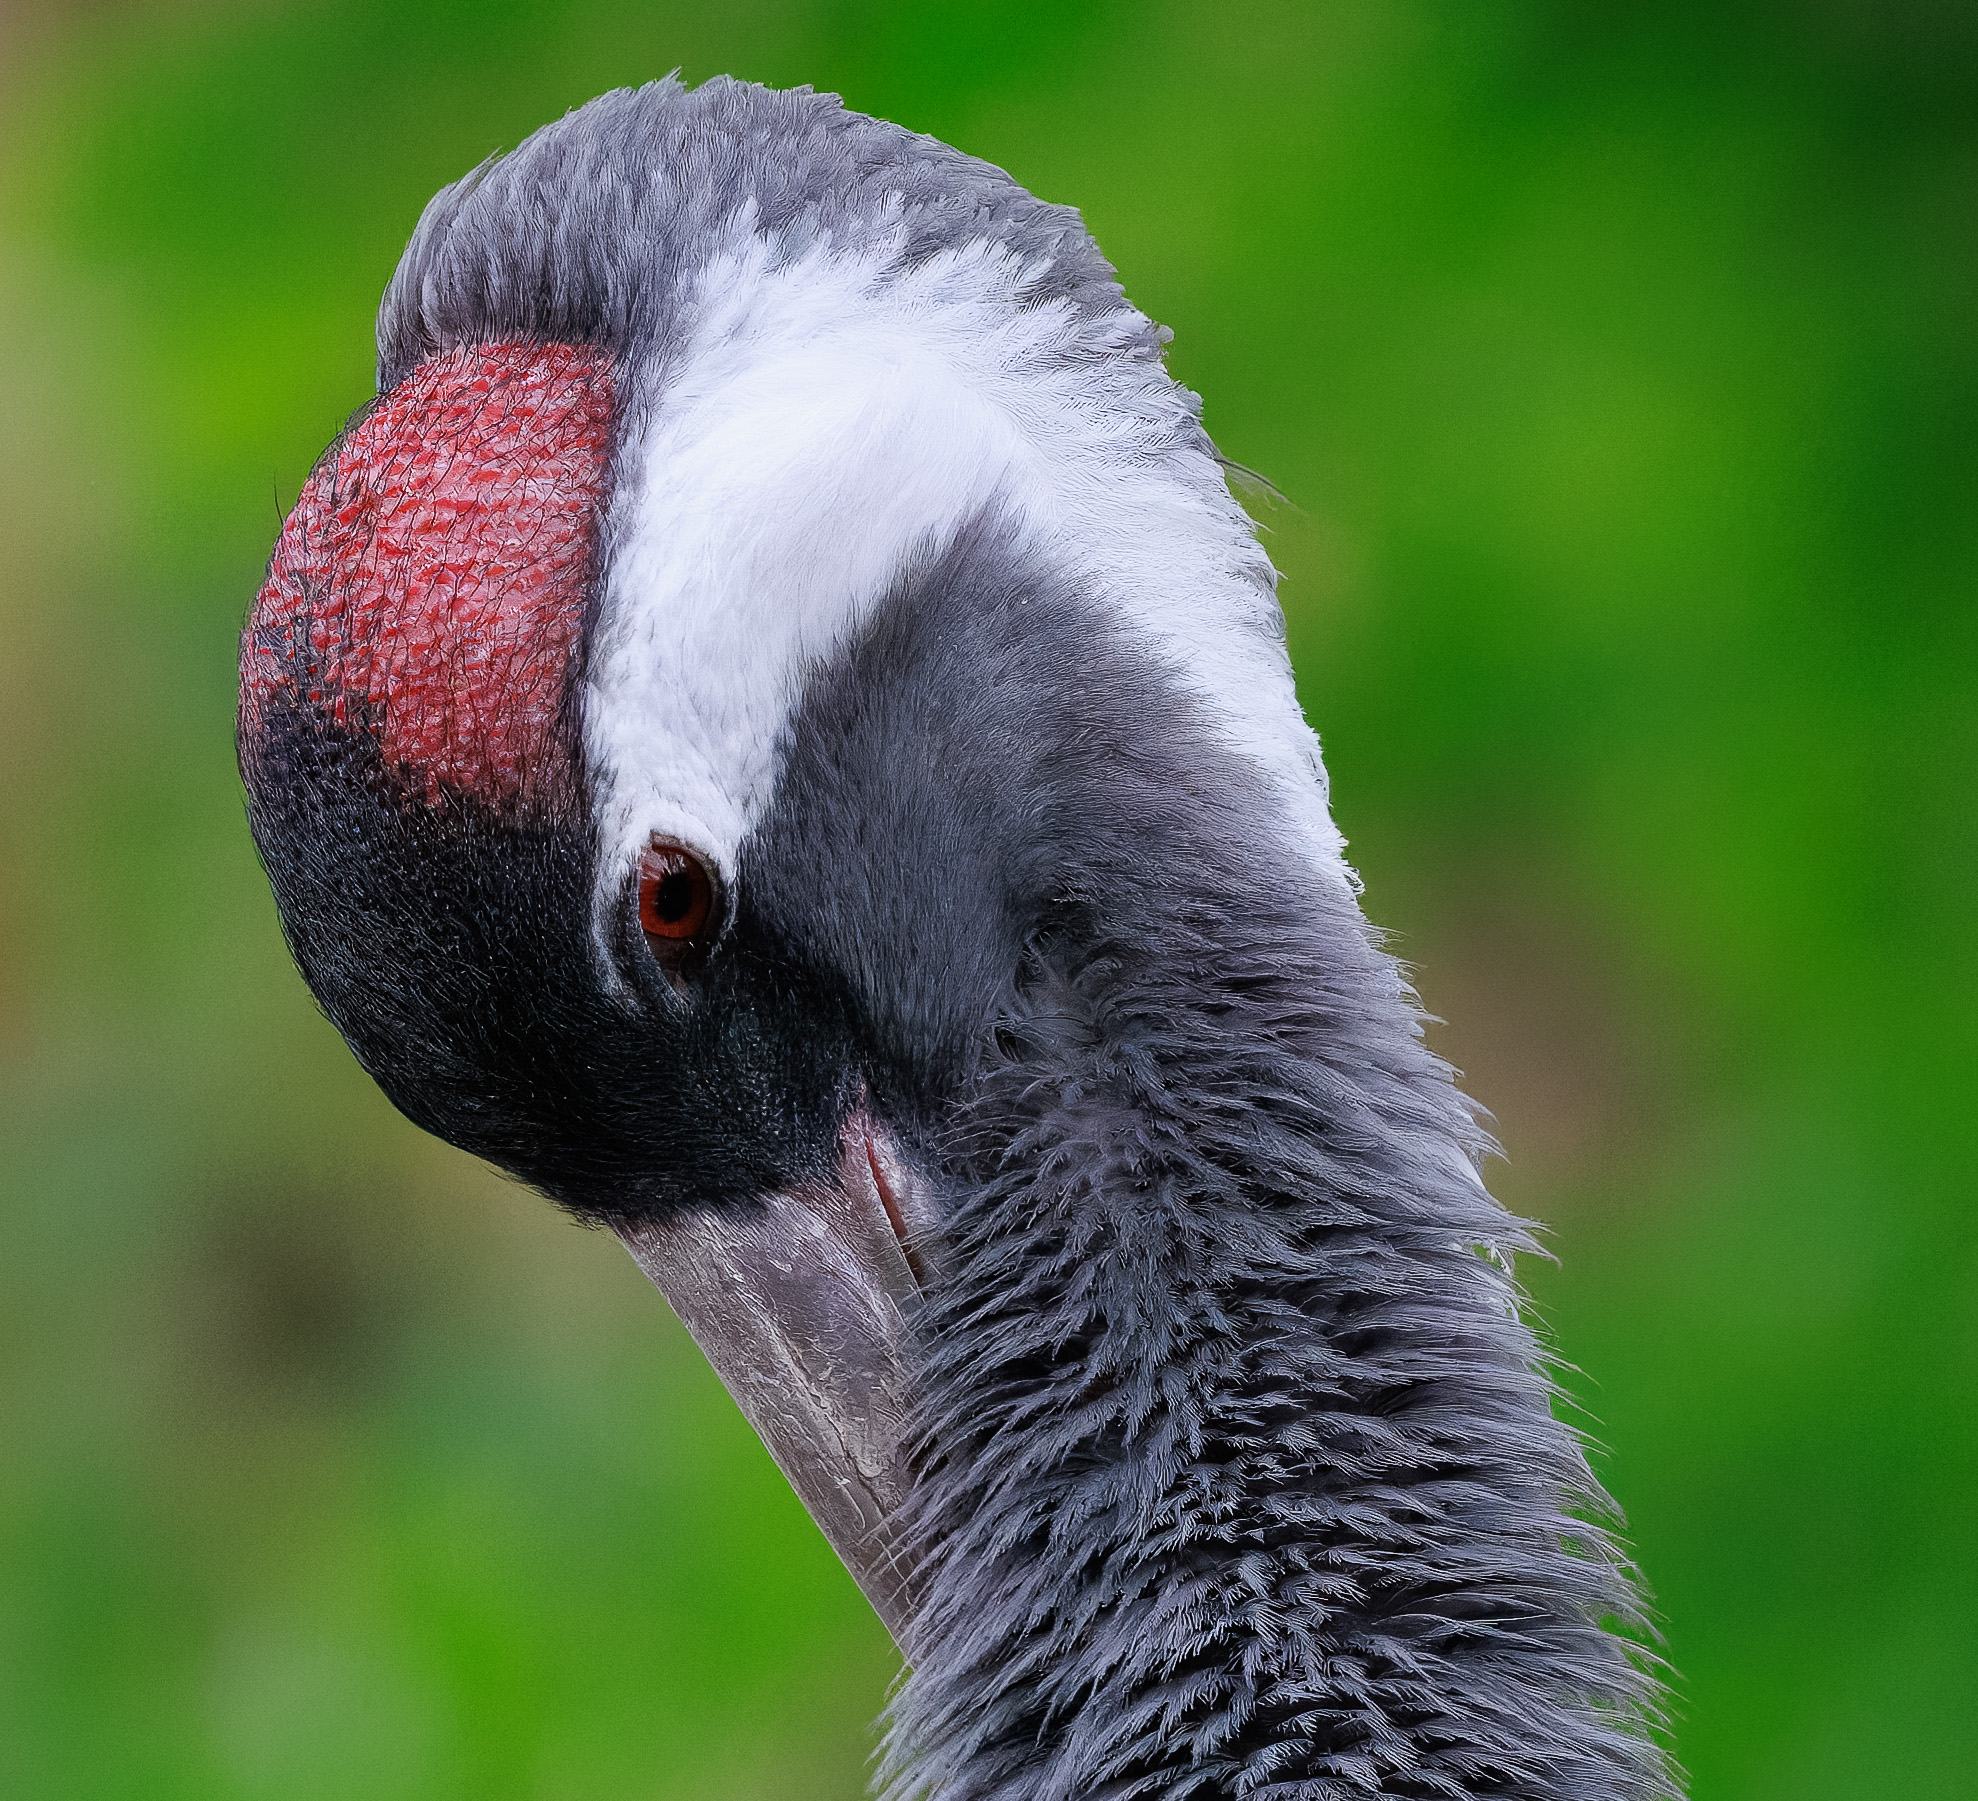
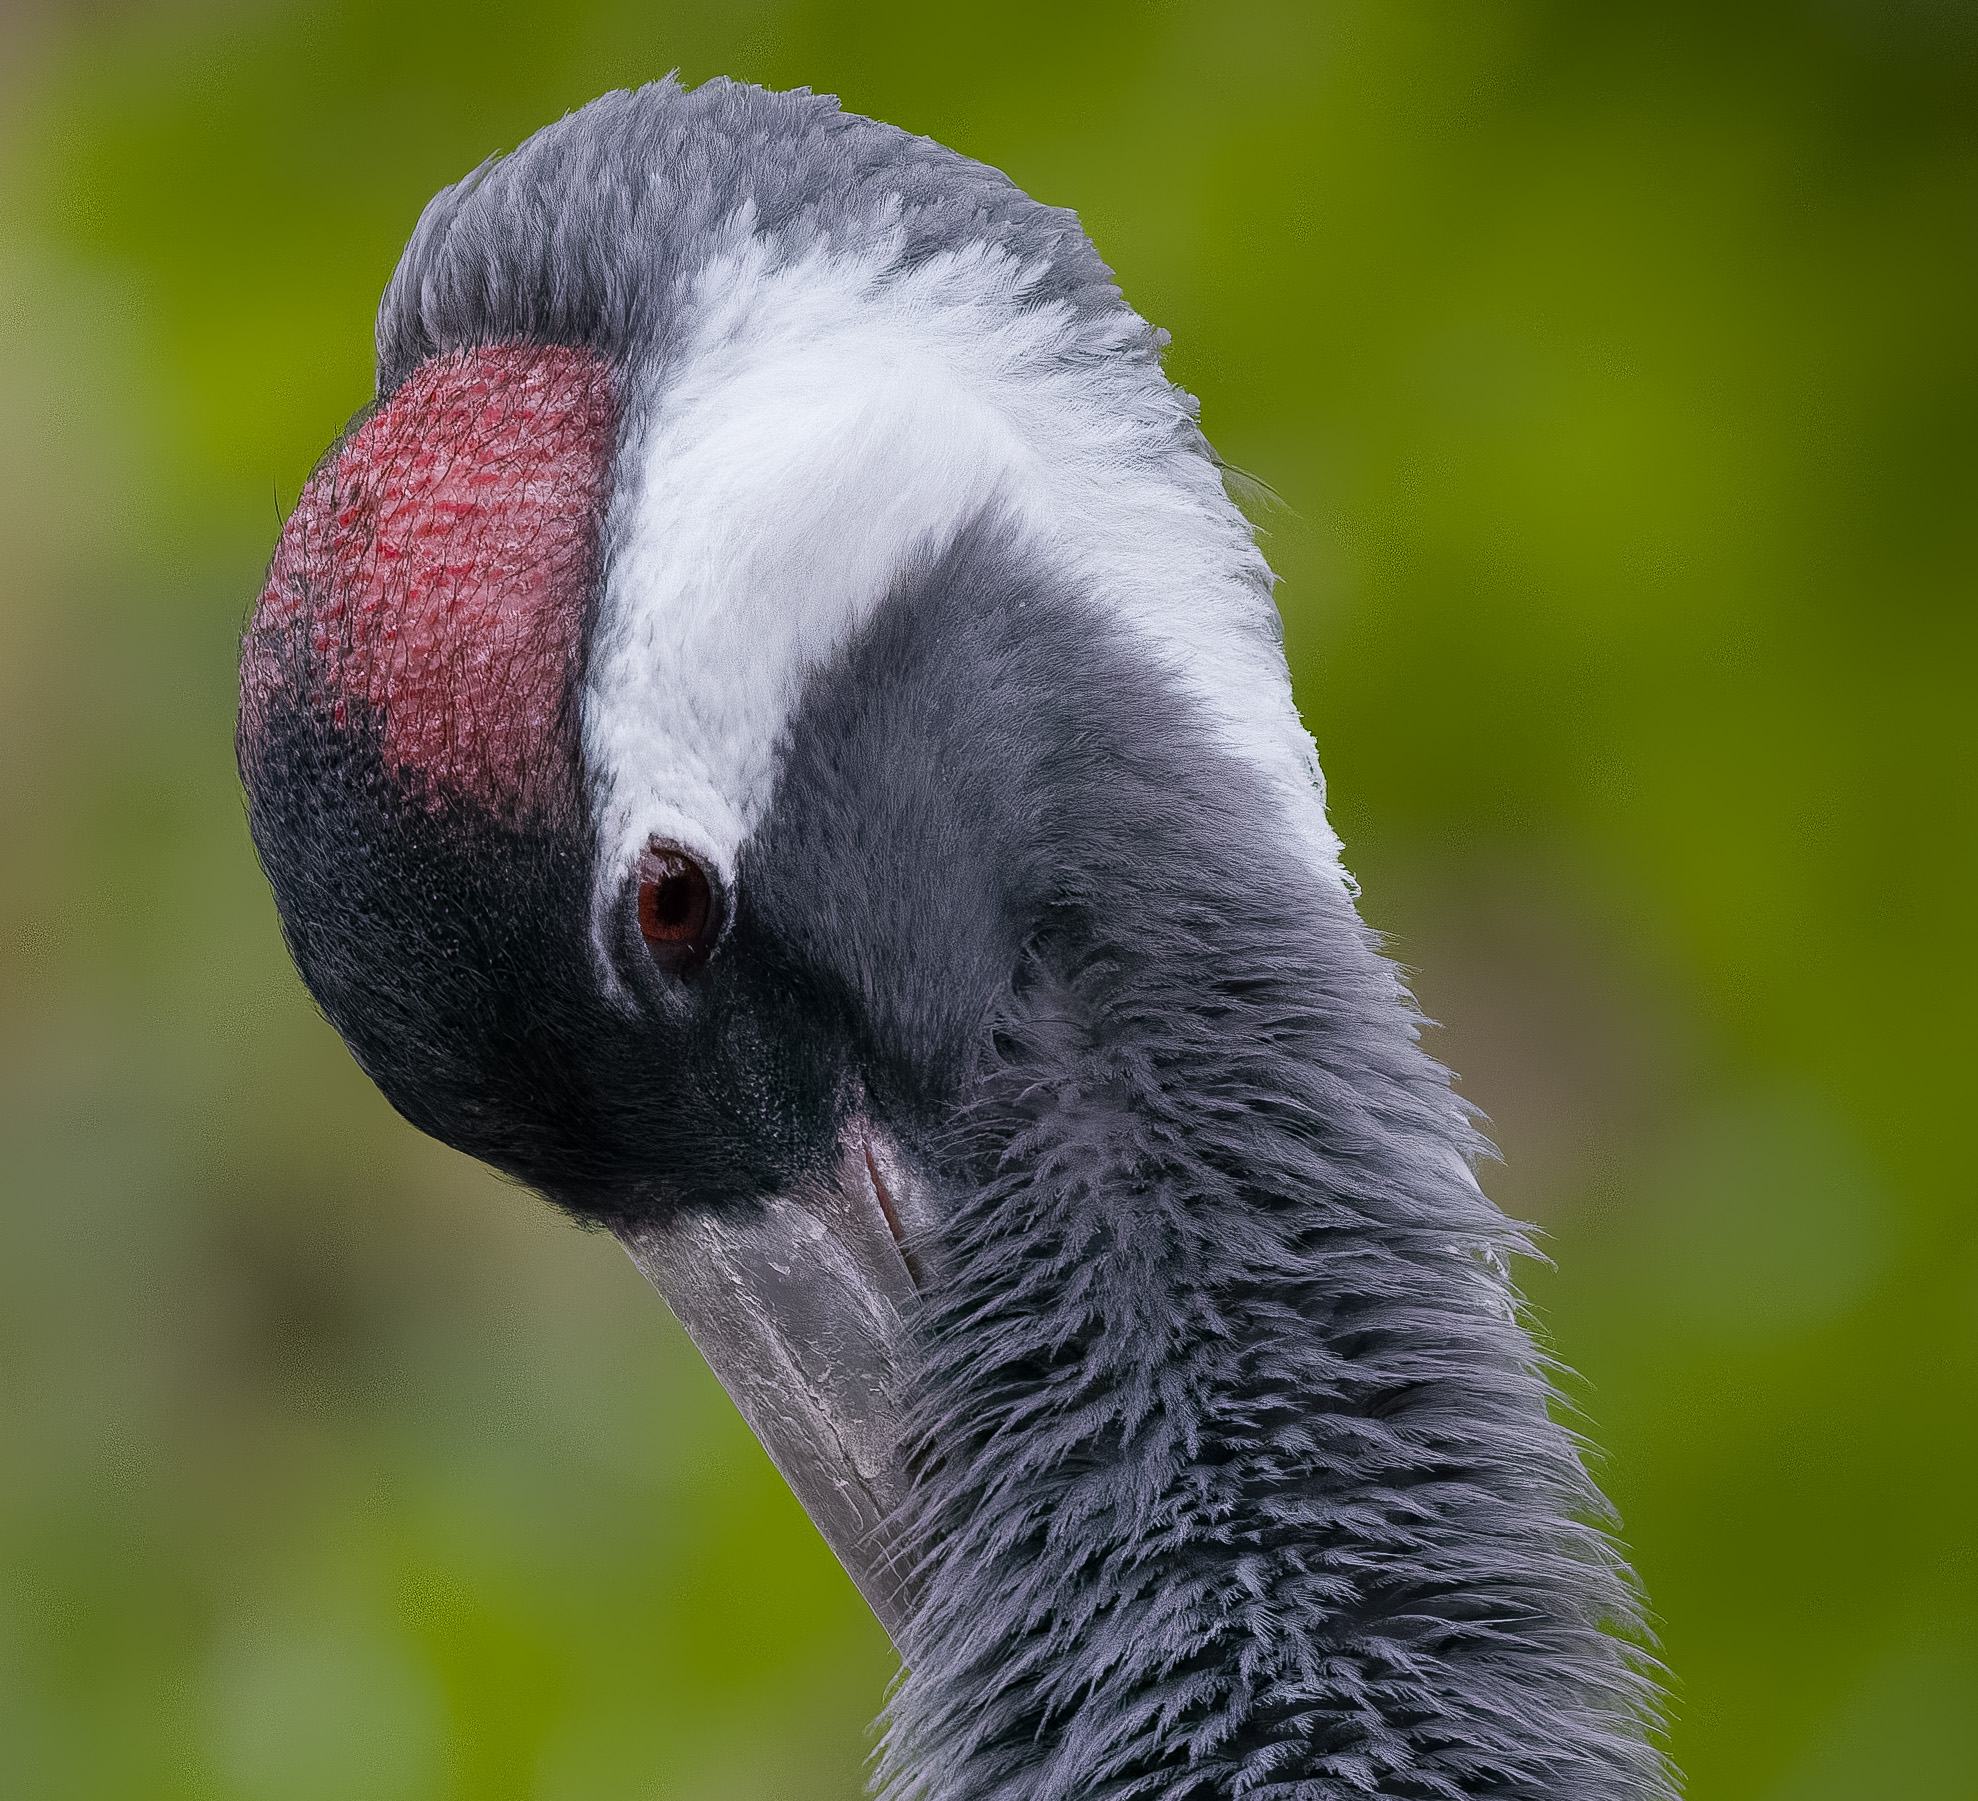
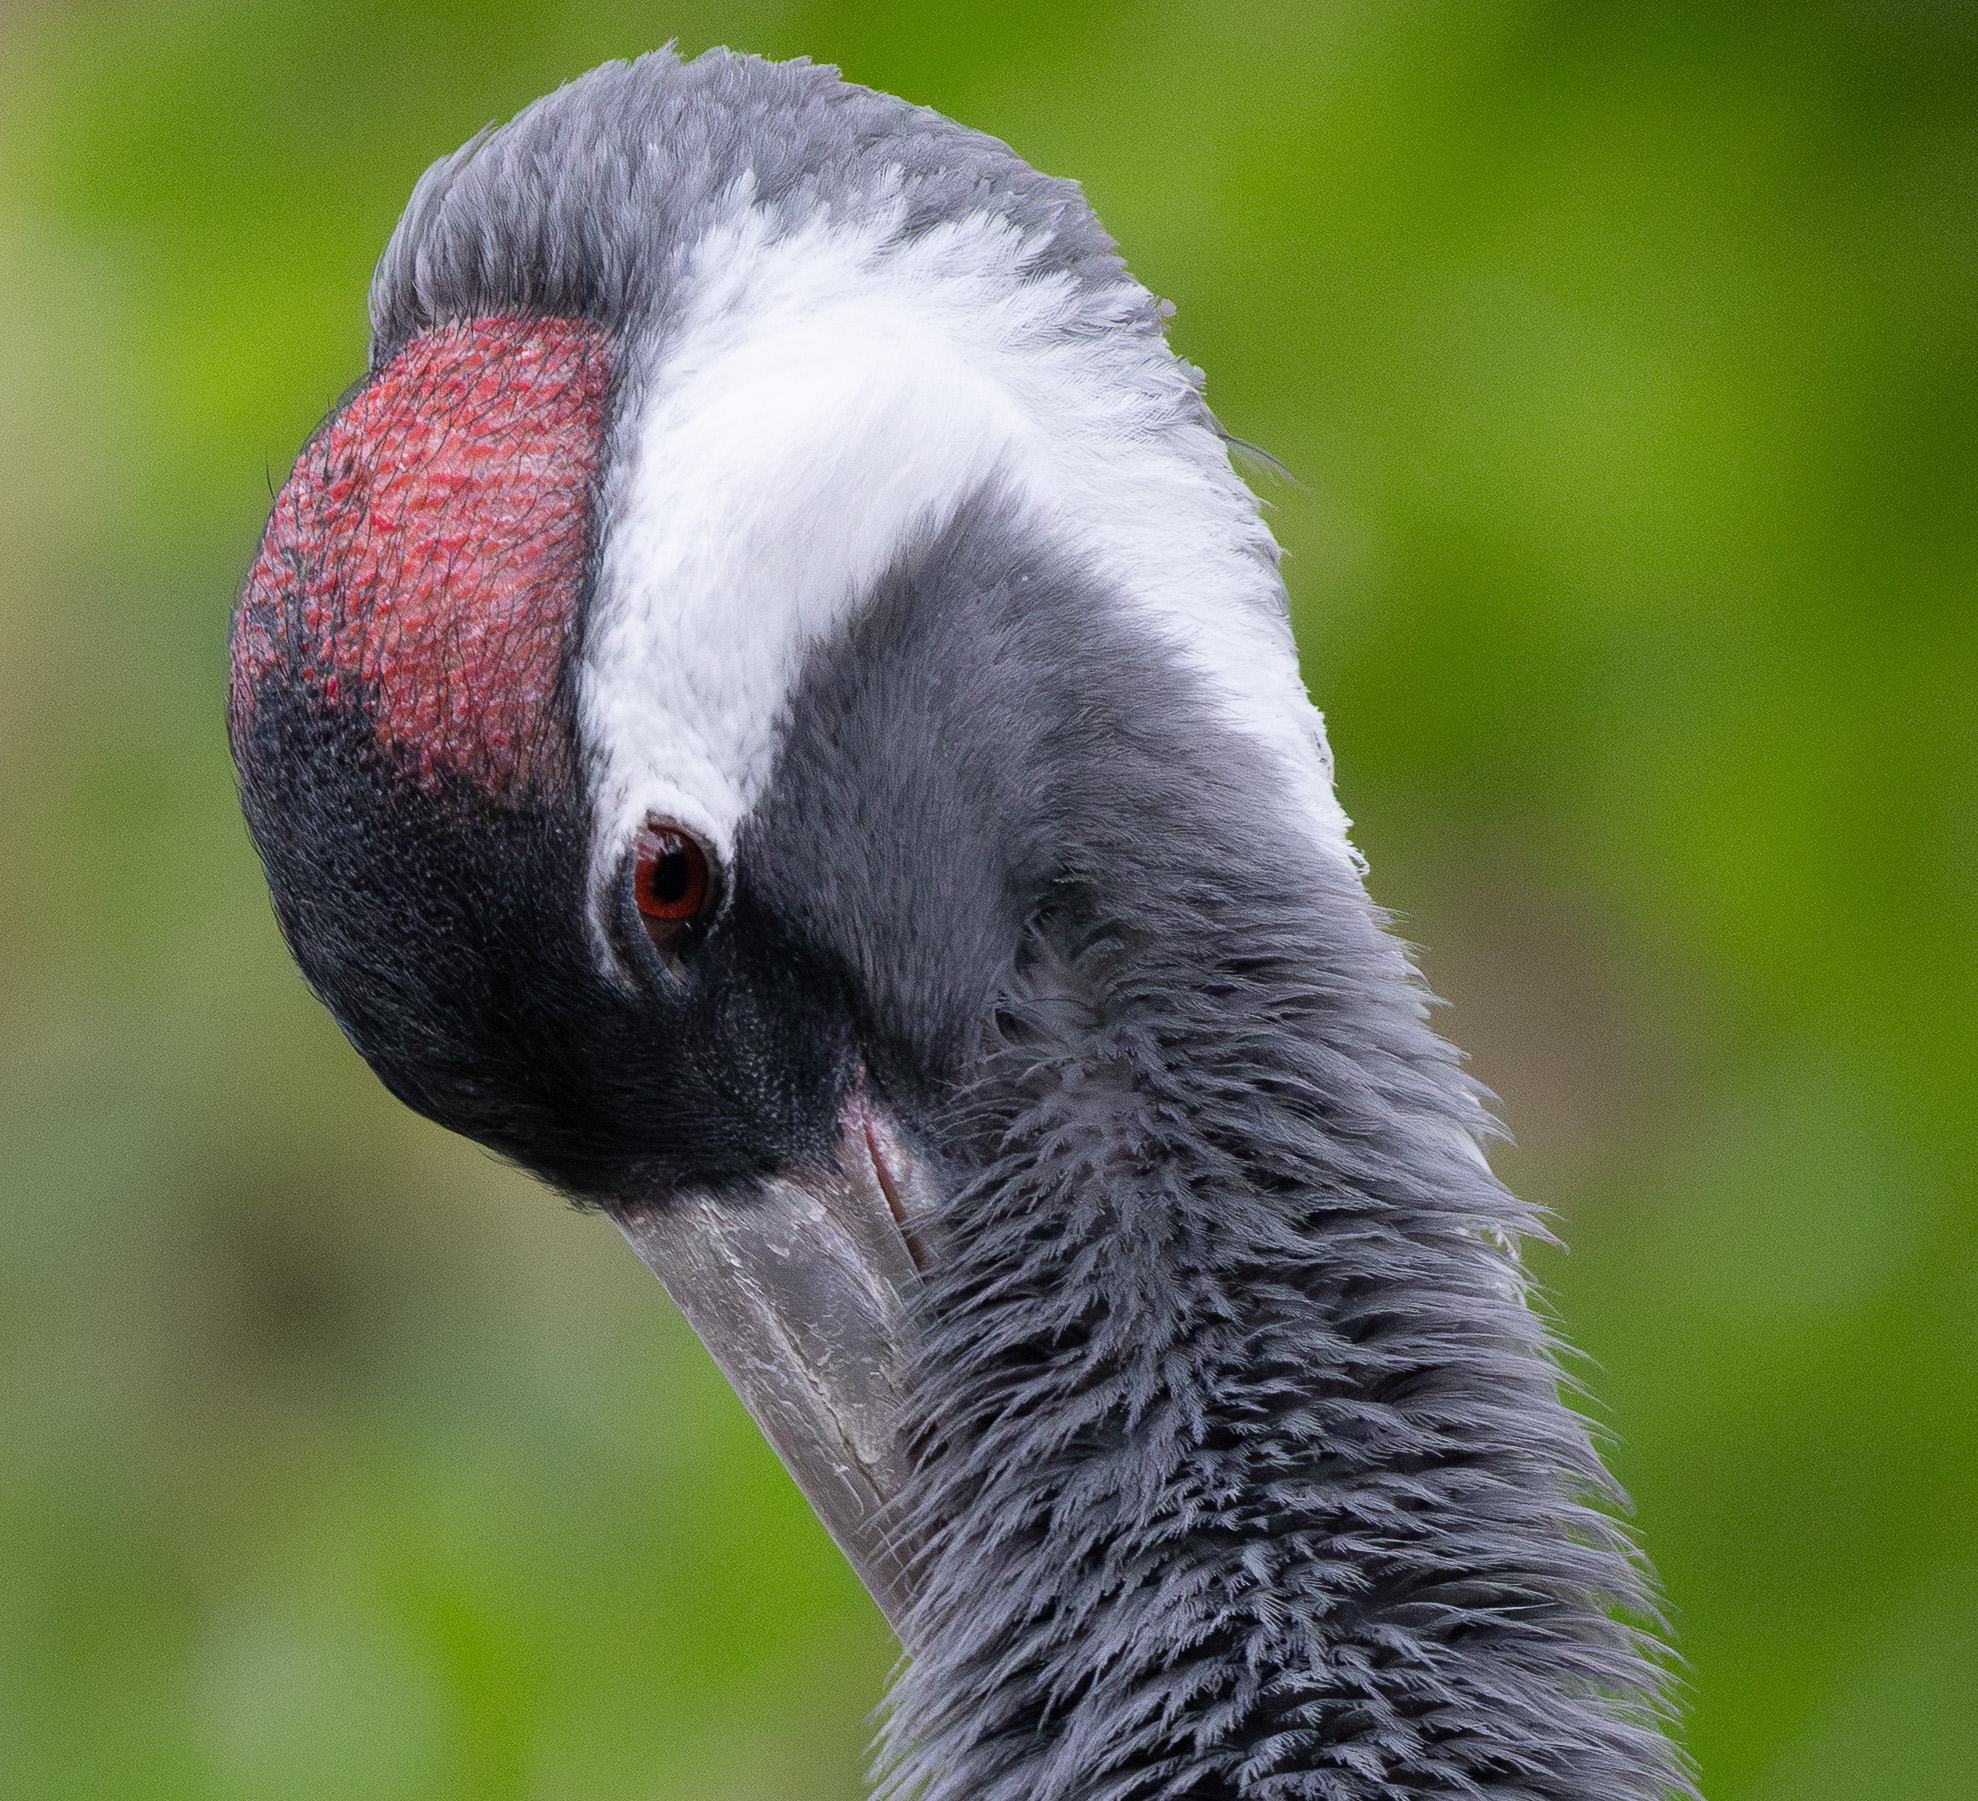
The third image is of a common crane preening itself. This was shot in relatively low light on a Canon EOS R5 at ISO 6400.

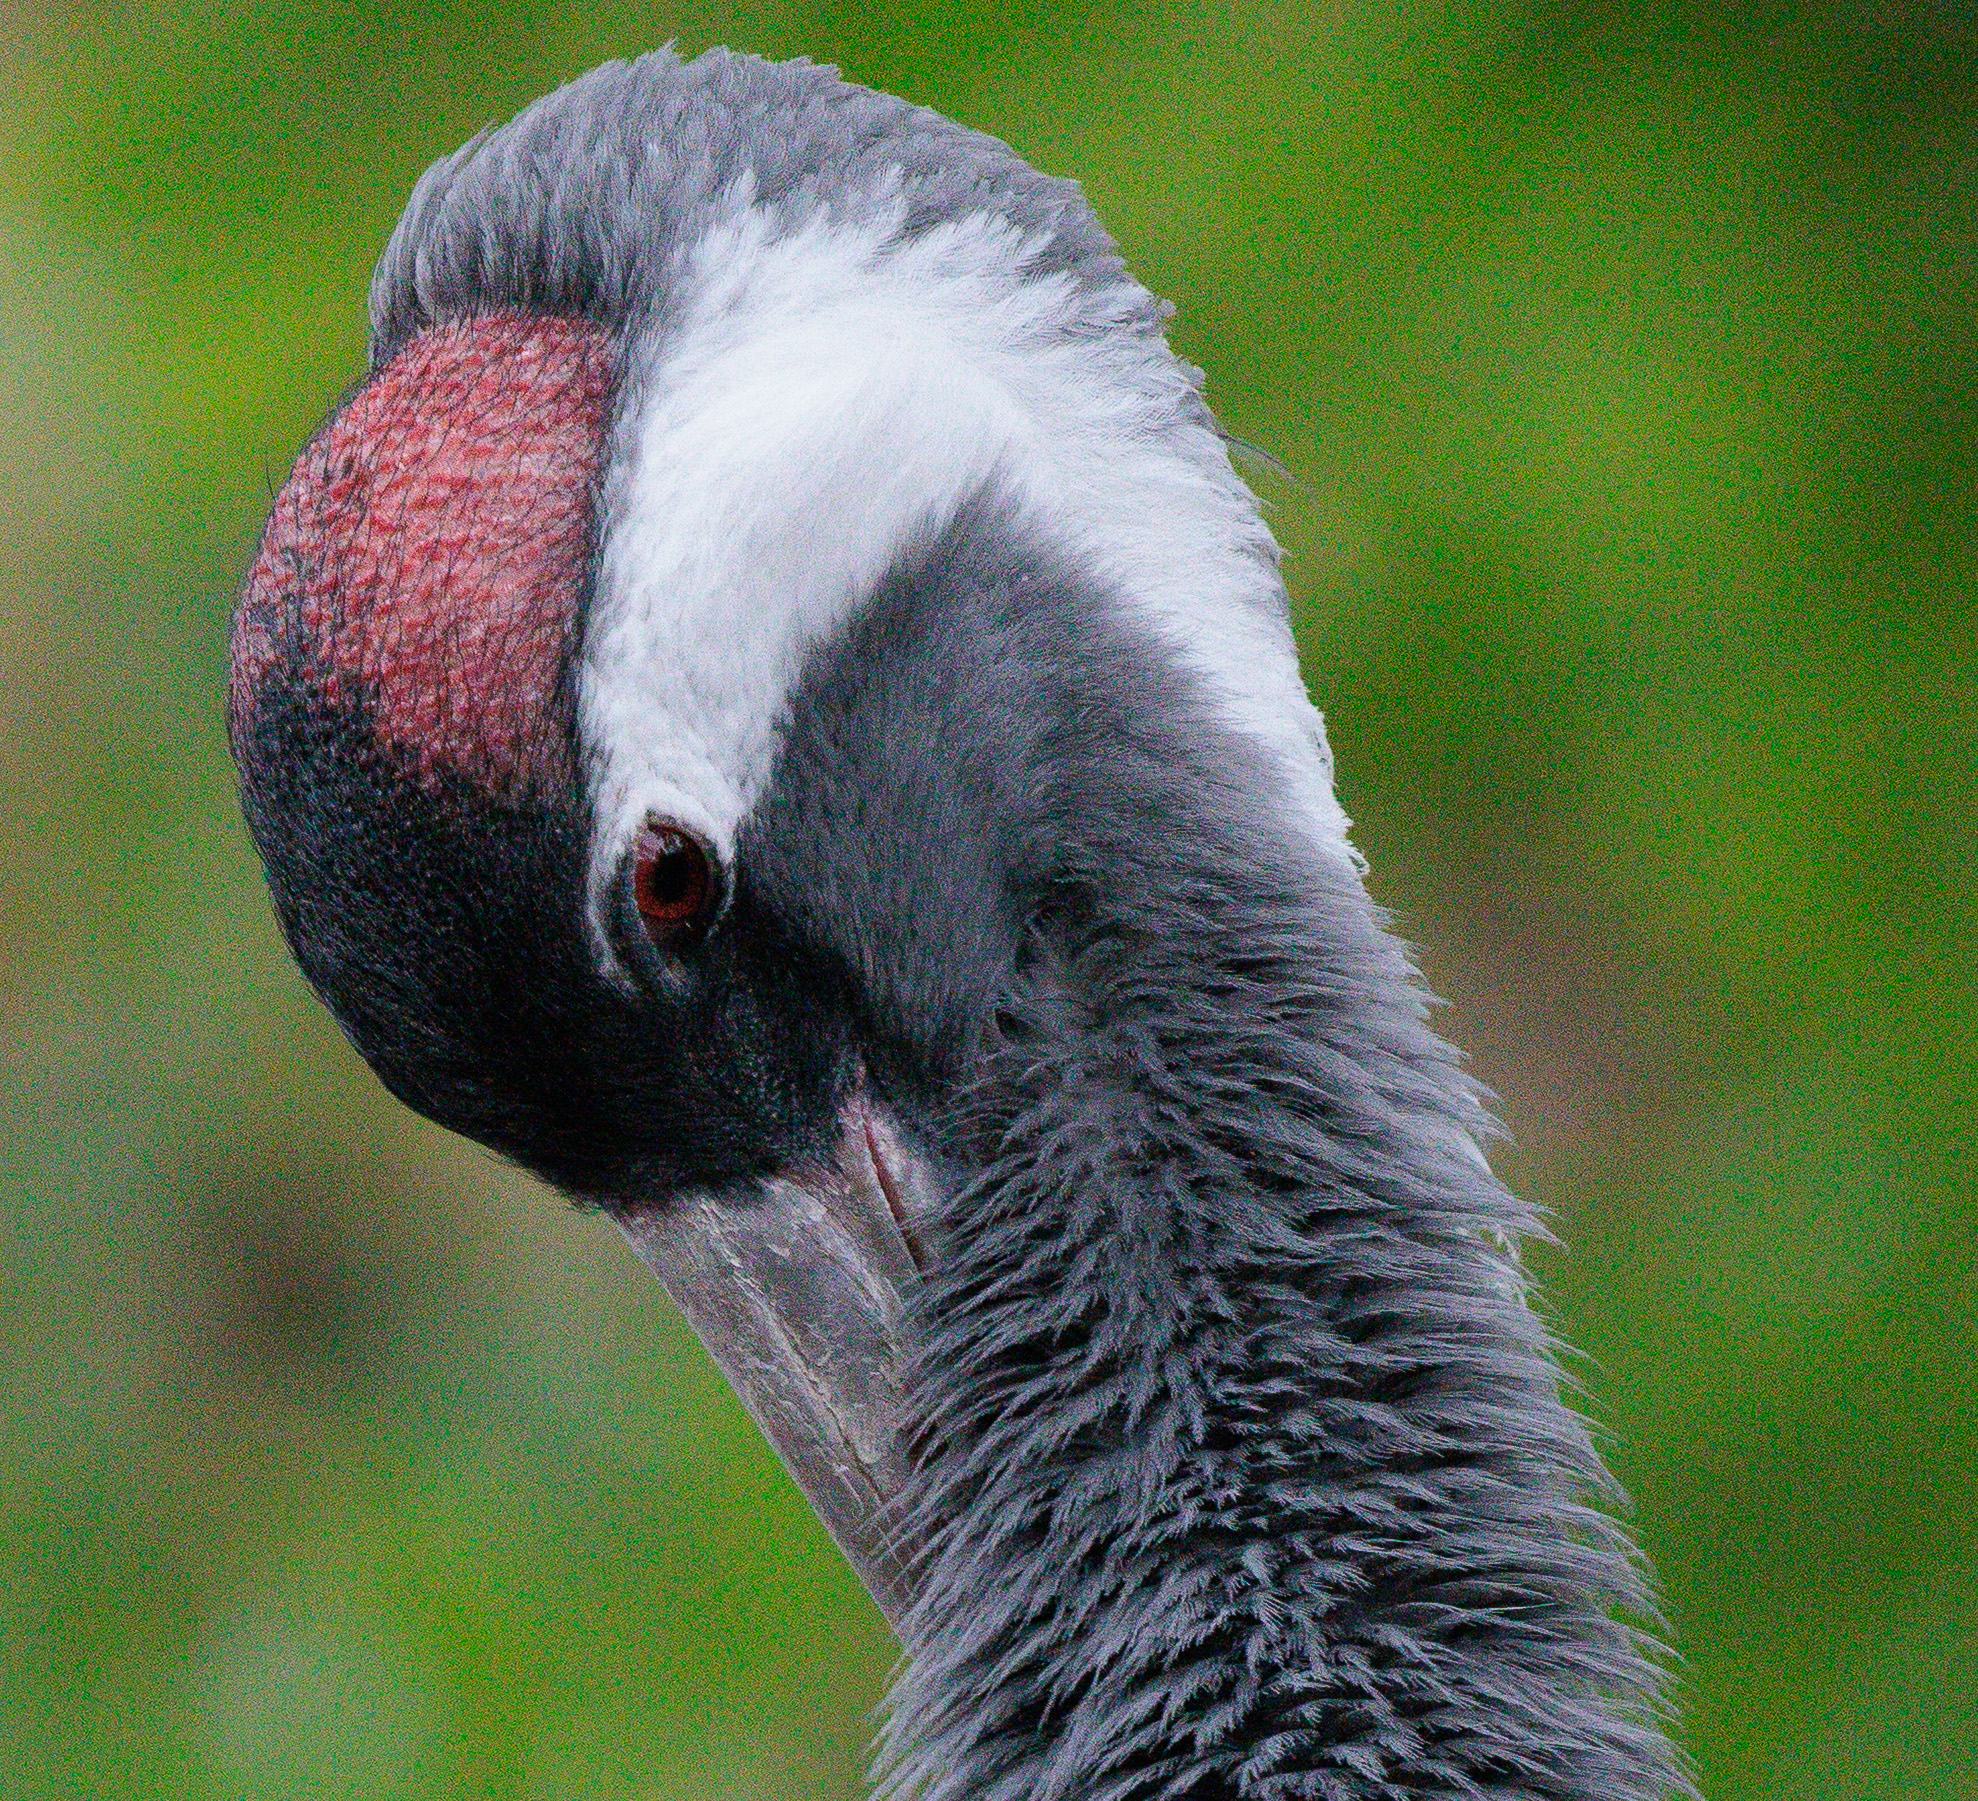

My preference from the above image versions is in the following order, but you should come to your own conclusion:
- DxO PureRAW DeepPRIME XD 2
- Topaz Photo
- DxO PureRAW DeepPRIME 3
- Lightroom Denoise AI
- On1 NoNoise AI
This was a very tough one to call and honestly, I felt that the results from DxO DeepPRIME XD 2 were the best, followed by Topaz Photo. DeepPRIME 3 and Lightroom are very close. On1 NoNoise AI continues to introduce odd artefacts in my tests which are not ideal.
Noise Reduction Test Image 4
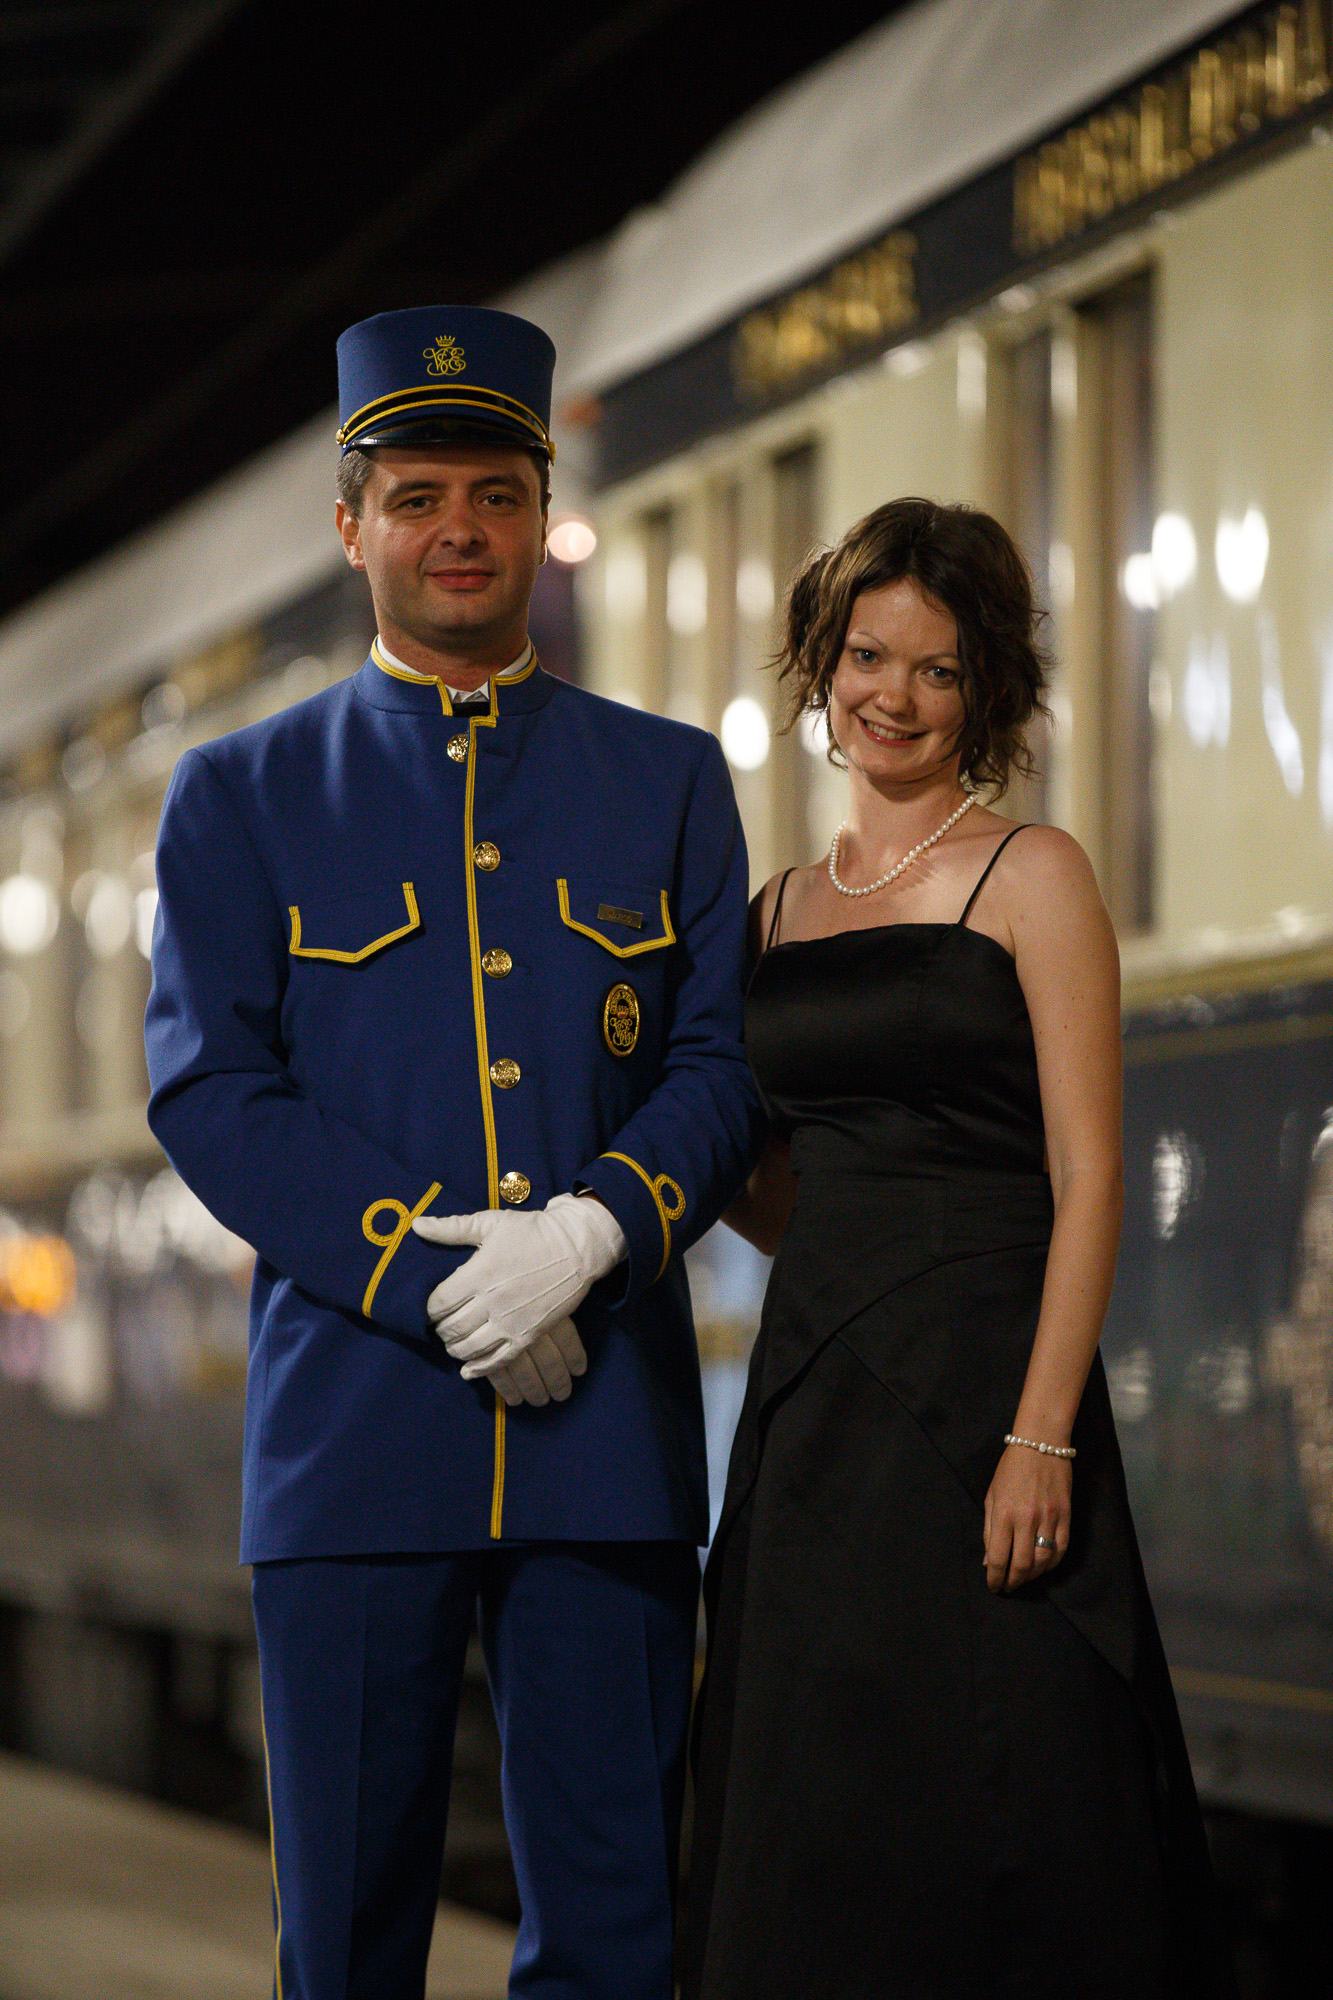
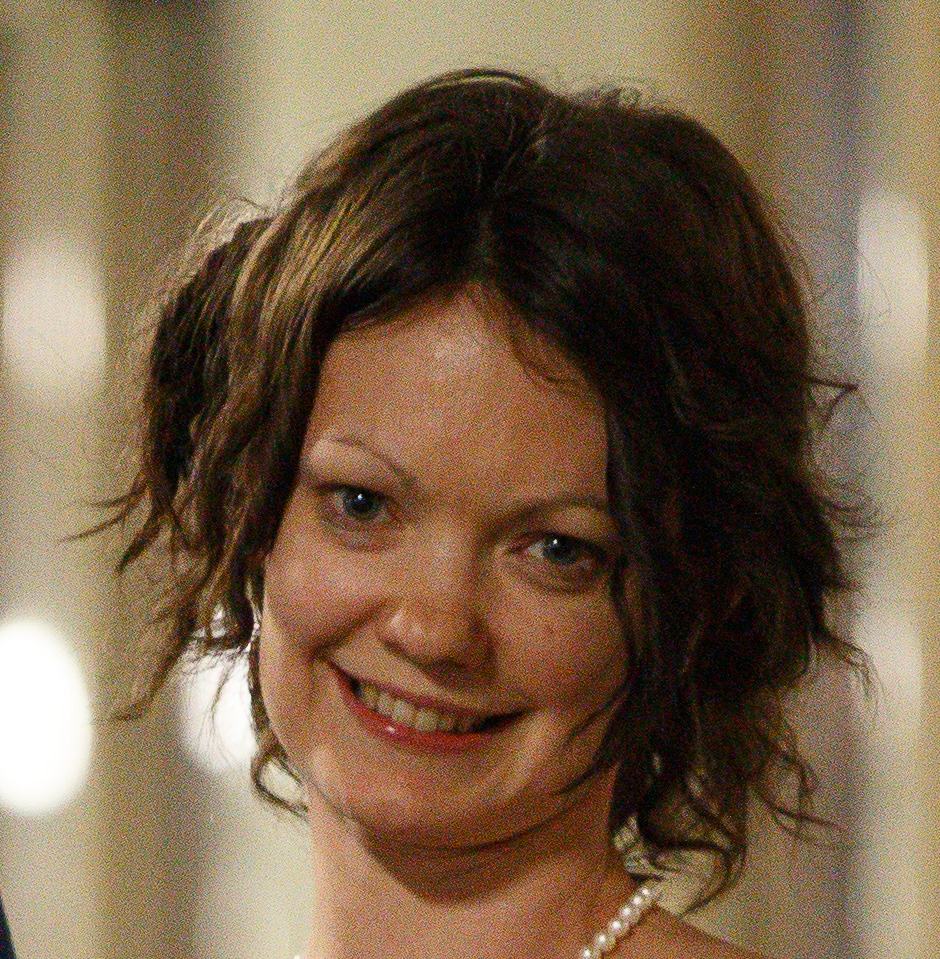
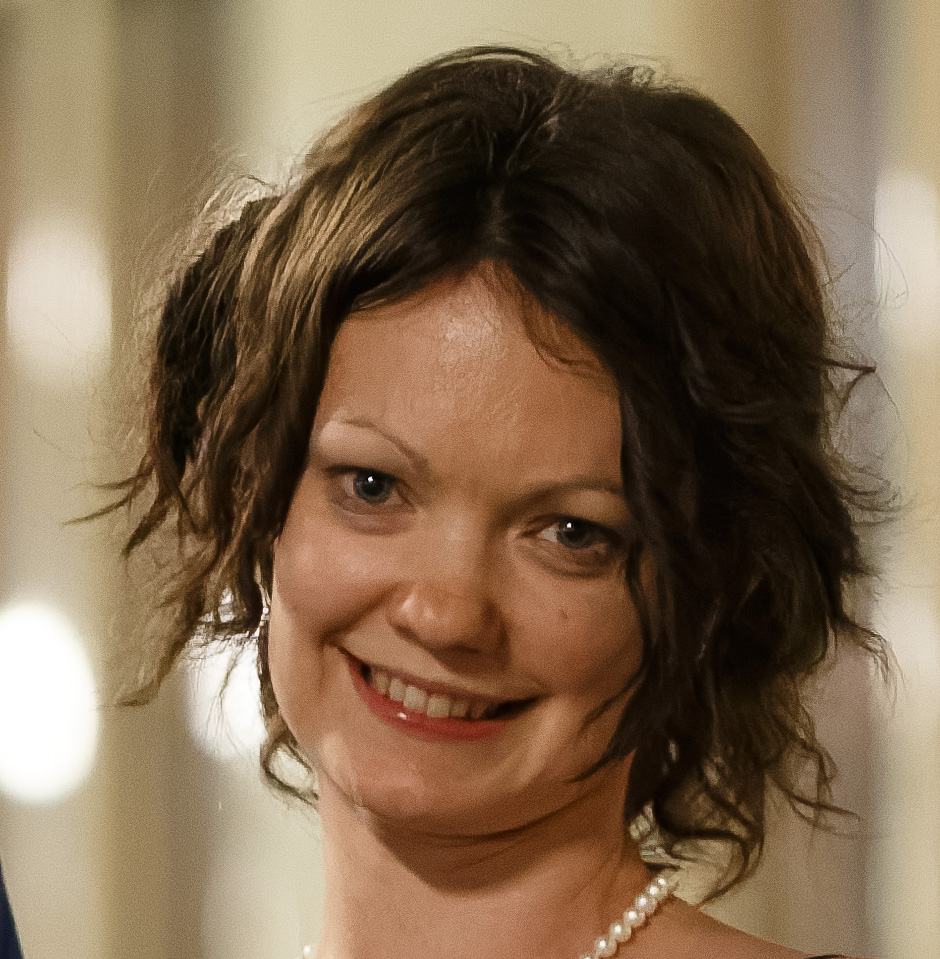
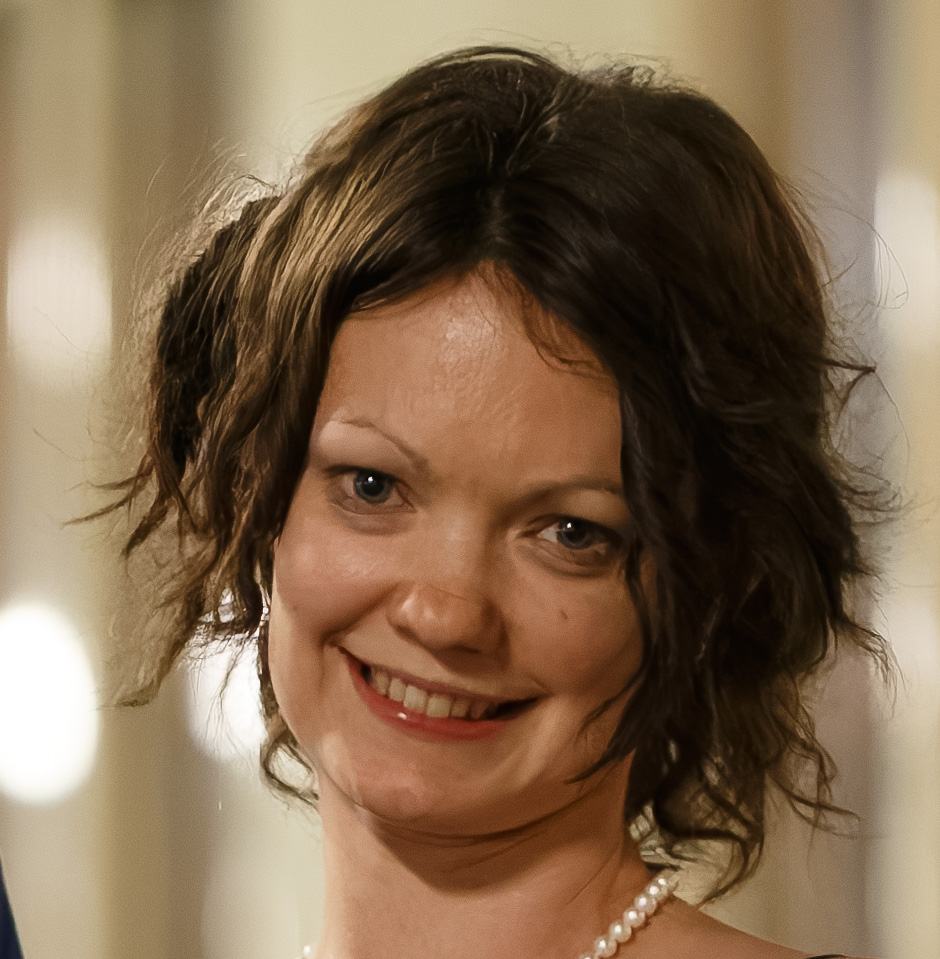
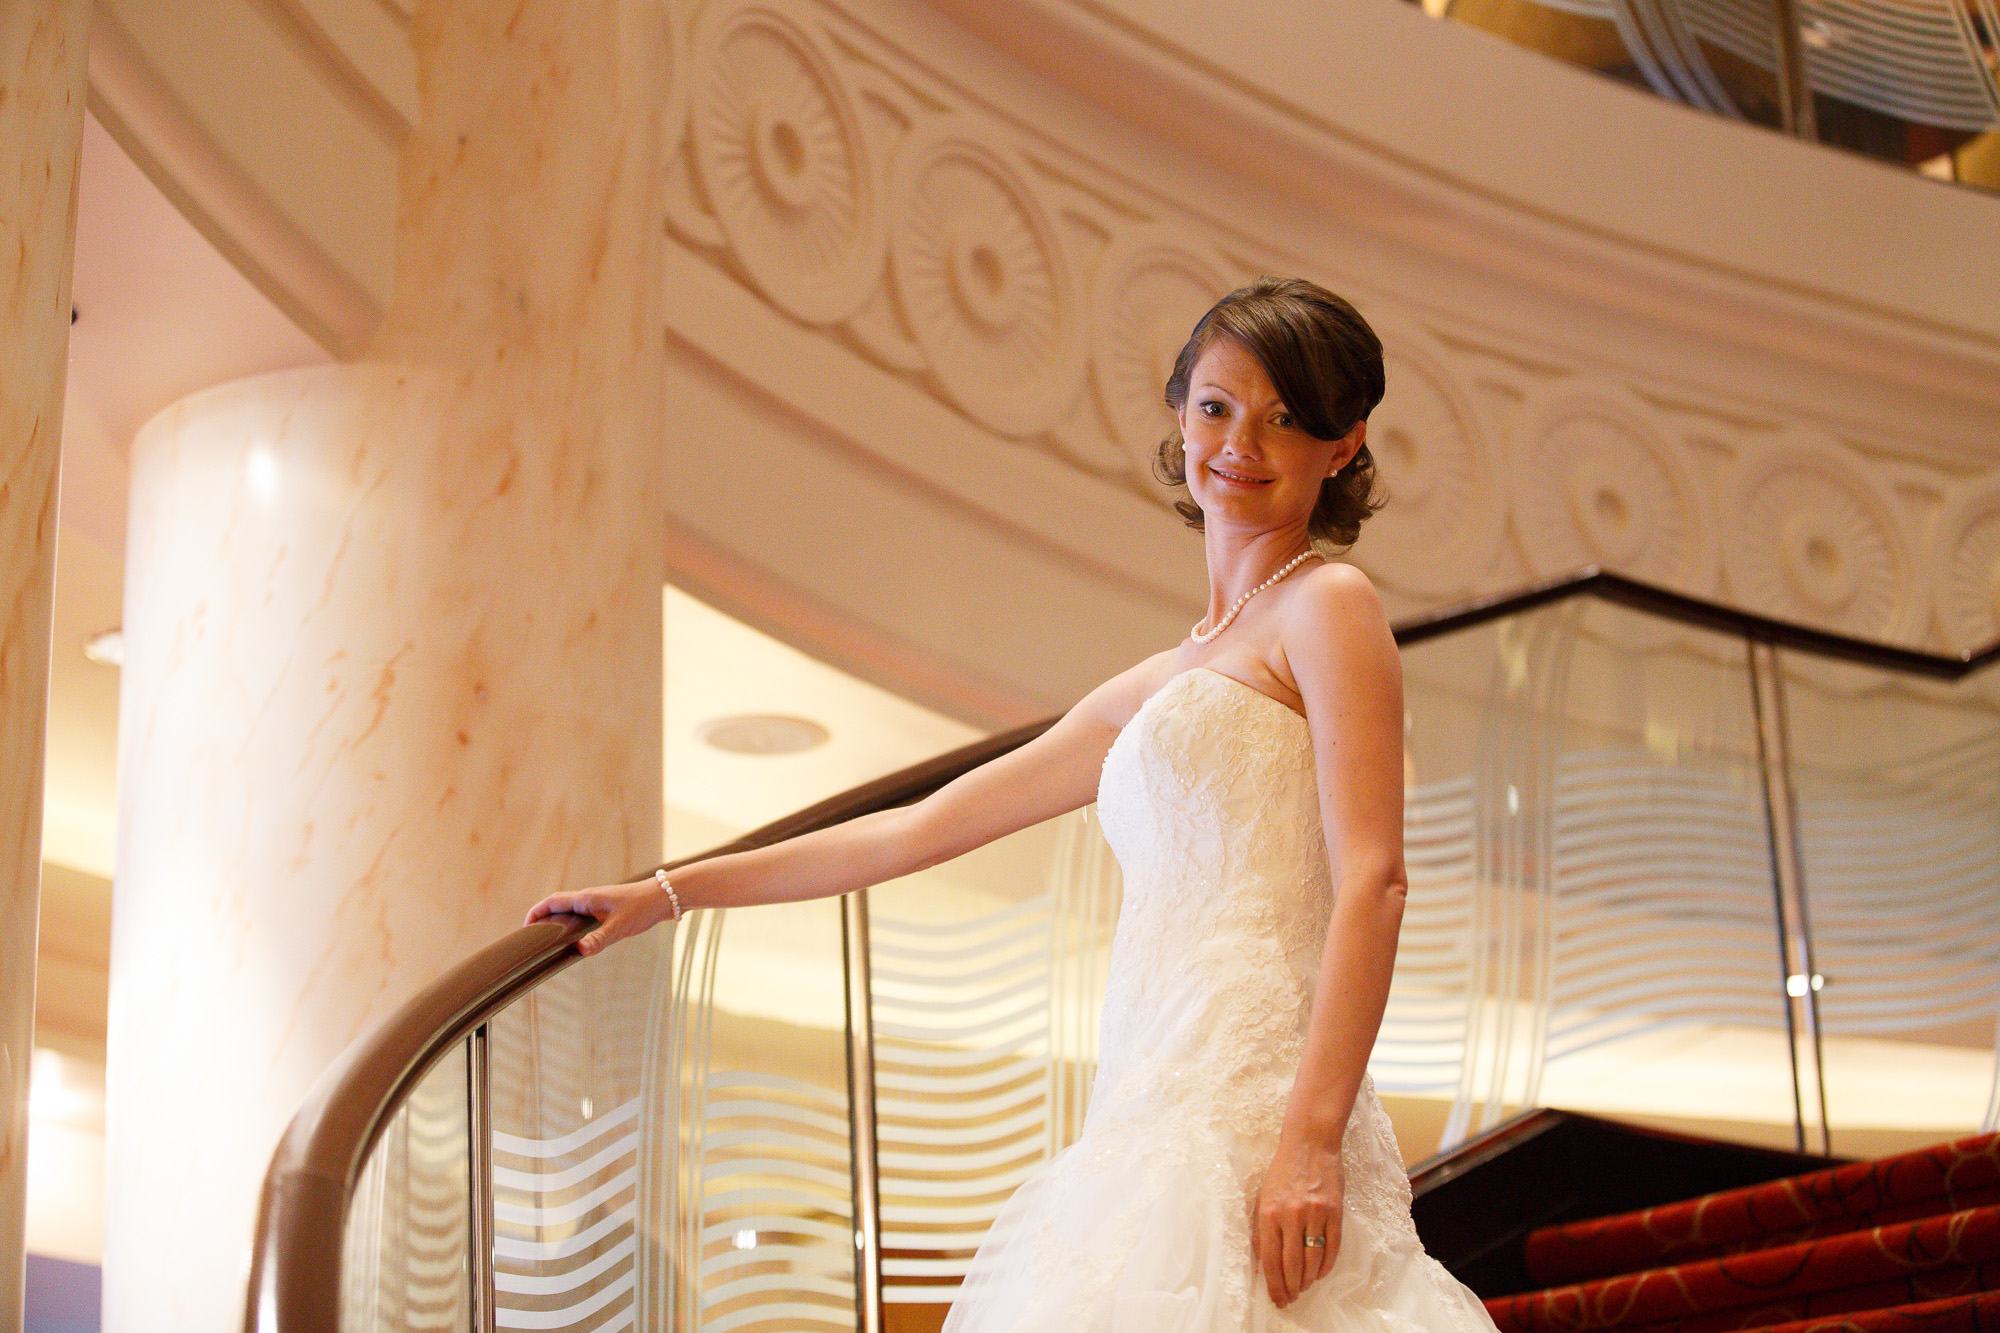
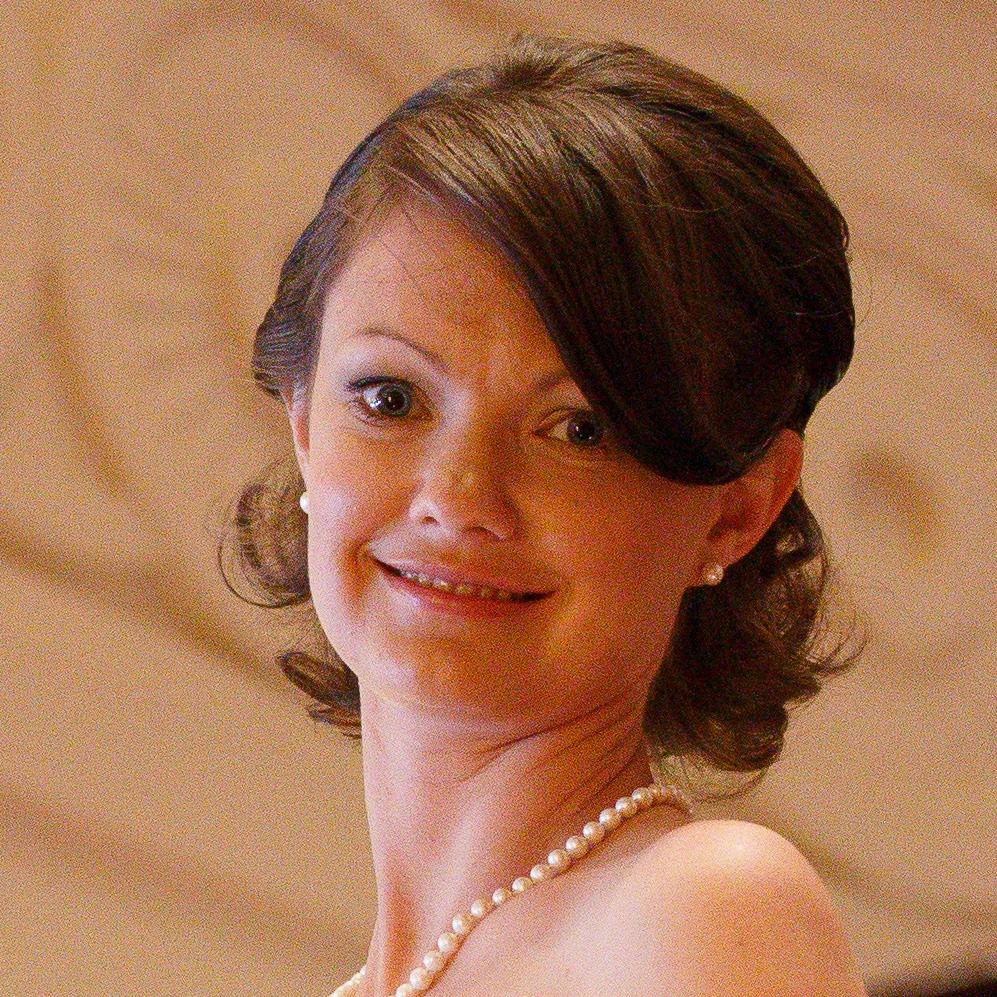
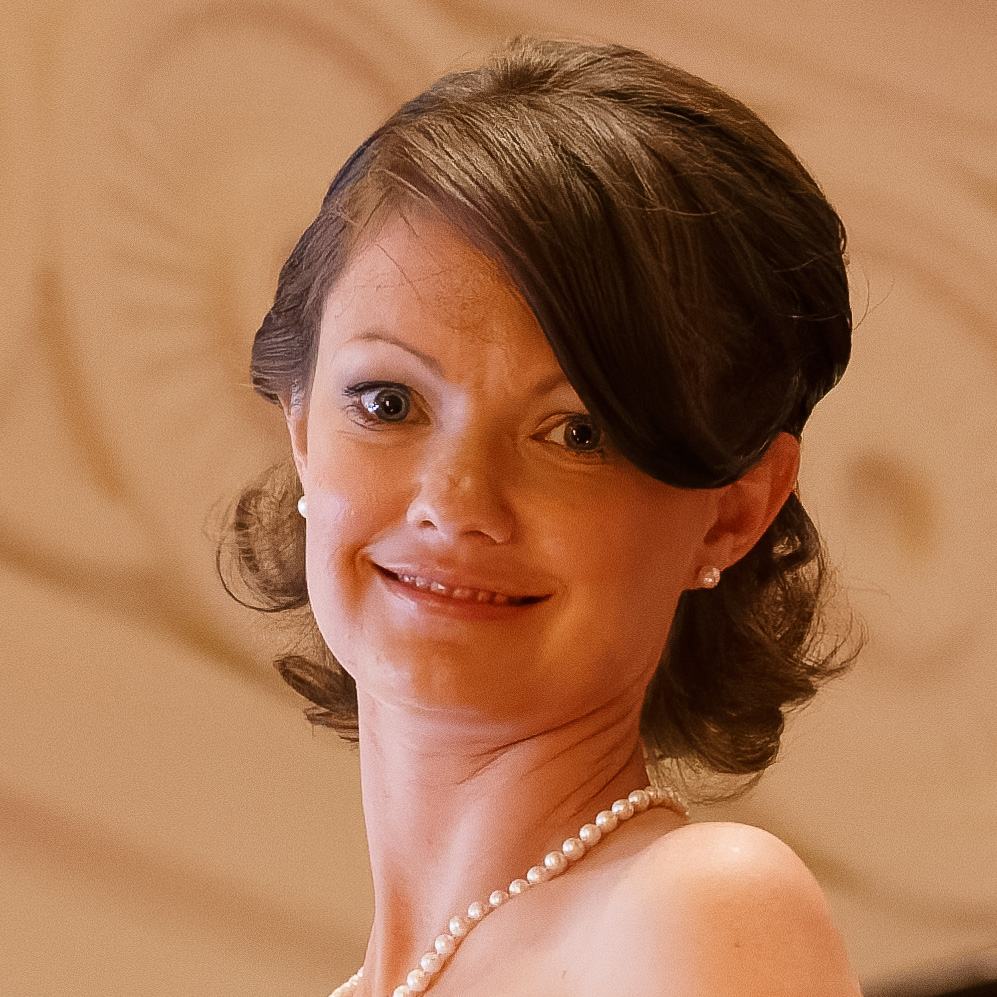
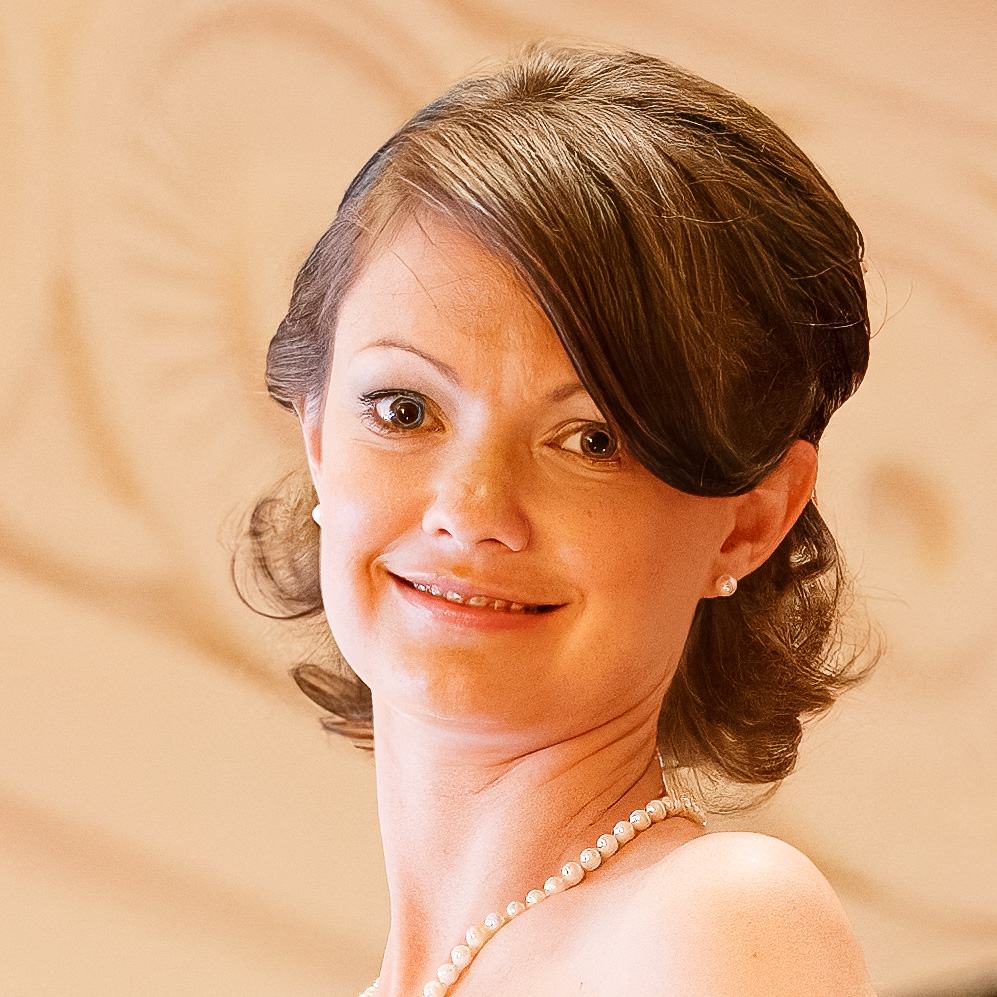
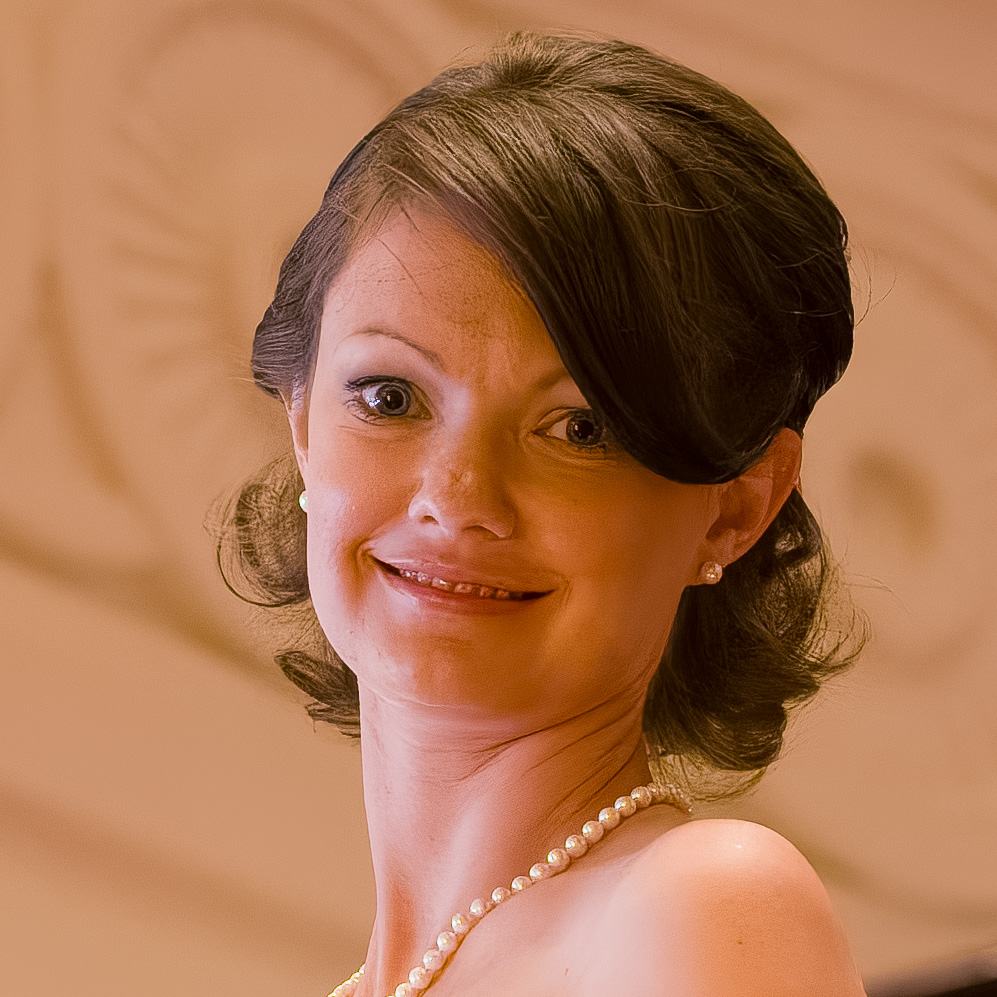
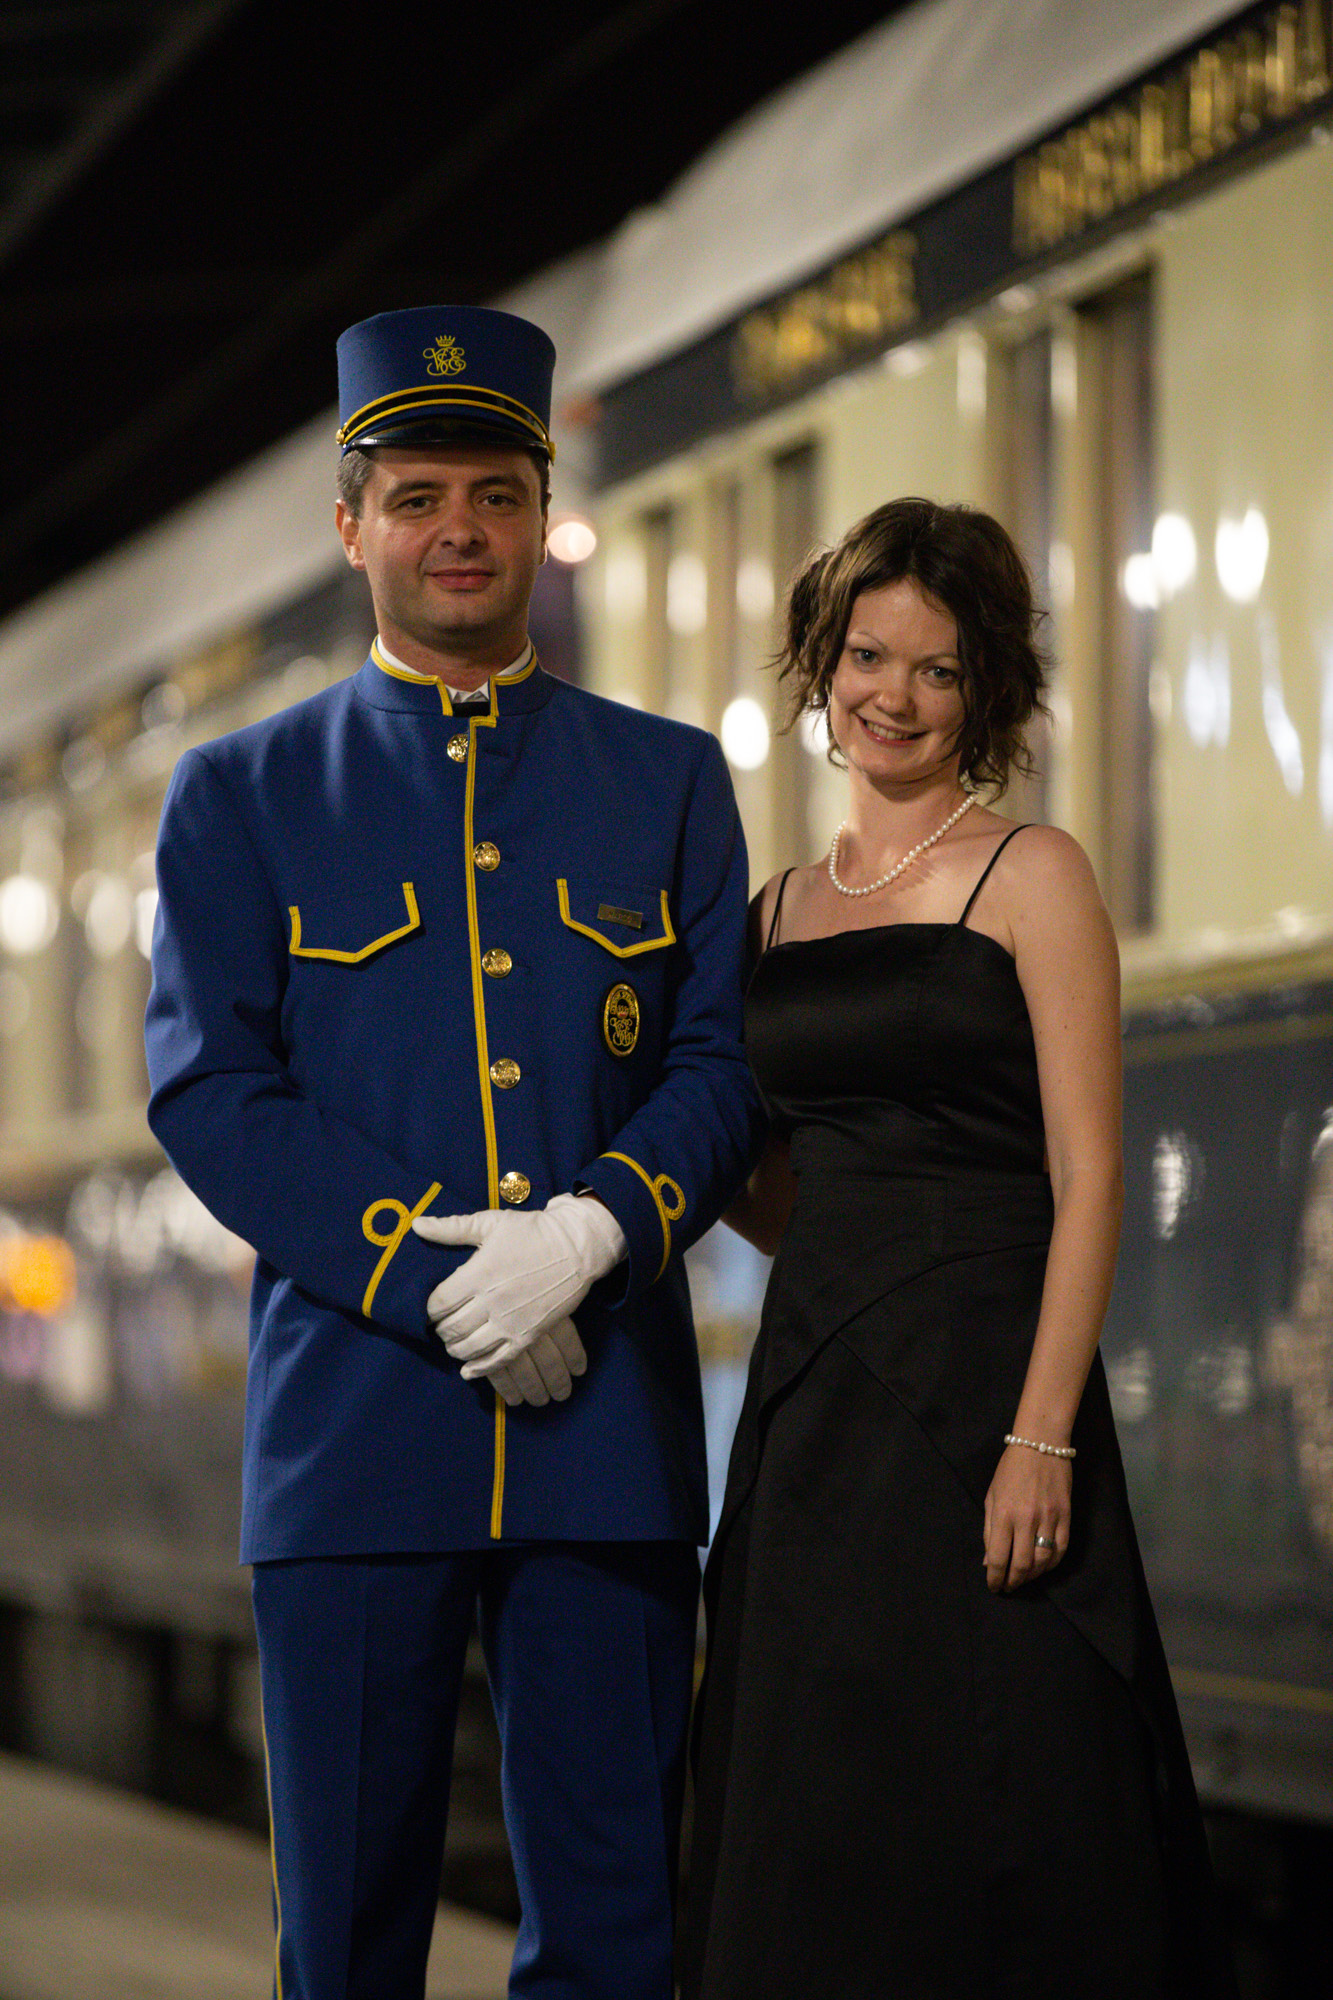
People are one of the more challenging subjects for noise reduction tools to get right. We are highly attuned to skin tones and how people’s faces look, and even slight errors can ruin an image. Let’s see how these tools do with this image, shot at Paris train station at night on a Canon EOS 6D at 6400 ISO.
This shot was taken of my wife who has a light skin tone. The tools may work differently with other skin tones, so for those who shoot a lot of portrait and people photos I’d recommend testing against a variety of skin tones.
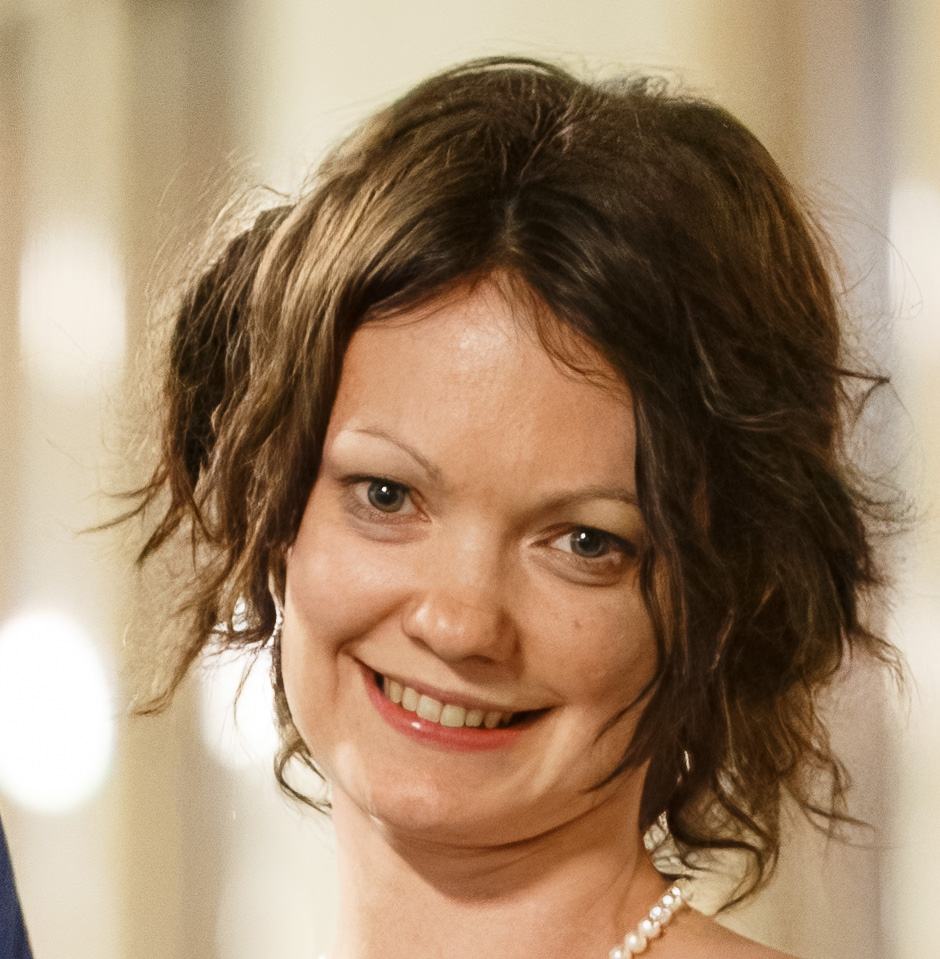
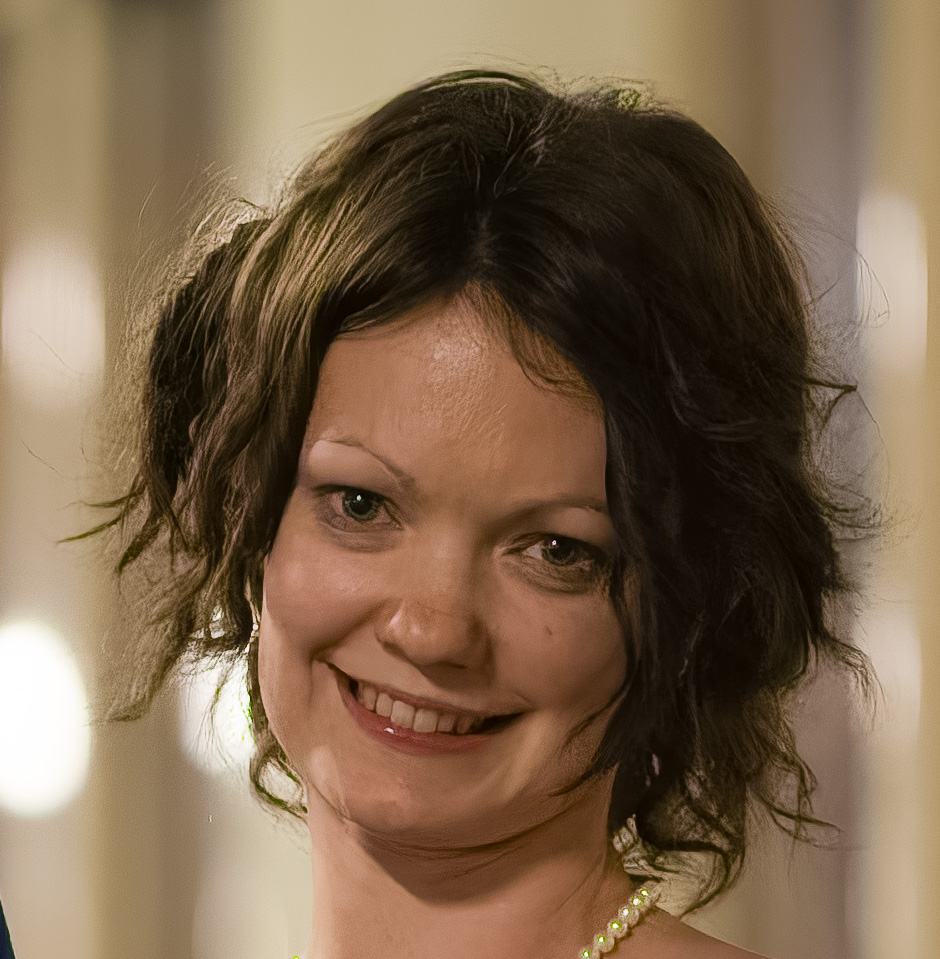
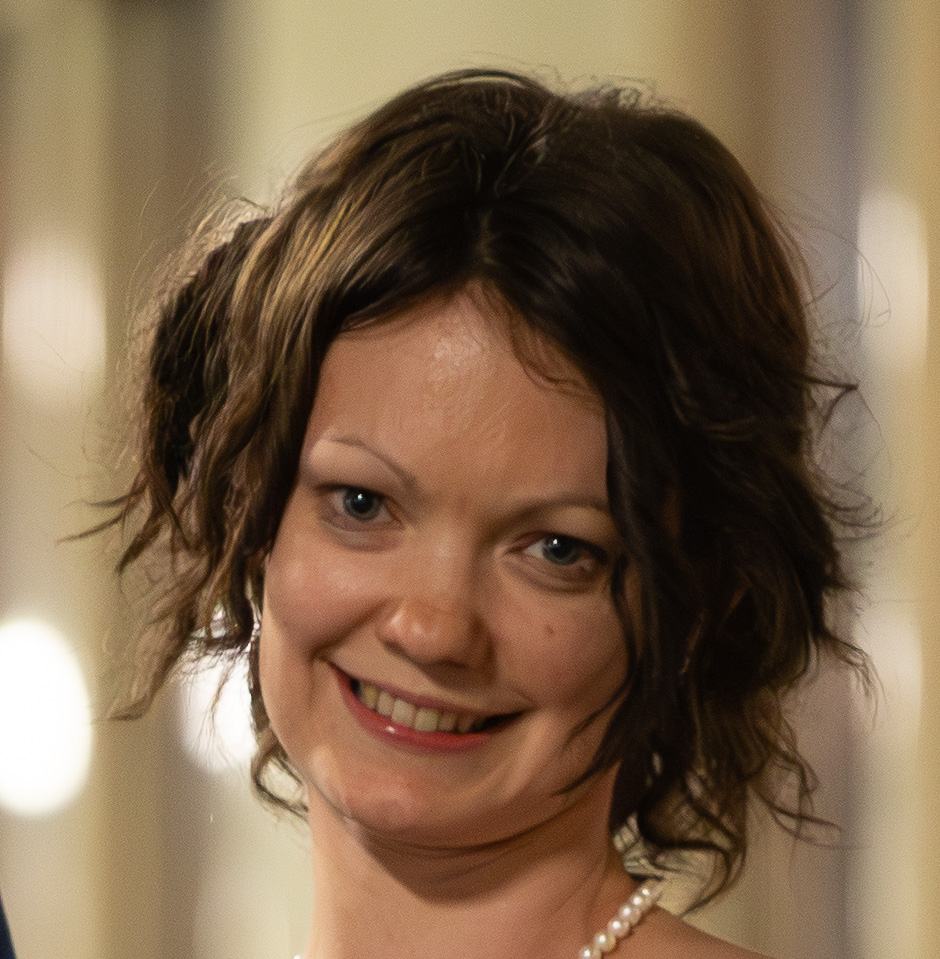
Of these images, my order of preference was as follows
- Topaz Photo
- Lightroom AI DeNoise
- DxO PureRAW DeepPRIME XD2S
- DeePRIME 3
- On1 NoNoise AI
In this case I think Topaz Photo produces the most natural looking result by far. The Lightroom result is good but not quite as natural looking, although still very usable.
Honestly, I am not that impressed with any of the other results, the skin either looks unnaturally waxy (often a problem with noise reduction tools), or the sharpening is too strong.
Noise Reduction Test Image 5
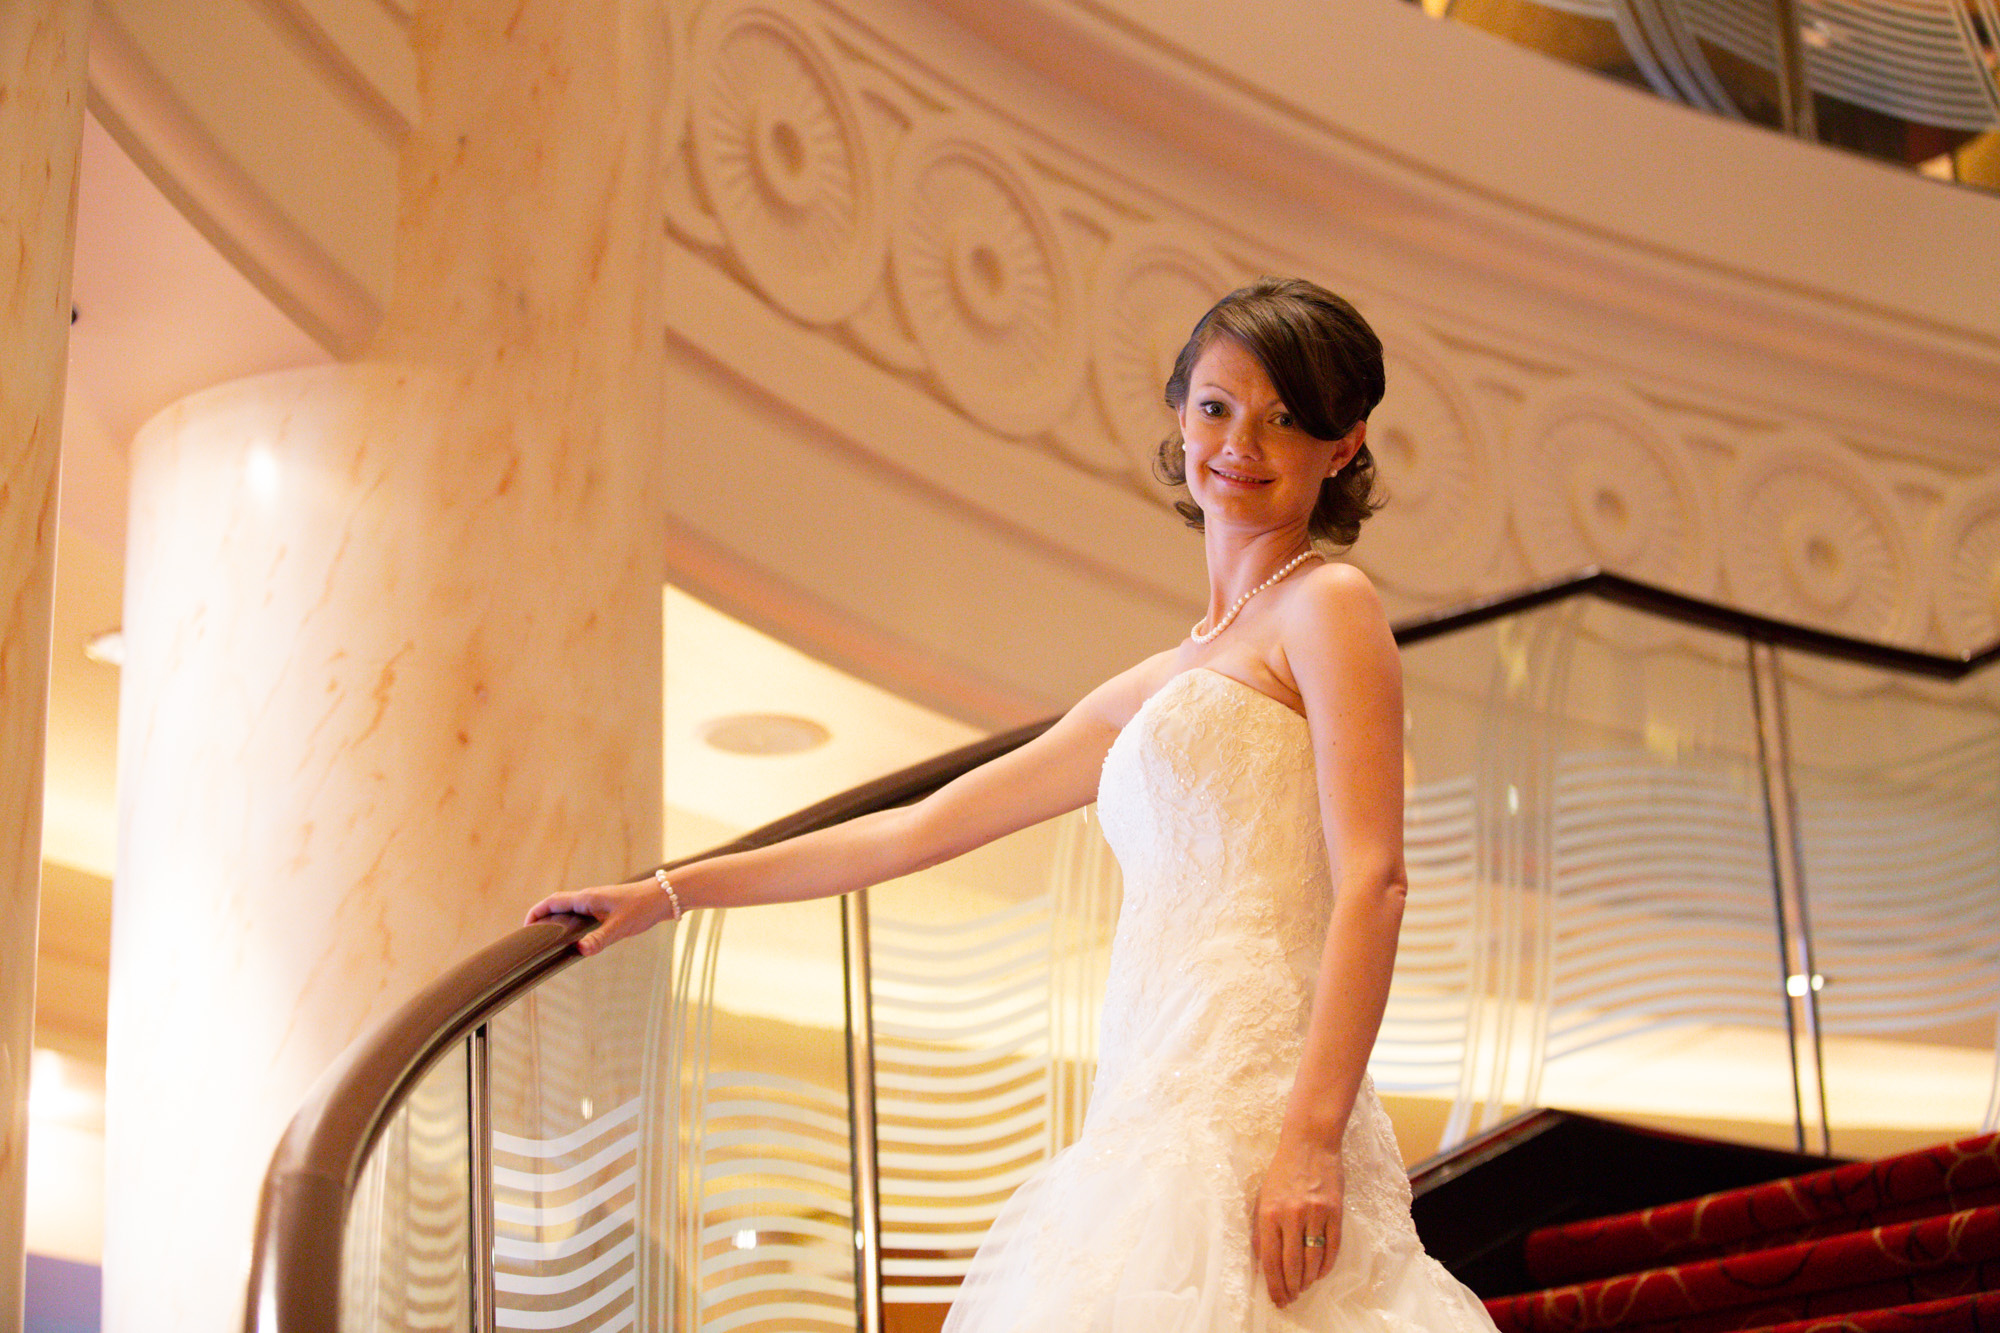
This image was also taken indoors on a Canon EOS 6D. Wedding photographers tend to find themselves shooting in low light, so including a wedding photograph for noise reduction testing seemed like a good idea.


Of these images, my order of preference was as follows
- DxO PureRAW DeepPRIME XD2S
- Lightroom AI DeNoise
- Topaz Photo
- On1 NoNoise AI
- DxO PureRAW DeepPRIME 3
This time round, I found DxO PureRAW XD2 to produce the most natural results. Lightroom DeNoise AI also did a good job. None of the other three really produced a particular standout result.
Noise Reduction Test Image 6
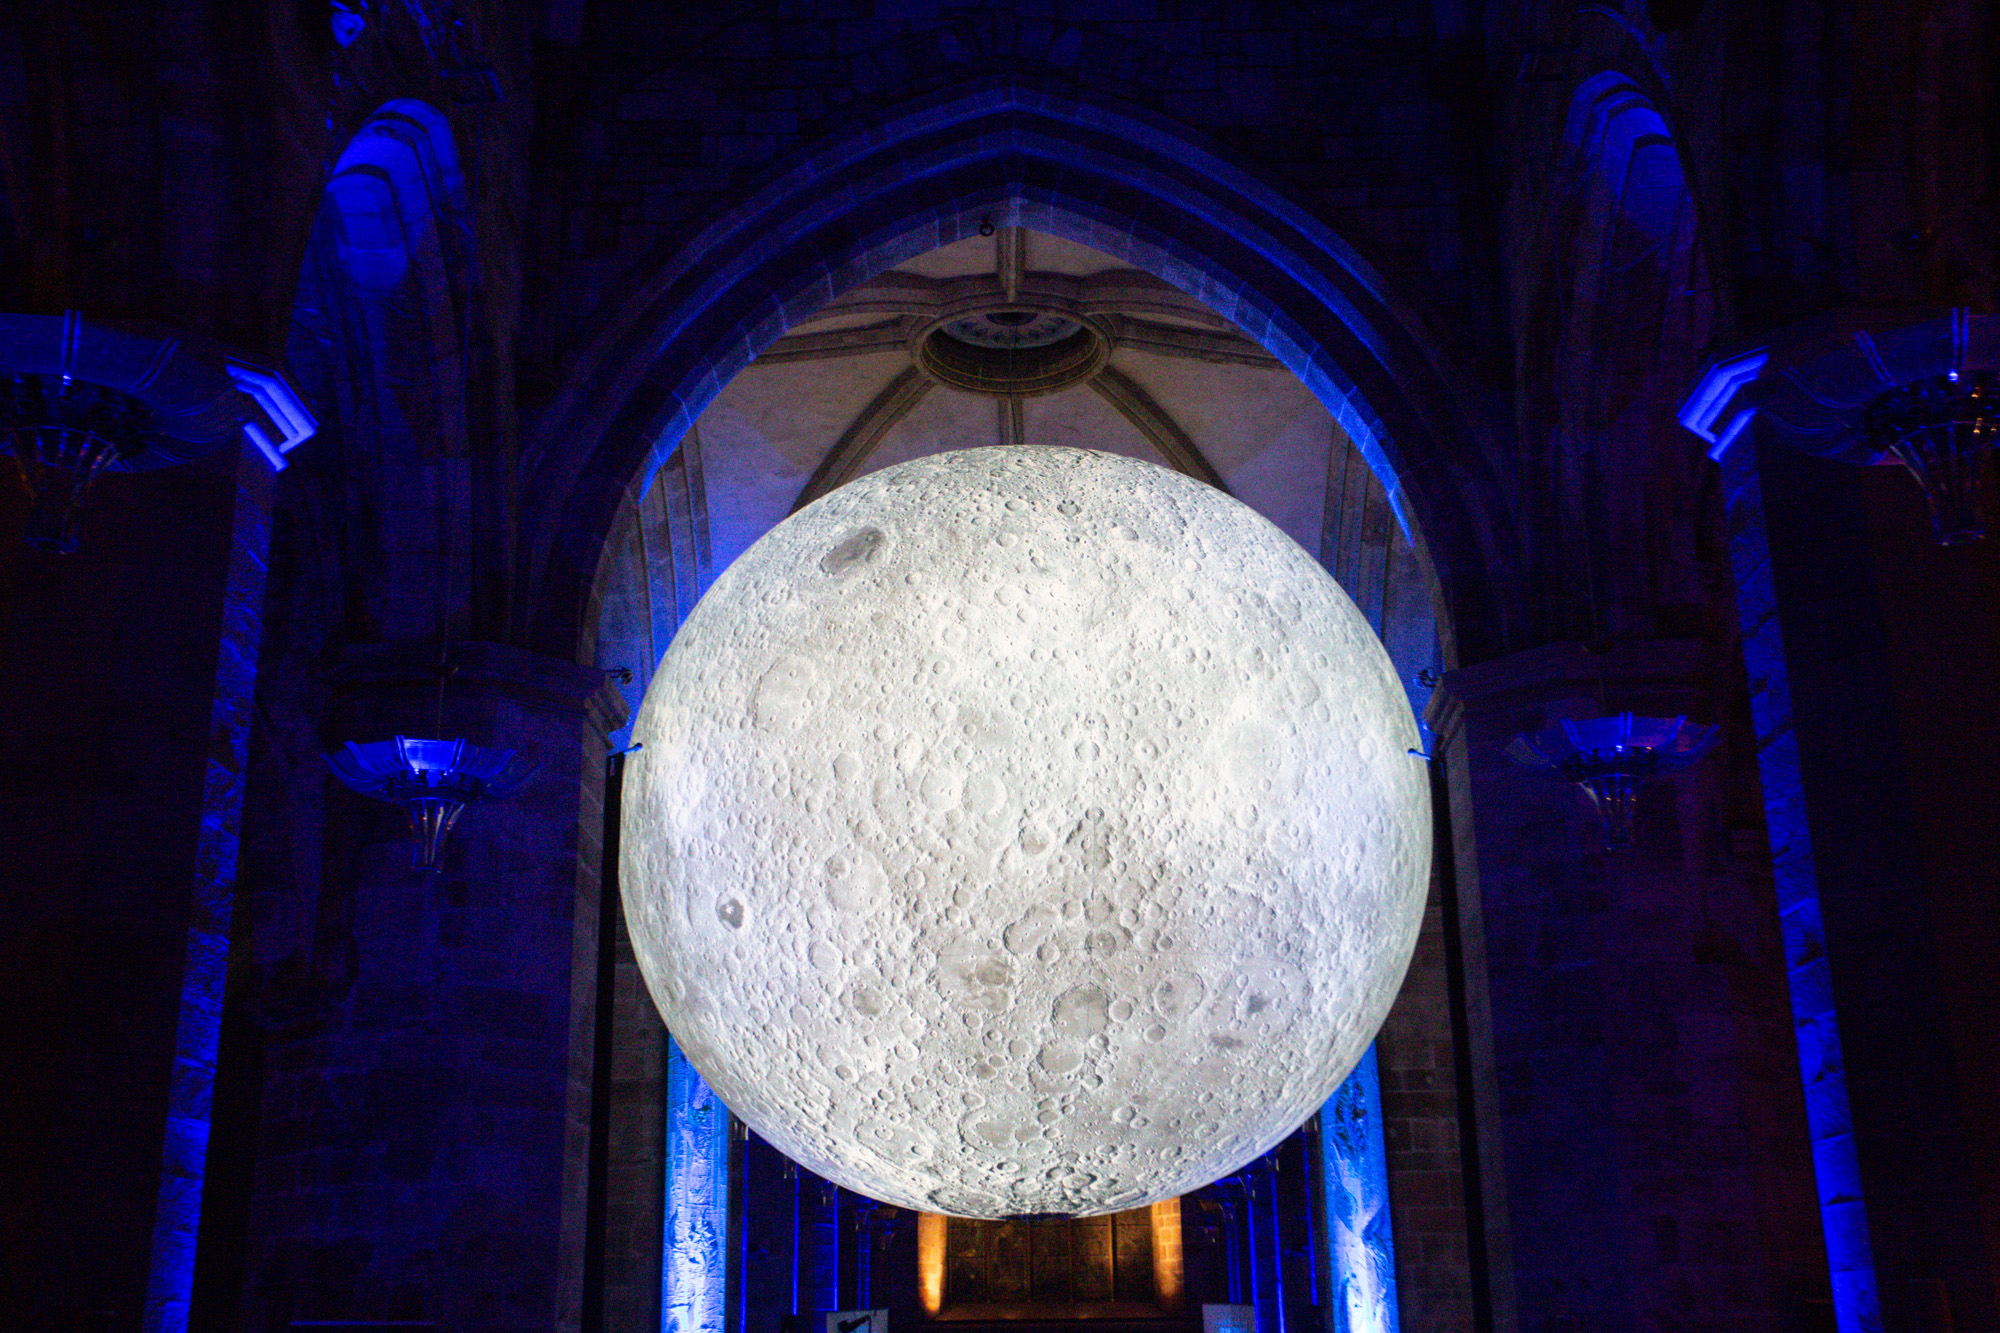
This image was also taken on a Canon EOS 6D. Indoor low light photography is commonly a time when high ISO images are output, so I wanted to include this image which also doesn’t have people or animals in it.
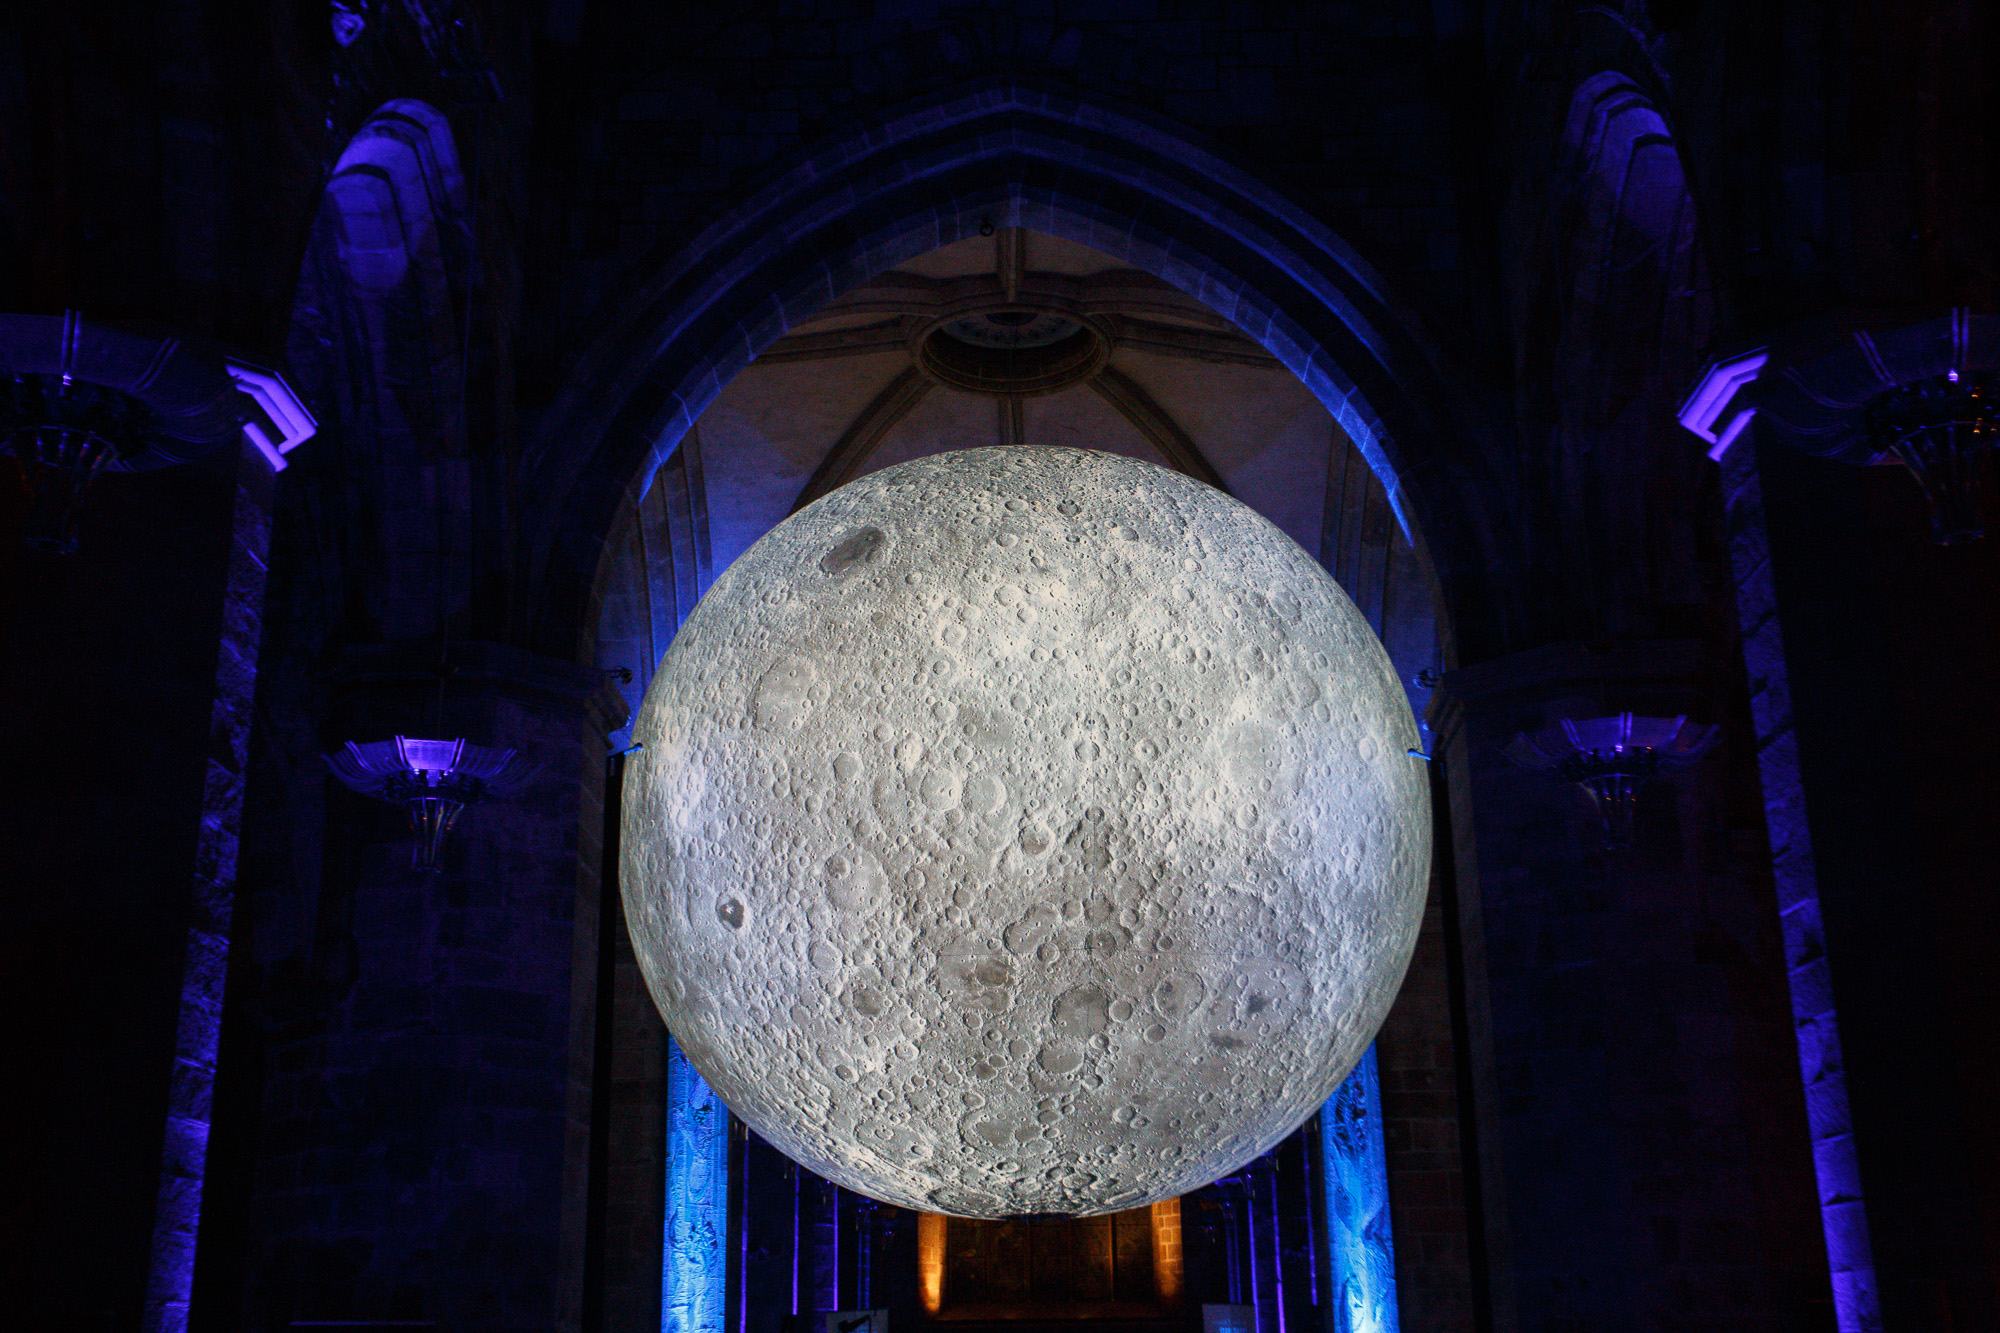
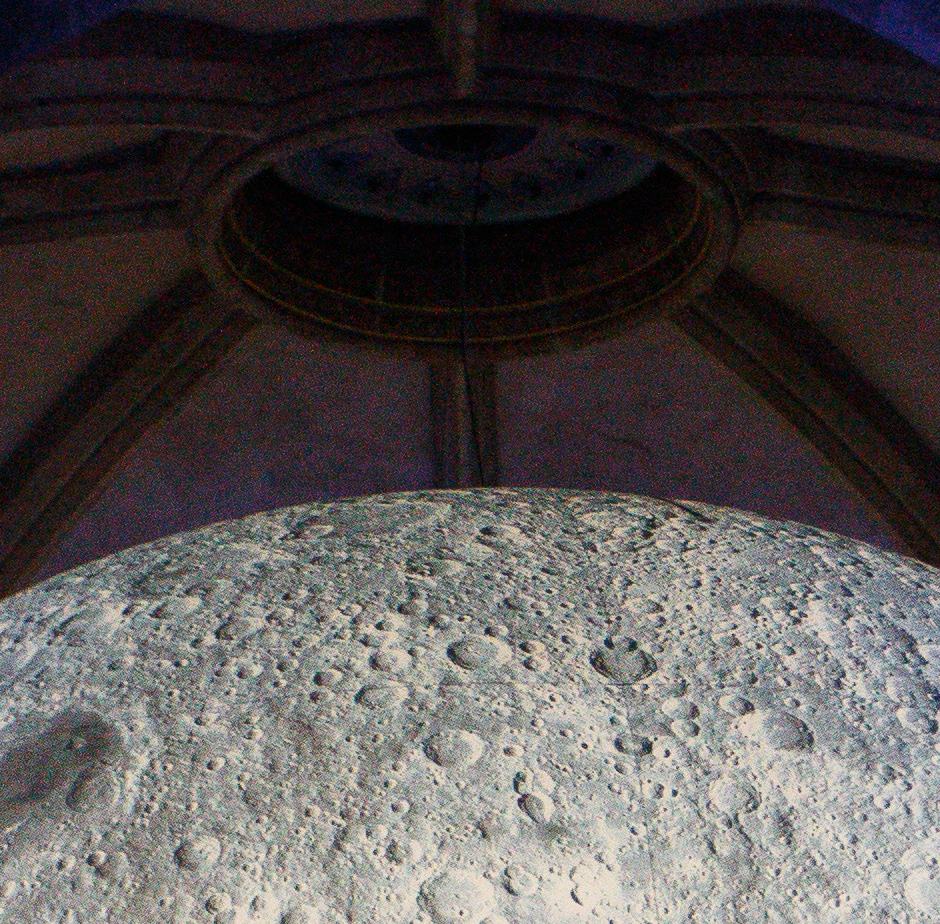
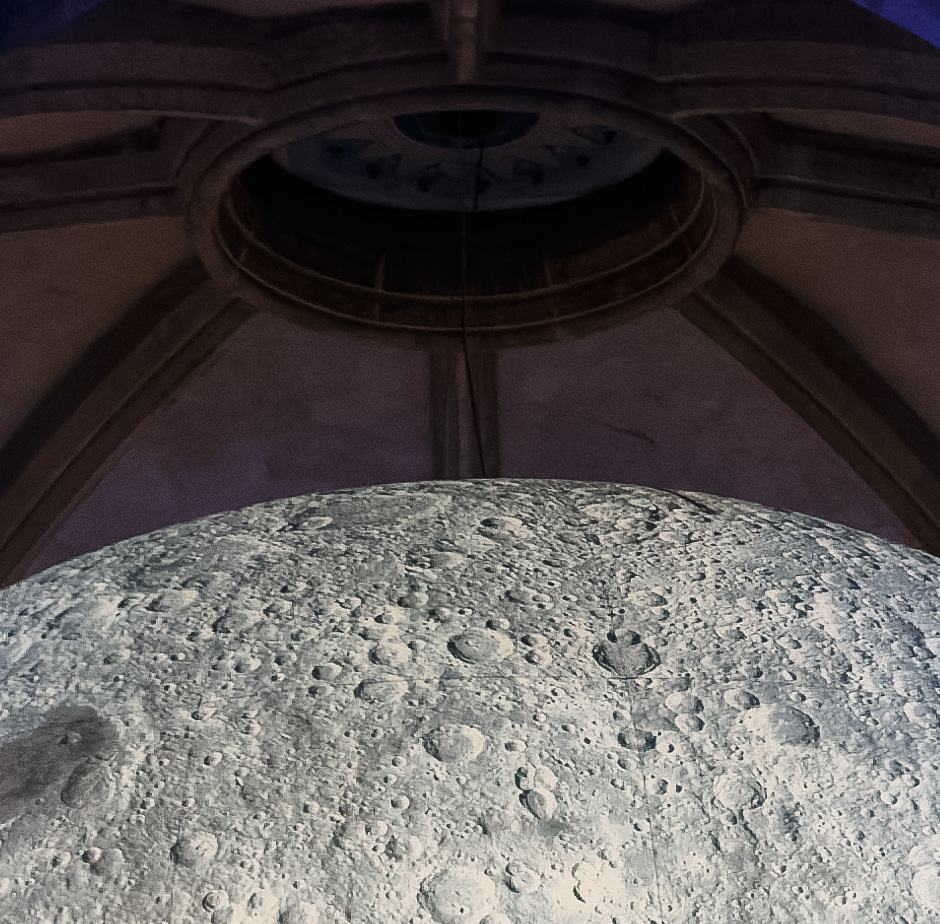

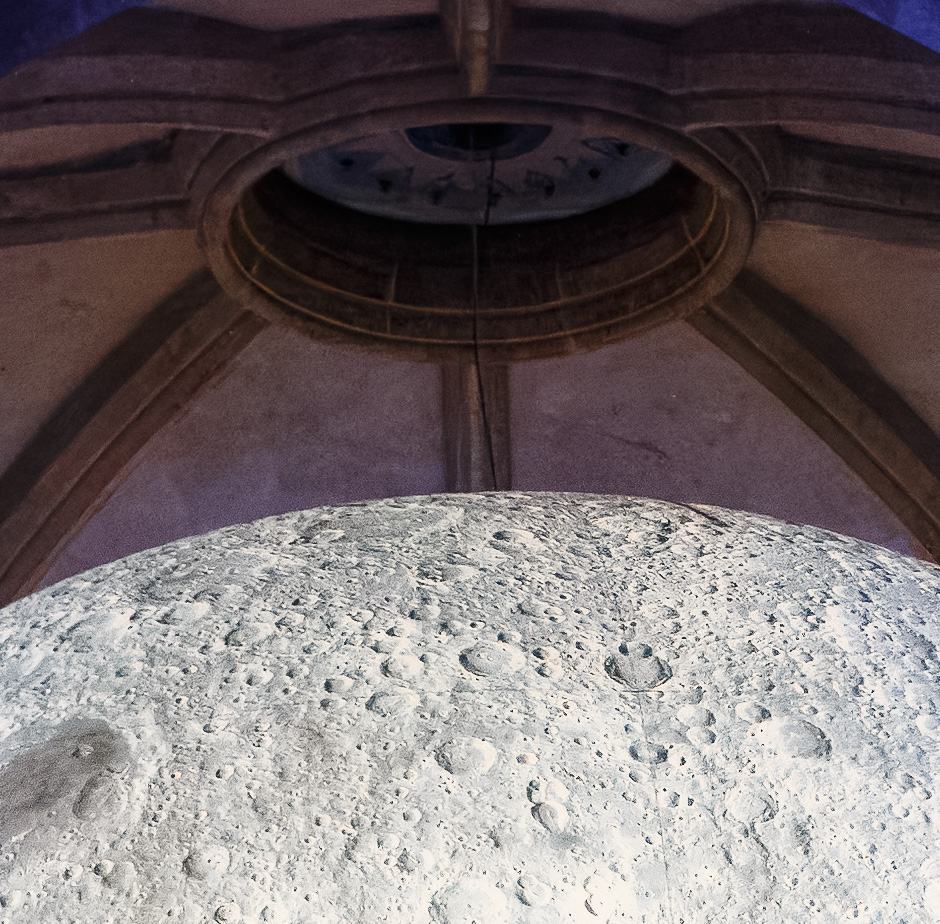
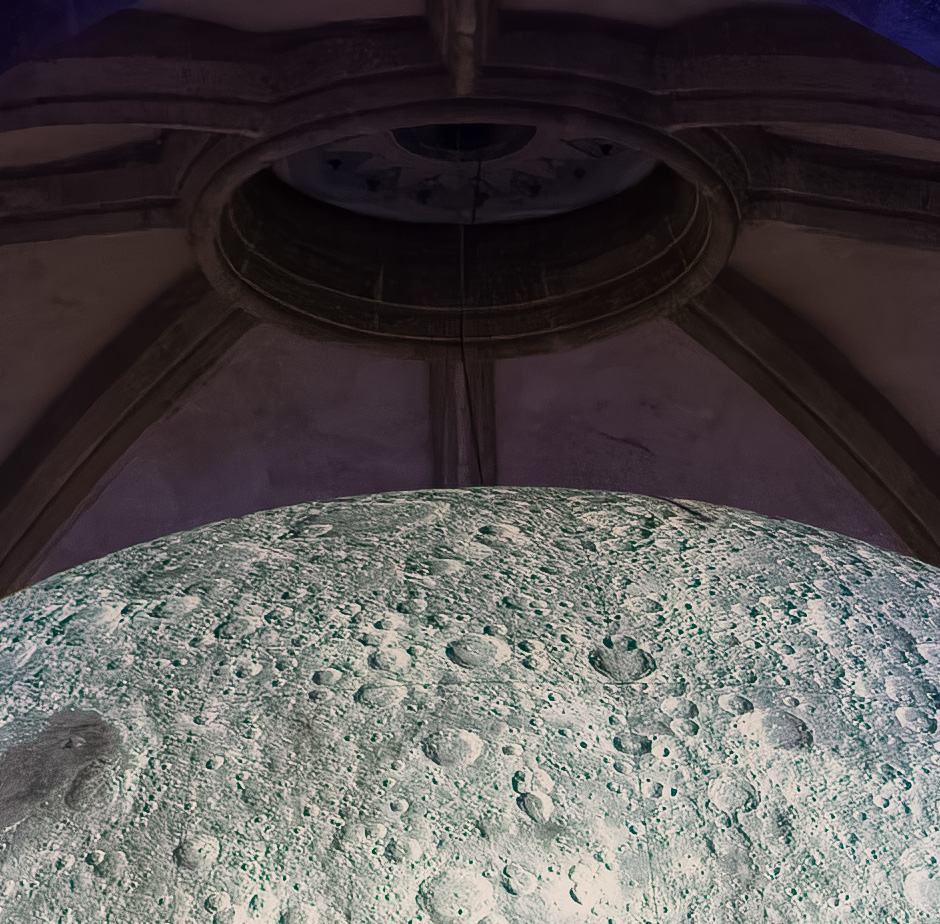
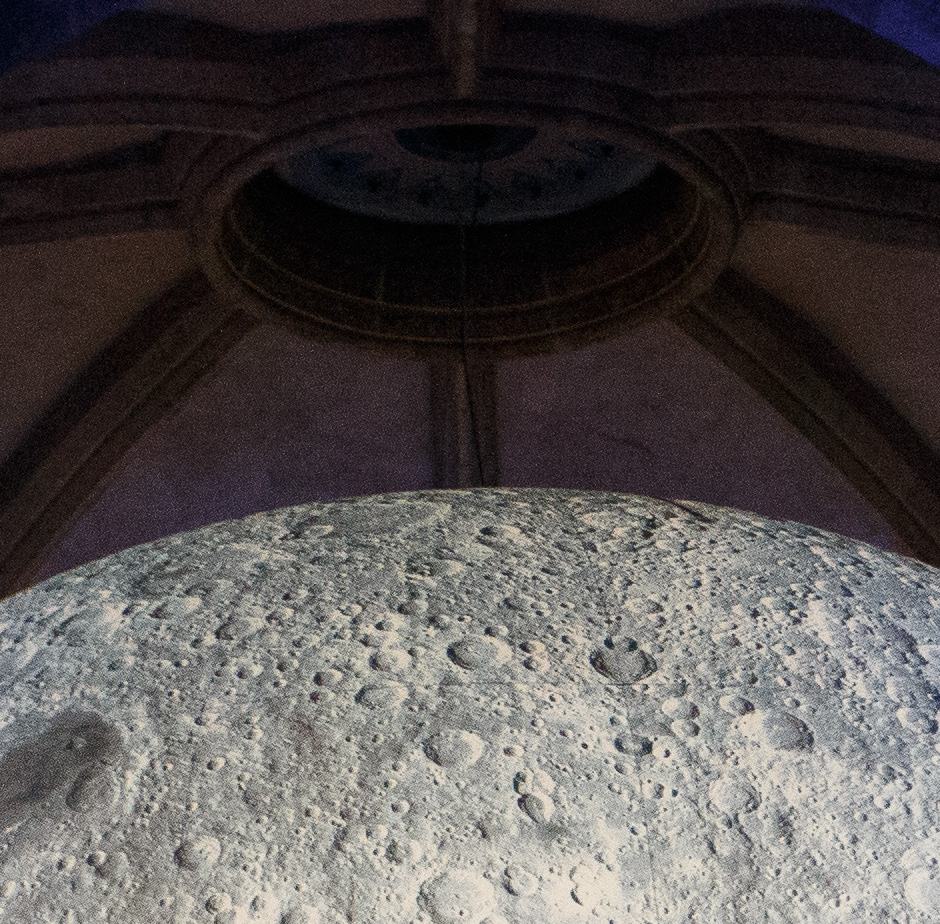
Of these images, my order of preference was as follows
- DxO PureRAW DeepPRIME XD2
- Topaz Photo
- On1 NoNoise AI
- DxO DeepPRIME 3
- Adobe Lightroom DeNoise
My favourite of these was the DeepPRIME XD2, closely followed by Topaz Photo. On1 NoNoise AI did a good job in terms of noise reduction but shifted the moon craters green, which lost it points. Adobe Lightroom DeNoise put in its worst performance with this specific image.
Noise Reduction Software Results Conclusion
I definitely encourage you to draw your own conclusions, both based on my testing and also using your own image files.
In terms of overall results, DxO PureRAW DeepPRIME XD2 was my favourite in the majority of images, with Topaz Photo right behind. Third was Lightroom, then DxO DeepPRIME 3 and finally On1 NoNoise.
To be honest, in terms of quality, it is a very close run between Topaz Photo and DxO PureRAW.
On1 NoNoise isn’t quite as good yet.
Lightroom does put in a great show, and certainly gets bonus points for small file sizes and the fact it integrates well into an Adobe centered workflow.
If you had read this guide prior to April 2023, you would have noticed me discount Lightroom’s built-in noise reduction tool as they weren’t that great. And when they announced the AI powered tool, I was a bit skeptical. After all, how could Lightroom’s first generation AI noise reduction compete with tools that are into their third generation.
It turns out I was very much under estimating Adobe. They may have taken their time with rolling out noise reduction, but I have to be honest, I was very impressed with the results of the new Lightroom noise reduction toolkit. If you are already invested in the Lightroom ecosystem, you might not need to look any further for your noise reduction.
Noise Reduction Speed
Image quality is of course the most important factor when it comes to assessing noise reduction tools, but it’s not the only consideration. If you are processing large numbers of images, then you will want to consider how long that process will take, and how big the resulting file sizes will be.
Let’s look at how each tool performed in terms of speed of processing. I used the same six images, and timed how long each tool took to process using a stopwatch. Of course, performance will vary depending on various factors, so rather than focusing on the actual time, I’d suggest looking at them relatively.
In every case I used the RAW file straight out of my Canon camera. The first three were shot on a Canon EOS R5, with the last one on a Canon EOS 6D.
Note that each tool works a little differently.
DxO PureRAW loads the image file without displaying a preview, so there’s no initial processing and therefore this stage takes no time at all. You just choose the processing mode and set it going. If you want to adjust the settings you can, but this is optional.
Topaz Photo loads the image and runs it through its AI powered Autopilot tool to analyze what improvements are required. Once done it generates a preview of a zoomed in area of the image with the recommended adjustments applied.
As these adjustments will vary based on the image the time can vary, but it takes 10-20 seconds on my system with GPU acceleration and a fairly high end Nvidia graphics card. In my testing it is often slower when it detects faces or text as it runs additional algorithms on these to see if they need additional processing.
You can then adjust the settings and pan around the image. Any adjustment or panning requires the preview to be generated again, which takes a second or so. Finally, you save the image, which takes more time. For my numbers, I’ve included both the time to load the preview image initially, and then the time to save it.
You can disable the Autopilot, but in my testing it works pretty well so I have left it on.
On1 NoNoise AI also analyses the whole image file on load, so it also takes longer to load. However, as most of the processing is done up front, subsequent adjustments and the saving process are a lot quicker than the other tools. Again, I’ve included the total processing time in my numbers.
For reference, I am using a desktop computer with an with an AMD Ryzen 7950X3D processor, a 12GB Nvidia RTX 4070 Super GPU and 64GB of system memory. Images were stored on an SSD for maximum read speed.
In the past I have done tests with a desktop computer with an AMD Ryzen 5800X processor, an 8GB Nvidia GeForce RTX 3060TI and 64GB of system memory. I’ve also tested with a laptop computer with a mobile 4070 Nvidia graphics card and an AMD processor.
The results were very similar – as far as I can tell as long as you have a relatively recent graphics card then it will perform much better than a regular CPU.
As I said, I used a stopwatch to time the results, so there will be a small margin of error. Some of the tools like Topaz also provide a time when they process, but this tends to be under the actual processing time by a few seconds in my testing, hence the use of a stopwatch for consistency across all the tools.
Finally, Lightroom does allow you to toggle use of the GPU on and off, but as far as I could tell it ignored my setting and used my GPU anyway. So I was not able to test Lightroom’s noise reduction using only the CPU, but you can assume it will be much slower.
Image 1, Robin on Branch
Canon EOS R5. 45-megapixel image, ISO 6400.
DxO PureRAW 5
- DxO PureRAW DeepPRIME 3 – 6 seconds (GPU accelerated)
- DxO PureRAW DeepPRIME XD2- 11 seconds (GPU accelerated)
- DxO PureRAW DeepPRIME 3 – 43 seconds (CPU only)
- DxO PureRAW DeepPRIME XD2 125 seconds (CPU only)
- DNG file output: DeepPRIME 3: 152 MB; DeepPrime XD2 133 MB
Topaz Photo
- Topaz Photo – 13 seconds (GPU accelerated)
- Topaz Photo – 24 seconds (CPU only)
- DNG file output 134 MB
On1 NoNoise AI
- On1 NoNoise AI – 11 seconds (GPU accelerated).
- On1 NoNoise AI – 146 seconds (CPU only)
- DNG file output 131 MB
Lightroom AI
- Lightroom – 14 seconds (GPU accelerated)
- File size is just the original RAW, which was 29 MB
Image 2, Duck in Water
Canon EOS R5. 45-megapixel image, ISO 5000.
DxO PureRAW 5
- DxO PureRAW DeepPRIME 3 – 6 seconds (GPU accelerated)
- DxO PureRAW DeepPRIME XD2 – 8 seconds (GPU accelerated)
- DxO PureRAW DeepPRIME 3 – 44 seconds (CPU only)
- DxO PureRAW DeepPRIME XD2 – 126 seconds (CPU only)
- DNG file output: DeepPRIME 3: 172 MB; DeepPrime XD2 159 MB
Topaz Photo
- Topaz Photo – 10 seconds (GPU accelerated)
- Topaz Photo – 21 seconds (CPU only)
- DNG file output: 158 MB
On1 NoNoise AI
- On1 NoNoise AI – 13 seconds (GPU accelerated).
- On1 NoNoise AI – 144 seconds (CPU only)
- DNG file output: 174 MB
Lightroom AI
- Lightroom – 11 seconds (GPU accelerated)
- File size is just the original RAW, which was 35 MB
Image 3, Crane
Canon EOS R5. 45-megapixel image, ISO 6400.
DxO PureRAW 5
- DxO PureRAW DeepPRIME 3 – 8 seconds (GPU accelerated)
- DxO PureRAW DeepPRIME XD2 – 8 seconds (GPU accelerated)
- DxO PureRAW DeepPRIME 3 – 43 seconds (CPU only)
- DxO PureRAW DeepPRIME XD2 – 125 seconds (CPU only)
- DNG file output: DeepPRIME 3: 164 MB; DeepPrime XD2: 148 MB
Topaz Photo
- Topaz Photo – 11 seconds (GPU accelerated)
- Topaz Photo – 32 seconds (CPU only)
- DNG file output: 148 MB
On1 NoNoise AI
- On1 NoNoise AI – 13 seconds (GPU accelerated).
- On1 NoNoise AI – 145 seconds (CPU only)
- DNG file output 147 MB
Lightroom AI
- Lightroom – 12 seconds (GPU accelerated)
- File size is just the original RAW, which was 31 MB
Image 4, Person by train
Canon EOS 6D. 20.2 Megapixel image, ISO 6400
DxO PureRAW 5
- DxO PureRAW DeepPRIME 3 – 5 seconds (GPU accelerated)
- DxO PureRAW DeepPRIME XD2 – 5 seconds (GPU accelerated)
- DxO PureRAW DeepPRIME 3 – 21 seconds (CPU only)
- DxO PureRAW DeepPRIME XD2 – 57 seconds (CPU only)
- DNG file output: DeepPRIME 3: 65 MB; DeepPrime XD2: 58 MB
Topaz Photo
- Topaz Photo – 23 seconds (GPU accelerated)
- Topaz Photo – 27 seconds (CPU only)
- DNG file output: 61 MB
On1 NoNoise AI
- On1 NoNoise AI – 8 seconds (GPU accelerated).
- On1 NoNoise AI – 72 seconds (CPU only)
- DNG file output: 53 MB
Lightroom AI
- Lightroom – 5 seconds (GPU accelerated)
- File size is just the original RAW, which was 25 MB
Image 5, Person at Wedding
Canon EOS 6D. 20.2 Megapixel image, ISO 6400
DxO PureRAW 5
- DxO PureRAW DeepPRIME 3 – 3 seconds (GPU accelerated)
- DxO PureRAW DeepPRIME XD2 – 4 seconds (GPU accelerated)
- DxO PureRAW DeepPRIME 3 – 22 seconds (CPU only)
- DxO PureRAW DeepPRIME XD2 – 58 seconds (CPU only)
- DNG file output: DeepPRIME 3: 75 MB; DeepPrime XD2 68 MB
Topaz Photo
- Topaz Photo – 11 seconds (GPU accelerated)
- Topaz Photo – 18 seconds (CPU only)
- DNG file output: 69 MB
On1 NoNoise AI
- On1 NoNoise AI – 7 seconds (GPU accelerated).
- On1 NoNoise AI – 70 seconds (CPU only)
- DNG file output: 67 MB
Lightroom AI
- Lightroom – 4 seconds (GPU accelerated)
- File size is just the original RAW, which was 28 MB
Image 6, Indoor low Light scene
DxO PureRAW 5
- DxO PureRAW DeepPRIME 3 – 3 seconds (GPU accelerated)
- DxO PureRAW DeepPRIME XD2 – 4 seconds (GPU accelerated)
- DxO PureRAW DeepPRIME 3 – 21 seconds (CPU only)
- DxO PureRAW DeepPRIME XD2 – 57 seconds (CPU only)
- DNG file output: DeepPRIME 3: 62 MB; DeepPrime XD2: 57 MB
Topaz Photo
- Topaz Photo – 11 seconds (GPU accelerated)
- Topaz Photo – 18 seconds (CPU only)
- DNG file output: 57 MB
On1 NoNoise AI
- On1 NoNoise AI – 8 seconds (GPU accelerated).
- On1 NoNoise AI – 71 seconds (CPU only)
- DNG file output: 56 MB
Lightroom AI
- Lightroom – 5 seconds (GPU accelerated)
- File size is just the original RAW, which was 24 MB
Average Relative Speed
Taking all the numbers, here’s how each tool performed on my computer on average.
- DxO PureRAW DeepPRIME 3 GPU: 5 seconds
- DxO PureRAW DeepPRIME XD2 GPU: 7 seconds
- DxO PureRAW DeepPRIME 3 CPU: 32 seconds
- DxO PureRAW DeepPRIME XD2 CPU: 91 seconds
- Topaz Photo GPU: 14 seconds
- Topaz Photo CPU: 24 seconds
- On1 NoNoise AI GPU: 10 seconds
- On1 NoNoise AI CPU: 108 seconds
- Lightroom AI GPU: 9 seconds
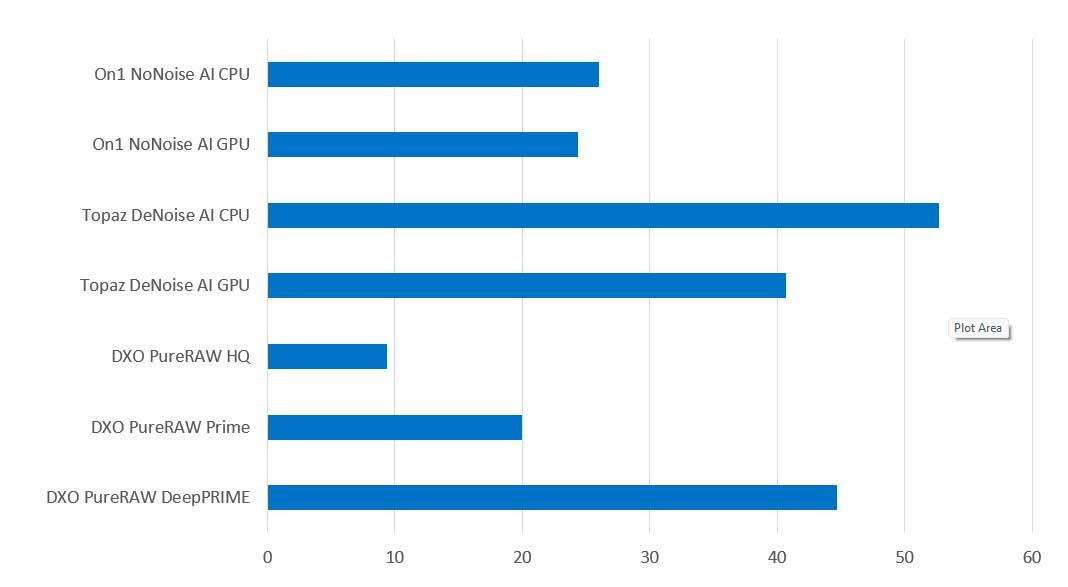
And here’s a chart to show the difference. Smaller bars mean faster performance.
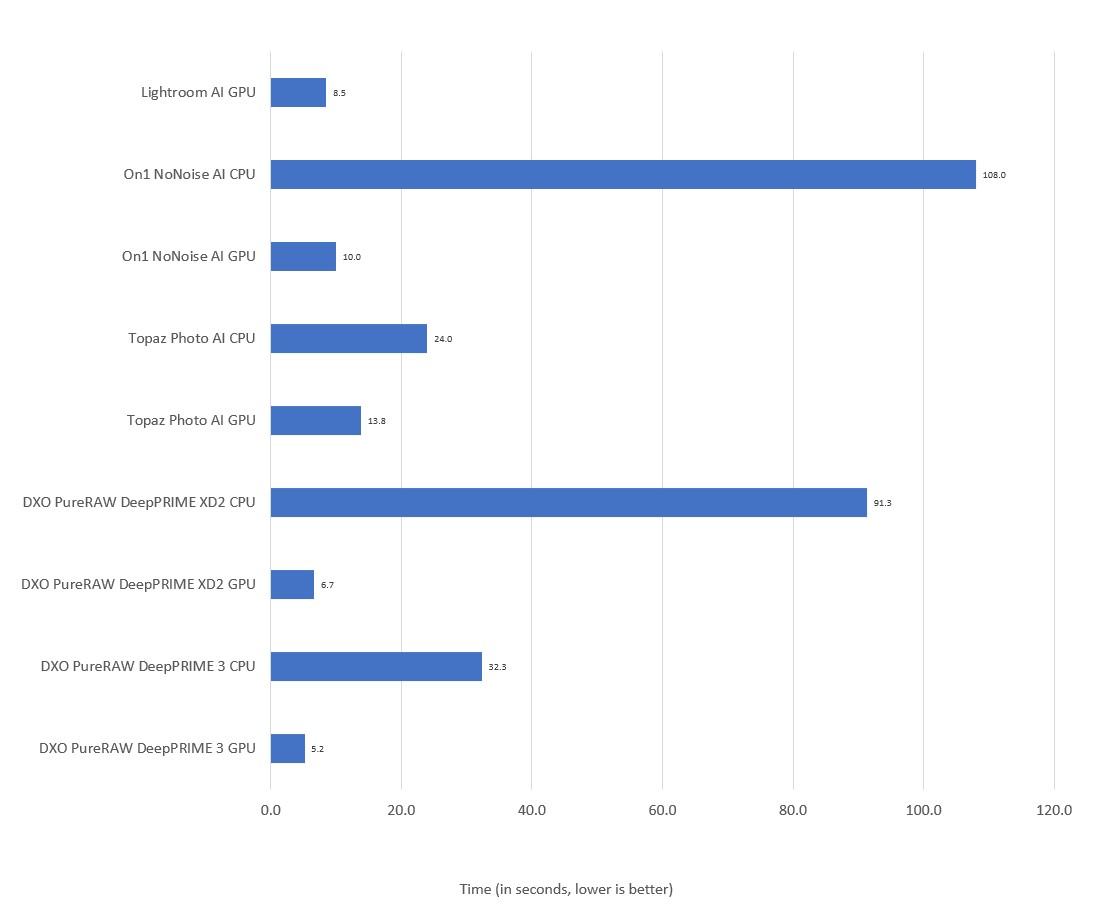
In summary, you can see that a good GPU makes a big difference. In my setup, there is a bit of a difference between the products when using a GPU, with DxO PureRAW DeepPrime 3 taking around 5 seconds, and Topaz Photo taking around 14 seconds on average.
If you are planning on batch processing a large number of images, especially higher megapixel images, then a good GPU is going to make a significant difference.
If you don’t have a good GPU, then in my testing Topaz Photo produced the fastest CPU only results, but of course this will vary depending on your CPU.
Note that these results are very hardware dependent, and software updates can make a difference too. For reference, here are my results back when I first started testing noise reduction software back in 2021 with an older computer and older versions of the software. As you can see, the GPU acceleration over the years has made a remarkable improvement!
Again, I want to make clear that these results are going to vary depending on a range of factors, from the RAW file format through to the size of the images you use and your computer specifications and hardware.
Whilst these numbers do show the relative performance of these tools on my setup, your results are very likely to vary depending on your setup. I highly recommend testing the performance on your system and using your image files with a trial version prior to making any financial commitment.
Average File Sizes
Another factor you might consider is the file sizes that the software outputs. One thing that surprised me was how different these were for the same input images.
DxO DeepPRIME 3 consistently produced the largest output DNG files, while the XD2 version of the noise reduction AI produced the smallest. That said, Lightroom wins this contest by a country mile because it doesn’t even need to generate a DNG file when doing noise reduction, which is definitely a big benefit.
Here’s how those looked as an average across my results. Notice the output file sizes were the same regardless of whether GPU or CPU was used, which is to be expected as the final result is the same. Also, this includes both 20.2MP and 45MP input files, so the comparison is just relative.
- DxO PureRAW DeepPRIME 3: 115 MB
- DxO PureRAW DeepPRIME XD2: 103 MB
- Topaz Photo: 105 MB
- On1 NoNoise AI: 105 MB
- Lightroom AI: 29 MB
And here’s a chart to show the difference. Smaller bars mean smaller file sizes.
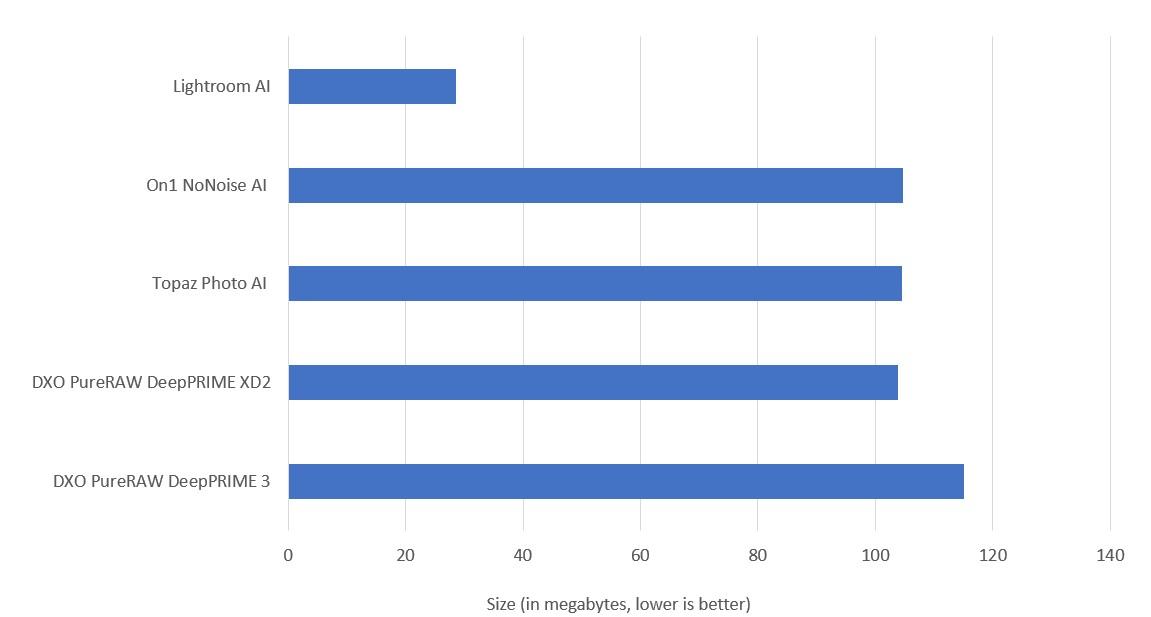
I’m not suggesting you base your decision on which tool produces the smallest file sizes, as hard drive space is relatively cheap. However, if it’s a close decision between two tools, this might be a decider.
Which Noise Reduction Software is Best?
If I was purchasing today and looking for a pure noise reduction tool with great performance and excellent sharpening, I would choose DxO PureRAW. The one-off purchase prices make it a good, affordable solution for most users.
I’d also add that Adobe’s Lightroom AI powered noise reduction tool certainly puts on a very strong performance, so much so that users who are already invested in the Lightroom ecosystem might not even need an additional noise reduction tool. Just bear in mind you get minimal control, it is slower, and batch processing is a little clunky.
Topaz Photo is another option to consider, particularly if you need the additional tools it providers. However, it is substantially more expensive and requires a subscription.
If you’d prefer a more detailed comparison, here are the key differences between the main standalone denoise options that work the best in my experience: Topaz Photo and DxO PureRAW.
Topaz Photo vs DxO PureRAW
- DxO PureRAW produces great results, especially with the DeepPRIME XD2 model, however you get a less comprehensive toolset than Topaz Photo and it only works on RAW files. However, the noise reduction results were my favourite in most cases, even if just by a hair.
- Speed wise, DxO PureRAW is faster on my hardware, but it definitely requires a good GPU to get that speed.
- Both tools offer batch processing and excellent lens correction and sharpening across a huge range of camera and lens combinations.
- Topaz Photo generally produces similar results to PureRAW, depending on the options you choose. The sharpening can definitely be a little on the aggressive side though.
- Both options give you the option to get previews of the output so you can adjust any settings prior to processing. Of course, the downside to this approach is that it can take longer to get each image right as there are more options and settings to play with.
- Cost-wise, Topaz Photo is significantly more expensive, particularly now (as of 2025) you have to pay an annual subscription fee. However, you do get a lot more control as well as additional products like image upscaling, focus recovery tools and advanced sharpening. Whether or not that is worth the extra cost is up to you.
- Both tools integrate with Lightroom, but the DxO integration is far more seamless, especially for batch processing of images.
Honestly, in terms of actual denoising, you’ll only notice the minor differences between these tools if you dive in at the pixel level.
Personally, I use both Topaz Photo and DxO PureRAW. However, I only have Topaz Photo because I still pay the original annual cost for Topaz rather than the new price. I am not sure I would shell out $199 a year for the product, given the alternatives.
For editing a single image, I generally just use DxO as the integration with Lightroom is seamless and it runs incredibly quickly on my hardware.
For batch noise reduction, I also primarily use DxO PureRAW 5 as it tends to be the easiest option for my workflow thanks to the Lightroom integration, the results are excellent, and the output file sizes are a reasonable size.
If I want more control and additional features such as rescaling, face adjustments and advanced sharpening controls, I’ll use Topaz Photo.
Honestly though, these are all good options, and you would be happy with any of my top three options I suspect. It really depends on if you prefer to move sliders and tweak, or just let the AI do its thing.
I’d also add, if I wasn’t already invested in Lightroom, I would likely look at investing in DxO PhotoLab and get a whole product which has awesome built-in noise reduction.
DxO PureRAW vs Topaz Photo vs Lightroom Summary
Choose Lightroom if:
- You already use Lightroom or are considering using it for your photo editing workflow
- You aren’t that bothered about granular control or batch processing noise reduction.
Choose DxO PureRAW if:
- You want a simple click and go option for noise reduction that works standalone or through Lightroom
- You want some of the best-in-class noise reduction
- It supports your camera and lens combination
- You want to be able to reduce noise on multiple images at once
- You have a supported GPU (download the trial and test it out before purchase)
- You prefer to pay once and actually own the software you buy
Choose Topaz Photo if:
- You want more control over the noise reduction process, and don’t mind spending time doing so
- You want to be able to reduce noise on more than just RAW files
- It supports your camera and lens combination
- You want to be able to do more than just noise reduction with the tool
To reiterate, all of these pieces of software work very well at the job they are designed to do, so it mostly comes down to your workflow and approach to editing.
Here are links to each noise reduction application on test so you can download them and try them out yourself with your own images. Again, I highly recommend you test each version against the types of images you usually take, so you can see how it runs on your hardware and also choose your favorite.
A Word of Warning about AI tools and Photo Contests
I just wanted to briefly make a point about noise reduction software and photography competitions. As these tools get more and more powerful, some photography competitions have forbidden the use of tools like this.
For example, the 2021 Audubon Photography Society awards had a rule forbidding “AI and machine-learning-based software used for upscaling, sharpening and significant noise reduction”. That said, this rule has been removed from their more recent competition ruleset, which might signal a changing approach.
Generally though, if you plan to enter any competition, make sure you follow the rules as set out, as otherwise you could lose. If the rules don’t allow for AI based noise reduction, then a tool like Lightroom would likely be a better option than one of AI powered options.
Further Reading
That’s it for my comparison of some of the more popular noise reduction applications on the market today. If you found this useful, you might enjoy some of my other photography content. Here are some articles to get you started.
- I have a guide to my favorite photo editing applications, as well as the best alternatives to Lightroom
- If you’re wondering how to sort your photos, see my guide to how to organize and find your digital photos
- We have a guide to how to use a compact camera, how to use a DSLR camera, and how to use a mirrorless camera. We also have a guide to how a DSLR works
- Knowing how to compose a great photo is a key photography skill. See our guide to composition in photography for lots of tips on this subject
- We have a guide to what depth of field is and when you would want to use it.
- We are big fans of getting the most out of your digital photo files, and do to that you will need to shoot in RAW. See our guide to RAW in photography to understand what RAW is, and why you should switch to RAW as soon as you can if your camera supports it.
- You’re going to need something to run your photo editing software on. See our guide to the best laptops for photo editing for some tips on what to look for.
- If you’re looking for more advice on specific tips for different scenarios, we also have you covered. See our guide to Northern Lights photography, long exposure photography, fireworks photography, tips for taking photos of stars, and cold weather photography.
- Color accuracy is important for photography – see our guide to monitor calibration to ensure your screen is set up correctly.
- If you’re looking for a great gift for a photography loving friend or family member (or yourself!), take a look at our photography gift guide,
- If you’re in the market for a new camera, we have a detailed guide to the best travel cameras, as well as specific guides for the best cameras for hiking and backpacking, the best compact camera, best bridge camera, best mirrorless camera and best DSLR camera. We also have a guide to the best camera lenses.
- If you want a camera or lens, but the prices are a bit high, see our guide to where to buy used cameras and camera gear for some budget savings options.
- We have a guide to why you need a tripod, a guide to choosing a travel tripod, and a round-up of our favourite travel tripods
Looking to Improve Your Photography?
If you found this post helpful, and you want to improve your photography overall, you might want to check out my online travel photography course.
Since launching the course in 2016, I’ve already helped over 2,000 students learn how to take better photos. The course covers pretty much everything you need to know, from the basics of how a camera works, through to composition, light, and photo editing.
It also covers more advanced topics, including astrophotography, long exposure photography, flash photography, and HDR photography.
You get feedback from me as you progress, access to webinars, interviews and videos, as well as exclusive membership of a Facebook group where you can get feedback on your work and take part in regular challenges.
It’s available for an amazing one-off price for lifetime access, and I think you should check it out. Which you can do by clicking here.
And that’s it! I’d love to hear about your favourite noise reduction tools, and am happy to answer any questions you have. Just pop them in the comments below and I’ll get back to you as soon as I can.
Tom Veilleux says
Laurence,
A great review of complex products. Best I have seen on this topic.
Presently looking into either upgrading from Topaz AI v2 to v3, getting DxO, or checking my ACDSee functions with the 2025 version coming out next week.
You mention losing file data when using DxO as a plug-in, similar problems with Topaz and ACDSee as you lose the Keywords and Catagories embedded with ACDSee. You have to copy from the orig file and paste into the Topaz returned file. I think this is a result of the ACDSee system using a database to manage these Keywords. The returned file, not being created by ACDSee, looks like a new photo waiting to be managed.
Looking forward to reading more of this site.
Tom
Laurence Norah says
Thanks Tom! I’ll be interested to hear what you think about the ACDSee software and how that works. Honestly though I’d say that most of the products I’ve tested do a great job, and really it comes down to individual workflow to see which works the best. I still use both DxO and Topaz Photo AI in my workflow, but I’d be happy using one or the other if I hadn’t already invested in both for this review!
Laurence
Brett Patching says
Exceptional review Laurence! Now at the start of 2024 and noting that the latest updates to Topaz DeNoise AI and Sharpen AI were in June 2022 and March 2022 respectively, I was really curious to see what the competition had been up to in the meantime. I sometimes work on jpegs and that was one of the reasons I stuck with Topaz when they introduced the AI products (I had already been using Topaz plugins). They still work really well, so I may as well stick with them.
Cheers,
Brett
Laurence Norah says
Hi Brett!
Well, honestly, I think there was a surge of progress in 2022 as a lot of products incorporated GPU accelerated AI processing into their software. However since then not much has really changed, especially with JPG processing. Topaz is putting a lot of effort into the Photo AI product which is certainly a nice bit of software, but for standalone Denoise I’d say Topaz DeNoise is still more than capable. DxO is nice but only supports RAW files (same with Lightroom, which is still very slow to denoise compared to the competition), and to be honest, unless you are staring at things at tremendous zoom levels, it’s almost impossible to tell the results apart between the options out there. So I’d say sticking with Topaz is a good option!
Best
Laurence
Blane says
Hi
Thank you so much for all your hard work and for sharing it. Awesome. as I am using a MFT OM1 this denoise tool is huge
But I have the latest Lightroom Classic and it does offer bulk denoise methinks. I select say 5 or so images and, in Develop, select Denoise. It then says applying denoise to 5 images. Am I missing something? Totally erodes DXO Raw benefits.
Also If I do basic editing to the RAW in Lightroom, does DXO Raw just apply its magic to the original RAW or the Original RAW plus edits?
Thanks again
Blane
Laurence Norah says
Hi Blane,
Thanks very much! You are totally right, you can batch edit in Lightroom that way. It didn’t occur to me that that approach would work, but it did, so thanks for pointing that out. I’ve updated the post to reflect that, and yes, it does further reduce the difference between Lightroom and DxO when it comes to noise reduction.
For your second question, if you edit a photo in Lightroom and then send it to PureRAW, DxO applies its magic to the original RAW. However, when the file comes back to Lightroom the edits you originally applied will be re-applied. Lightroom is a non destructive editor, so the RAW file is never actually “edited”, all that happens is that it keeps track of the edits you make. So those edits are just applied to the newly created file that PureRAW sends back to Lightroom.
I hope this helps and thanks for your input to help me improve this post!
Laurence
Blane says
Glad to have helped.
But to be clear, the DNG returned to LR from DXO incorporates any previous ‘edits’ ‘applied’ to the original RAW, and thus cannot be undone? Sounds like it makes sense to send the original RAW to DXO, and then apply all edits after that to maximise flexibility eg save the “ah, now that noise has been cleaned up by DXO I wish I hadn’t lightened the shadows in the original RAW edit” moments).
Such a good article
Laurence Norah says
Hi Blane,
No, the DNG doesn’t incorporate the edits, DxO just works on the unedited RAW file. However, when the file is imported back to Lightroom, Lightroom’s edits (basically the slider positions etc) are put back where they were with the original. So if you applied +1 exposure, the new DNG will also get +1 exposure. But you can reset it back to the unedited version. The only exception is that because DxO does noise reduction, sharpening and lens corrections, those sliders are usually reset to zero.
I hope this helps!
Laurence
Bruce C says
Generally I don’t comment but this review is exceptional. The most comprehensive, well thought out, understandable, and usable review I’ve seen in years (maybe ever) on ANY piece of gear. So as a result I’ve passed it along and consulted and passed along your laptop review. I initially found the site to be a little cluttered but man am I glad I ignored the superficial.
Laurence Norah says
Hey Bruce!
Thanks very much, that’s most appreciated. I set out on this endeavor to compare noise reduction because I was personally interested in which would be best, and I thought others might find my results interesting. So I am glad you did! I understand your feelings about the clutter, ideally I’d have a way to make a living from the site without it, but thus far this is the best way to keep offering content for free. So I am glad you persevered. Enjoy whichever noise reduction tool you choose, and thanks again for taking the time to comment, it’s appreciated!
Laurence
Shawn says
Based on your comparison here I tried DXO PureRAW 2. I’m just using it in 30 day trial mode right now and I’m completely blown away! I did a simple experiment with a photo I took yesterday on a 24MP full frame sensor. I did all my normal processing through Lightroom including noise reduction and sharpening. Then I ran the same file through DXO PureRAW 2 DeepPRIME and then re-applied all my edits minus noise reduction, sharpening, and lens correction. DXO PureRAW 2 was TWICE as good as a normal Lightroom workflow: lower noise, better lens correction, and significantly sharper.
I then took it one step further. I used Lightroom’s “Enhance” to increase both images to “Super Resolution” (double the pixels in both dimensions). Once again a simple compare showed the PureRAW image to be TWICE as good as the default processing. It was so good in fact that the new 96MP image which was preprocessed in PureRAW would be extremely usable for large prints.
I’m convinced that this plug-in has effectively doubled the resolving ability of my camera and enables me to create double the MP output at the same quality as the original image.
I’ve been happily jumping around my collection to photos I took years ago on 12MP cameras and seeing the same results. Not seeing any weird plasticy noise reduction or strange artifacts. Works on landscapes and portraits.
What is this magic???!!!
Laurence Norah says
Hi Shawn!
Glad to hear you are enjoying PureRAW 2. It is pretty amazing what it can do! Thanks for sharing your experience 🙂
Laurence
TF says
Thank you for the detailed comparison! Will it be possible to share the settings you used in DxO Pure Raw 2 for all the images?
Laurence Norah says
Hi Tausif,
So DxO Pure RAW 2 doesn’t really have that many settings. I ran each image three times, in DeepPRIME, PRIME and HQ modes, as noted with the captions. Sharpening and image quality were enabled. I also ran them with and without GPU enabled – the results in terms of output is the same but the speed is very different if you have a fast GPU.
Let me know if you have any more questions!
Laurence
TF says
Ah, I see, got it. I am used to Topaz Denoise AI (and Imageonomic Noiseware in the past), so was expecting some noise reduction params to choose from. Thank you very much for your quick response!
Laurence Norah says
Yep, the main difference is that Topaz offers a lot of adjustment and flexibility, whereas DxO is designed to work with minimal input. Each approach has advantages / disadvantages, so it depends on how hands on you want to be.
brad ashbrook says
Very thorough review and a lot of very good information. I recently went through this process with PureRaw and DeNoise (didn’t consider ON1 based on previous inconsistent results) on some astrophotography images shot with a Sony a7s at 20,000 ISO. I used that crazy ISO because of a Voightlander 10mm f5.6 lens that I wanted to try for fun. The biggest difference between the 2 was in the amount of hot spots PureRaw was able to remove and DeNoise was not. The addition of the LR integration with v2 of PureRaw is huge, simplifies the process signifacntly. I own v1 of DxO and v3.5 of Topaz DeNoise (no RAW option, must have come out in 3.6) and was looking to upgrade one of them. I do own PhotoLab4, but it is such a clunky process to use it for just DeepPrime and optical corrections. I think I will upgrade to v2 of PureRaw even though it is bit pricey for the sole purpose of noise. Thank you for your time!
Laurence Norah says
Thanks very much Brad! Glad to hear your positive experiences with DxO. It’s what I use primarily these days, the results are very good the majority of the time and I like how no fuss it is. I also appreciate the workflow with Lightroom as of version 2, although do feel that could have been a free upgrade as the underlying noise reduction is the same. Still, it is a nice bit of software overall. Thanks for taking the time to leave your comment 🙂
Laurence
Romualdas Budriunas says
Thanks for a thorough and valuable review!
I am using DXO PureRaw 1.5 and started to look for alternatives as update to 2.x is quite pricy, without improvement in the end result.
Two aspects in your review which I would like to include:
1. The output format of the denoise tool. Will you still have full flexibility of raw file? (with DXO DNG, you have; not so with TIFF/JPEG options).
2. Results with really high ISO (your examples were with ISO 5000-6400). What about ISO 25600-51200? Or ISO 6400 on really old crop-sensor cameras (e.g. EOS 400D, 60D – I’ve managed to get totally new look on some old images using PureRAW)
Laurence Norah says
Hi Romualdas,
Thanks, it’s my pleasure!
So honestly, I am not aware of another option on the market currently that will produce noticeably better results. If the DxO team could have improved their engine with the new version, they would have done. As it is, PureRAW 2 is slightly faster (noticeably so on the new Apple M1 & M2 chips), and the workflow is a little improved, but the overall results are identical.
I have used PureRAW on shots at 12800 with great results. I didn’t include those as I felt it was possibly a bit niche, and the article seemed already to be quite long. However, if you look at this article: https://www.findingtheuniverse.com/gorilla-trekking-in-uganda-a-complete-guide/
The very top image was shot at 10,000 ISO and process on PureRAW. It’s obviously not a 100% crop, but it came out really clean. So yes, it works well even at higher ISOs, although I don’t normally push past 12,800.
I believe all the tools I used output DNG files if you give them the RAW input. With DxO and On1 you can do this from Lightroom. With Topaz, you have to load the file separately into their tool as a RAW file, it doesn’t support outputting anything other than a TIFF or JPG from Lightroom.
Overall, I think you are likely better off with PureRAW for now until something better comes along further down the line.
Let me know if you have any questions!
Laurence
David French says
Thanks for that. The review was thorough and scientifically rigorous. I found it to be very helpful. Not quite there with what I will purchase, but I am almost there. Some of my own testing will decide. I just got a Z9, but every lens is on backorder (should have switched platforms), so I have an older sigma 150-600 for birds, which works remarkably well, especially for the price. 9 out of 10 bird shots are in low light, so we’ll see where this takes me.
Laurence Norah says
Thanks very much David! You are definitely correct to be testing out the options on your own files as everyone will have a slightly different goal for what they want from their images. The Z9 is a lovely bit of kit, enjoy it and your new lenses when they arrive 🙂
Laurence
Vincent Danyluk says
Wow!
Lots of words. Lots and lots of words! But I read every one of them because they were all significant with relevant examples. Usually after the first few paragraphs of such a lengthy review I am sorely tempted (and often do) to just skip to the conclusion. Well done.
Vincent
Laurence Norah says
Thanks Vincent! Yep, this one was definitely a long one 🙂 Glad you found it helpful and I hope you have been able to narrow down your choices.
Laurence
Larry G says
Thank you so much, this was nicely detailed and objectively written, IMO. I appreicate the work and time that it must have taken, and it will definitely assist me in making a decision on which package to purchase. Now I’ll have to peruse your blog posts and other content!
Laurence Norah says
Thanks so much for taking the time to leave a comment Larry, it’s appreciated! Let me know if you have any questions, I’m always happy to help 🙂
Laurence
megapro17 says
You forgot to add ON1 result with photo of your wife
And ON1 has a very good advantage – it is supporting any raw format, unlike dxo that can’t open photos from smartphones
Laurence Norah says
Thanks very much! I’ve updated the post to include the missing image. Also good to know about the On1 advantage with smartphones, this is why I always recommend people test the software they are interested in first with their camera files to be sure the results are good 🙂
Andrew H says
Hi Laurence, I have left them a message. Yes it works extremely well on the R5. I suppose I use the 2 systems about equally, the R5 for wildlife and tracking fast running grandchildren and the M10R for everything else. I will have a look at Topaz too but friends how use that have given me mixed feedback.
Thanks
Andrew
Laurence Norah says
In my testing, Topaz definitely works better if you use it on the RAW file prior to any other processing, but PureRAW generally produced better results. I hope you get a positive result from DxO!
Andrew H says
Very interesting – I have DxO PureRaw on trial at the moment. I was very impressed until I tried to run a Leica M10R DNG file through it – not supported. It hrough it.handles R5 files wonderfully well so I may still buy it but I find it a real pain that my M10R files can’t be put t
Laurence Norah says
Hey Andrew,
Yep, whilst their support of cameras and lens combinations is quite extensive, they don’t cover everything. It’s probably worth reaching out to DxO directly to see if the Leica M10R is on their roadmap or something they might add. This is why I always recommend folks try out the product to see if it works 🙂 I also have an R5 which works great with PureRAW.
Thanks for stopping by and your input, it’s appreciated!
Laurence